1. 首先在src目录下新建beans.xml文件,该文件名可更改。
2. 编辑xml文件如下,这里需要注意的是beans的表头中信息需要根据不同的版本对应的内容不同,本例中使用的spring的版本为4.0.4。
在做单元测试时一直提示错误“找不到元素 'beans' 的声明”,最后找到原因是网上找的头部内容与我使用的spring的版本不一致导致的。
<?xml version='1.0' encoding='utf-8'?>
<beans xmlns="http://www.springframework.org/schema/beans"
       xmlns:xsi="http://www.w3.org/2001/XMLSchema-instance"
       xmlns:context="http://www.springframework.org/schema/context"
       xsi:schemaLocation="http://www.springframework.org/schema/beans
       http://www.springframework.org/schema/beans/spring-beans.xsd
       http://www.springframework.org/schema/context
        http://www.springframework.org/schema/context/spring-context.xsd"
       default-autowire="byName">

    <context:annotation-config/>

<bean id="date" class="java.util.Date"></bean>
<bean id="person" class="com.model.Person">
    <property name="user" ref="user"></property>
</bean>
<bean id="user" class="com.model.User"></bean>
</beans>
3. 新建个测试类BeanTest.java如下, 这里是通过类加载的方式来生成Person的对象。
@Test
public void beanTest(){

    //ApplicationContext为Spring容器最常用的接口
    //ClassPathXmlApplicationContext为ApplicationContext的实现类
    ApplicationContext ctx = new ClassPathXmlApplicationContext("beans.xml");
        Person p = ctx.getBean("person",Person.class);
        p.useUser();

}
4. Person类如下:
package com.model;

import javax.persistence.Entity;
import javax.persistence.GeneratedValue;
import javax.persistence.GenerationType;
import javax.persistence.Id;
import javax.persistence.Table;

@Entity
@Table(name="t_person")
public class Person {

    @Id
    @GeneratedValue(strategy=GenerationType.IDENTITY)
    private Integer id;
    private String name;
    private String sex;

    private User user;

    public Integer getId() {
        return id;
    }
    public void setId(Integer id) {
        this.id = id;
    }
    public String getName() {
        return name;
    }
    public void setName(String name) {
        this.name = name;
    }
    public String getSex() {
        return sex;
    }
    public void setSex(String sex) {
        this.sex = sex;
    }
    public User getUser() {
        return user;
    }
    public void setUser(User user) {
        this.user = user;
    }

    //持有其他类的方法
    public void useUser(){
        System.out.println("准备使用user");
        user.getName();

    }


}
5. User.java类如下
package com.model;

import javax.persistence.Entity;
import javax.persistence.GeneratedValue;
import javax.persistence.GenerationType;
import javax.persistence.Id;
import javax.persistence.Table;


@Entity
@Table(name="t_user")
public class User extends BaseModel {


    /**
     *
     */
    private static final long serialVersionUID = -8640311439809984837L;

    @Id
    @GeneratedValue(strategy=GenerationType.IDENTITY)
    private int id;
    private String name;
    private String lastName;
    private String password;


    public int getId() {
        return id;
    }
    public void setId(int id) {
        this.id = id;
    }
    public String getName() {
        System.out.println("pring getName:" + name);
        return name;
    }
    public void setName(String name) {
        System.out.println("pring setName:" + name);
        this.name = name;
    }
    public String getPassword() {
        return password;
    }
    public void setPassword(String password) {
        this.password = password;
    }

    public String getLastName() {
        return lastName;
    }
    public void setLastName(String lastName) {
        this.lastName = lastName;
    }
    public User() {
        super();
    }


}
6.执行3中的测试类,结果如下
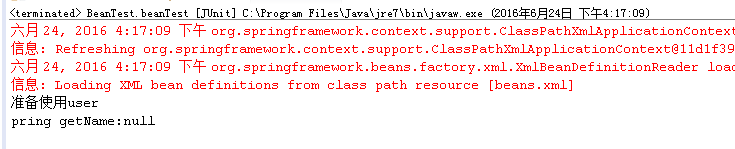
7. 由此可以得出,通过ApplicationContext的实现类ClassPathXmlApplicationContext可以拿到Person类的bean的实例。
然后通过该实例中方法,访问到User对象中的方法。