一、为什么要统一管理微服务配置
对于传统的单体应用而言,常使用配置文件来管理所有配置,比如SpringBoot的application.yml文件,但是在微服务架构中全部手动修改的话很麻烦而且不易维护。
微服务的配置管理一般有以下需求:
1.集中配置管理,一个微服务架构中可能有成百上千个微服务,所以集中配置管理是很重要的。
2.不同环境不同配置,比如数据源配置在不同环境(开发,生产,测试)中是不同的。
3.运行期间可动态调整。
4.配置修改后可自动更新。
好在Spring Cloud Config已经全部实现了上面几点。
二、Spring Cloud Config简介和使用
2.1原理
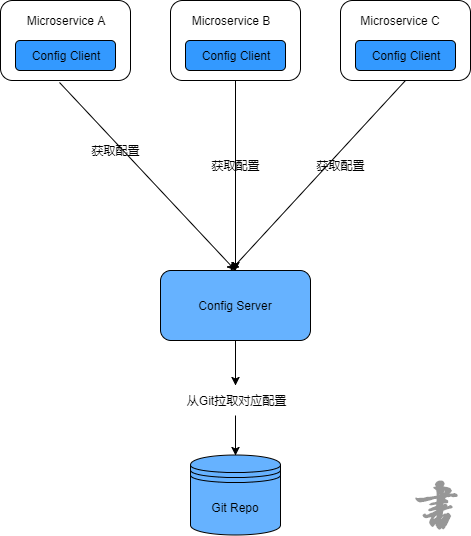
Spring Cloud Config为分布式系统外部化配置提供了服务器端和客户端的支持,它包括Config Client 和 Config Server两个部分。原理是所有的配置信息都存储在Config Server,所有的微服务都指向Config Server,
各个微服务启动时都会请求Config Server来获取配置信息,然后缓存到本地以提高性能。

2.2编写Config Server
1.在Git仓库https://github.com/2YSP/spring-cloud-config-repo(可以使用自己的仓库)新建几个配置文件,例如:

内容分别为:
profile=dev-1.0
profile=production-1.0
profile=test-1.0
profile=default-1.0
2.新建一个SpringBoot项目microservice-config-server,并添加以下依赖
<dependency>
            <groupId>org.springframework.cloud</groupId>
            <artifactId>spring-cloud-config-server</artifactId>
        </dependency>
3.在启动类添加 @EnableConfigServer注解
4.编写application.yml文件
server:
  port: 8080
spring:
  application:
    name: microservice-config-server
  cloud:
    config:
      server:
        git:
          # 配置Git仓库的地址
          uri: https://github.com/2YSP/spring-cloud-config-repo.git
          # 配置Git仓库的用户名
          username: 2YSP
          # 配置Git仓库的密码
          password: XX
这样就完成了,可以使用端点来获取配置文件,端点与配置文件的映射规则如下:
/{application}/{profile}[/{lable}]
/{application}-{profile}.yml
/{lable}/{application}-{profile}.yml
/{application}-{profile}.properties
/{lable}/{application}-{profile}.properties
{application}表示微服务的名称,{profile}代表环境,{lable}表示Git仓库的分支,默认是master。
本例如果要访问microservice-foo-dev.properties,则可以访问这些URL:
http://localhost:8080/microservice-foo/dev
http://localhost:8080/microservice-foo-dev.properties
http://localhost:8080/microservice-foo-dev.yml
2.3编写Config Client
1.创建一个SpringBoot工程,ArtifactId为microservice-config-client,并添加以下依赖
<dependency>
            <groupId>org.springframework.boot</groupId>
            <artifactId>spring-boot-starter-actuator</artifactId>
        </dependency>
        <dependency>
            <groupId>org.springframework.boot</groupId>
            <artifactId>spring-boot-starter-web</artifactId>
        </dependency>
        <dependency>
            <groupId>org.springframework.cloud</groupId>
            <artifactId>spring-cloud-starter-config</artifactId>
        </dependency>
2.编写配置文件application.yml
server:
  port: 8081
3.创建配置文件bootstrap.yml,并添加以下内容。
spring:
  application:
    # 对应Config Server所获取的配置文件的{application}
    name: microservice-foo
  cloud:
    config:
      uri: http://localhost:8080/
      #对应config server所获取配置文件的{profile}
      profile: dev
      # 指定Git仓库的分支,对应config server所获取配置文件的{label}
      label: master
需要注意的是,以上属性应配置在bootstrap.yml而不是application.yml文件中,否则部分配置就不能正常工作。
4.编写Controller
@RestController
public class ConfigClientController {


    @Value("${profile}")
    private String profile;


    @GetMapping("/profile")
    public String hello(){
        return this.profile;
    }
}
这里通过注解 @Value("${profile}") 来绑定Git仓库的profile属性。
5.测试
先启动microservice-config-server,再启动microservice-config-client,访问http://localhost:8081/profile即可获得以下结果。
dev-1.0
说明能够正常的获取Git仓库的配置信息。
三、配置文件的手动刷新和自动刷新
3.1通过/refresh端点手动刷新
1.复制项目microservice-config-client更改为microservice-config-client-refresh
2.为项目添加spring-boot-starter-actuator依赖,如果有了就不添加了。
3.在Controller类上添加@RefreshScope注解
@RestController
@RefreshScope
public class ConfigClientController {


    @Value("${profile}")
    private String profile;


    @GetMapping("/profile")
    public String hello(){
        return this.profile;
    }
}
4.修改Git仓库中microservice-foo-dev.properties文件的内容,然后先发送POST请求到http://localhost:8081/refresh,再访问http://localhost:8081/refresh即可获取最新的配置。
3.2使用Spring Cloud Bus 实现自动刷新配置
1.首先安装RabbitMQ,安装步骤这里不介绍我的博客里有。
2.为项目添加以下依赖
<dependency>
            <groupId>org.springframework.cloud</groupId>
            <artifactId>spring-cloud-starter-bus-amqp</artifactId>
        </dependency>
3.在bootstrap.yml中添加以下内容
spring:
  application:
    # 对应Config Server所获取的配置文件的{application}
    name: microservice-foo
  cloud:
    config:
      uri: http://localhost:8080/
      #对应config server所获取配置文件的{profile}
      profile: dev
      # 指定Git仓库的分支,对应config server所获取配置文件的{label}
      label: master
  rabbitmq:
    host: localhost
    port: 5672 #默认端口 5672
    username: guest
    password: guest