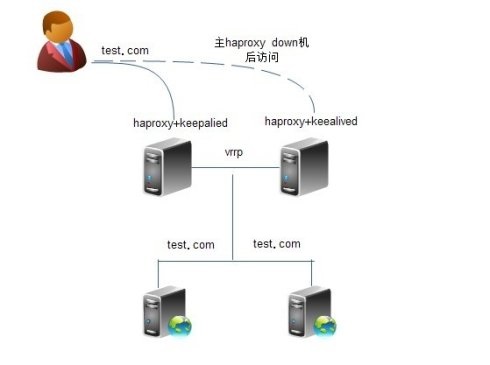
基于Haproxy+Keepalived构建高可用负载均衡集群
实验环境:
|
主机名 |
IP地址 |
|
VIP |
192.168.200.254 |
|
Haproxy-1 |
192.168.200.111 |
|
Haproxy-2 |
192.168.200.112 |
|
Nginx1 |
192.168.200.113 |
|
Nginx2 |
192.168.200.114 |
关闭防火墙
四台机器全部关闭防火墙
systemctl stop firewalld
iptables -F
setenforce 0
安装nginx
1.1 首先安装Nginx1
[root@localhost ~]# yum -y install gcc gcc-c++ make pcre-devel zlib-devel[root@localhost ~]# useradd -M -s /sbin/nologin nginx[root@localhost ~]# tar xf nginx-1.6.2.tar.gz -C /usr/src[root@localhost ~]# cd /usr/src/nginx-1.6.2[root@localhost nginx-1.6.2]# ./configure --prefix=/usr/local/nginx --user=nginx --group=nginx && make && make install[root@localhost nginx-1.6.2]# cd [root@localhost ~]# echo "server1" > /usr/local/nginx/html/index.html[root@localhost ~]# /usr/local/nginx/sbin/nginx [root@localhost ~]# netstat -lnpt |grep nginxtcp 0 0 0.0.0.0:80 0.0.0.0:* LISTEN 4503/nginx |
1.2 安装Nginx2
与Nginx1唯一不同的是:
[root@localhost ~]# echo "server2" > /usr/local/nginx/html/index.html |
安装Haproxy
[root@localhost ~]# yum -y install gcc gcc-c++ make pcre-devel bzip2-devel[root@localhost ~]# tar xf haproxy-1.4.24.tar.gz -C /usr/src/[root@localhost ~]# cd /usr/src/haproxy-1.4.24/[root@localhost haproxy-1.4.24]# make TARGET=linux26 && make install |
1.1 Haproxy服务器配置
建立haproxy的配置目录及文件
[root@localhost haproxy-1.4.24]# mkdir /etc/haproxy[root@localhost haproxy-1.4.24]# cp examples/haproxy.cfg /etc/haproxy/ |
1.2 haproxy配置项的介绍
haproxy的配置文件通常分为三部分: global(全局配置部分) defaults(默认配置部分) listen(应用组件部分)
[root@localhost ~]# vim /etc/haproxy/haproxy.cfg# this config needs haproxy-1.1.28 or haproxy-1.2.1global log 127.0.0.1 local0 log 127.0.0.1 local1 notice #log loghost local0 info maxconn 4096 #chroot /usr/share/haproxy uid 99 gid 99 daemon #debug #quietdefaults log global mode http option httplog option dontlognull retries 3 #redispatch maxconn 2000 contimeout 5000 clitimeout 50000 srvtimeout 50000listen web-cluster 0.0.0.0:80 option httpchk GET /index.html balance roundrobin server inst1 192.168.200.113:80 check inter 2000 fall 3 server inst2 192.168.200.114:80 check inter 2000 fall 3 |
1.3 创建自启动脚本
[root@localhost ~]# cp /usr/src/haproxy-1.4.24/examples/haproxy.init /etc/init.d/haproxy[root@localhost ~]# ln -s /usr/local/sbin/haproxy /usr/sbin/haproxy[root@localhost ~]# chmod +x /etc/init.d/haproxy [root@localhost ~]# /etc/init.d/haproxy startStarting haproxy: [确定] |
1.4 客户端访问测试:
用浏览器打开 http://192.168.200.111 打开一个新的浏览器再次访问 http://192.168.200.111
用浏览器打开 http://192.168.200.112 打开一个新的浏览器再次访问 http://192.168.200.112
可以验证两次访问到的结果分别为:
server1
server2
编译安装keepalived服务
我是用yum下载的 yum -y install keepalived
[root@localhost ~]# yum -y install kernel-devel openssl-devel popt-devel[root@localhost ~]# tar xf keepalived-1.2.13.tar.gz [root@localhost ~]# cd keepalived-1.2.13[root@localhost keepalived-1.2.13]# ./configure --prefix=/etc/ --with-kernel-dir=/usr/src/kernels/2.6.18-194.el5-i686 && make && make install |
1.1 配置keepalibed 主配置文件
[root@localhost ~]# vim /etc/keepalived/keepalived.conf ! Configuration File for keepalivedglobal_defs { vrrp_script chk_http_port { weight -20 vrrp_instance VI_1 { } virtual_server 192.168.200.254 80 { real_server 192.168.200.113 80 { nb_get_retry 3 |
1.2 第二台Haproxy配置keepalibed 主配置文件
可
scp 192.168.200.111:/etc/keepalived/keepalived.conf /etc/keepalived/
state BACKUP
priority 90
[root@Haproxy-2 ~]# cat /etc/keepalived/keepalived.conf ! Configuration File for keepalivedglobal_defs { vrrp_script chk_http_port { vrrp_instance VI_1 { } virtual_server 192.168.200.254 80 { real_server 192.168.200.113 80 { nb_get_retry 3 |
4、两台机器上都配置haproxy检测脚本
[root@localhost ~]# cat /etc/keepalived/check_haproxy.sh #!/bin/bashnum=$(ps -C haproxy --no-header |wc -l)if [ $num -eq 0 ]then systemctl start haproxy sleep 3 if [ $(ps -C haproxy --no-header |wc -l) -eq 0 ] then systemctl stop keepalived fifi[root@localhost ~]# chmod +x /etc/keepalived/check_haproxy.sh[root@localhost ~]# systemctl start keepalived |
1.1、测试VIP地址
[root@localhost ~]# ip a2: ens32: <BROADCAST,MULTICAST,UP,LOWER_UP> mtu 1500 qdisc pfifo_fast state UP qlen 1000 link/ether 00:0c:29:cc:18:a2 brd ff:ff:ff:ff:ff:ff inet 192.168.200.101/24 brd 192.168.200.255 scope global eth0 inet 192.168.200.254/32 scope global eth0 inet6 fe80::20c:29ff:fecc:18a2/64 scope link valid_lft forever preferred_lft forever[root@localhost ~]# systemctl stop keepalived [root@localhost ~]# ip a2: ens32: <BROADCAST,MULTICAST,UP,LOWER_UP> mtu 1500 qdisc pfifo_fast state UP qlen 1000 link/ether 00:0c:29:fd:8a:4e brd ff:ff:ff:ff:ff:ff inet 192.168.200.102/24 brd 192.168.200.255 scope global eth0 inet 192.168.200.254/32 scope global eth0 inet6 fe80::20c:29ff:fefd:8a4e/64 scope link valid_lft forever preferred_lft forever |
1.2、测试Haproxy健康检查
[root@localhost ~]# systemctl stop haproxyShutting down haproxy: [确定][root@localhost ~]# systemctl status haproxyhaproxy (pid 59717) 正在运行... |
1.3 网页测试:
用浏览器打开 http://192.168.200.254
再次打开一个新的浏览器再次访问 http://192.168.200.254
可以验证两次访问到的结果分别为:
server1
server2