1、项目背景
2019年新型冠状病毒感染的肺炎疫情发生以来,牵动人心,举国哀痛,口罩、酒精、消毒液奇货可居。
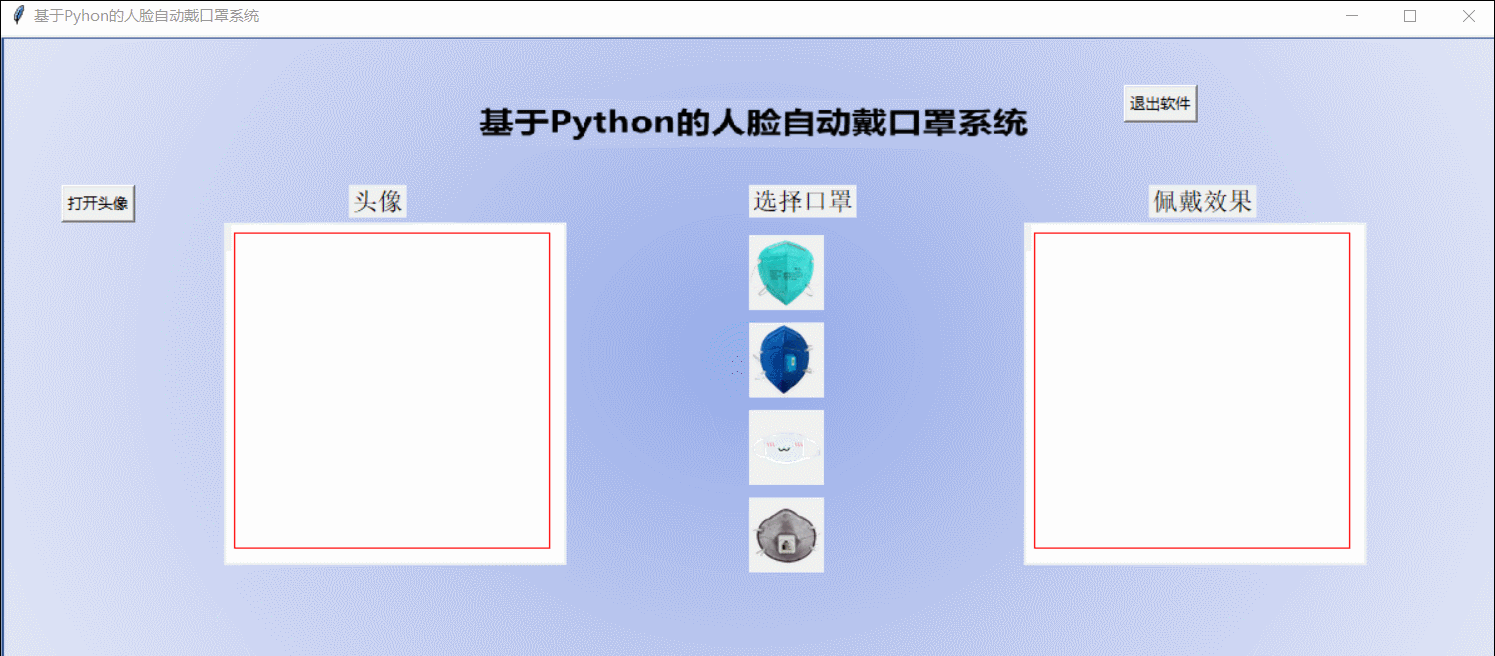
抢不到口罩,怎么办?作为技术人今天分享如何使用Python实现自动戴口罩系统,来安慰自己,系统效果如下所示:
本系统的实现原理是借助 Dlib模块的Landmark人脸68个关键点检测库轻松识别出人脸五官数据,根据这些数据,确定嘴唇部分的位置数据(48点~67点位置),根据检测到嘴部的尺寸和方向,借助PLL模块调整口罩的尺寸和方向,实现将口罩放在图像的适当位置。
2、页面设计
基于tkinter模块实现GUI设计,可载入人物图像,选择四种类型口罩(这里的口罩是处理好的图片),展示佩戴好口罩的效果,操作完成退出系统,效果如下所示:
页面布局实现代码如下所示:
    def __init__(self):
        self.root = tk.Tk()
        self.root.title('基于Pyhon的人脸自动戴口罩系统')
        self.root.geometry('1200x500')

        self.path1_ = None
        self.path2_ = None
        self.seg_img_path = None
        self.mask = None
        self.label_Img_seg = None

        decoration = PIL.Image.open('./pic/bg.png').resize((1200, 500))
        render = ImageTk.PhotoImage(decoration)
        img = tk.Label(image=render)
        img.image = render
        img.place(x=0, y=0)

        # 原图1的展示
        tk.Button(self.root, text="打开头像", command=self.show_original1_pic).place(x=50, y=120)
        tk.Button(self.root, text="退出软件", command=quit).place(x=900, y=40)

        tk.Label(self.root, text="头像", font=10).place(x=280, y=120)
        self.cv_orinial1 = tk.Canvas(self.root, bg='white', width=270, height=270)
        self.cv_orinial1.create_rectangle(8, 8, 260, 260, width=1, outline='red')
        self.cv_orinial1.place(x=180, y=150)
        self.label_Img_original1 = tk.Label(self.root)
        self.label_Img_original1.place(x=180, y=150)

        tk.Label(self.root,text="选择口罩",font=10).place(x=600,y=120)

        first_pic = Image.open("./pic/Mask.png")
        first_pic = first_pic.resize((60, 60), Image.ANTIALIAS)
        first_pic = ImageTk.PhotoImage(first_pic)
        self.first = tk.Label(self.root, image=first_pic)
        self.first.place(x=600,y=160, width=60, height=60)
        self.first.bind("<Button-1>", self.mask0)

        second_pic = Image.open("./pic/Mask1.png")
        second_pic = second_pic.resize((60, 60), Image.ANTIALIAS)
        second_pic = ImageTk.PhotoImage(second_pic)
        self.second_pic = tk.Label(self.root, image=second_pic)
        self.second_pic.place(x=600, y=230, width=60, height=60)
        self.second_pic.bind("<Button-1>", self.mask1)

        third_pic = Image.open("./pic/Mask3.png")
        third_pic = third_pic.resize((60, 60), Image.ANTIALIAS)
        third_pic = ImageTk.PhotoImage(third_pic)
        self.third_pic = tk.Label(self.root, image=third_pic)
        self.third_pic.place(x=600, y=300, width=60, height=60)
        self.third_pic.bind("<Button-1>", self.mask3)

        forth_pic = Image.open("./pic/Mask4.png")
        forth_pic = forth_pic.resize((60, 60), Image.ANTIALIAS)
        forth_pic = ImageTk.PhotoImage(forth_pic)
        self.forth_pic = tk.Label(self.root, image=forth_pic)
        self.forth_pic.place(x=600, y=370, width=60, height=60)
        self.forth_pic.bind("<Button-1>", self.mask4)

        tk.Label(self.root, text="佩戴效果", font=10).place(x=920, y=120)
        self.cv_seg = tk.Canvas(self.root, bg='white', width=270, height=270)
        self.cv_seg.create_rectangle(8, 8, 260, 260, width=1, outline='red')
        self.cv_seg.place(x=820, y=150)
        self.label_Img_seg = tk.Label(self.root)
        self.label_Img_seg.place(x=820, y=150)

        self.root.mainloop()
载入人物图像,实现代码如下所示:
    # 原图1展示
    def show_original1_pic(self):
        self.path1_ = askopenfilename(title='选择文件')
        print(self.path1_)
        self.Img = PIL.Image.open(r'{}'.format(self.path1_))
        Img = self.Img.resize((270,270),PIL.Image.ANTIALIAS)   # 调整图片大小至256x256
        img_png_original = ImageTk.PhotoImage(Img)
        self.label_Img_original1.config(image=img_png_original)
        self.label_Img_original1.image = img_png_original  # keep a reference
        self.cv_orinial1.create_image(5, 5,anchor='nw', image=img_png_original)
人脸戴口罩展示,实现代码如下所示:
    # 人脸戴口罩效果展示
    def show_morpher_pic(self):
        img1 = cv2.imread(self.path1_)
        x_min, x_max, y_min, y_max, size = self.get_mouth(img1)
        adding = self.mask.resize(size)
        im = Image.fromarray(img1[:, :, ::-1])  # 切换RGB格式
        # 在合适位置添加头发图片
        im.paste(adding, (int(x_min), int(y_min)), adding)
        # im.show()
        save_path = self.path1_.split('.')[0]+'_result.jpg'
        im.save(save_path)
        Img = im.resize((270, 270), PIL.Image.ANTIALIAS)  # 调整图片大小至270x270
        img_png_seg = ImageTk.PhotoImage(Img)
        self.label_Img_seg.config(image=img_png_seg)
        self.label_Img_seg.image = img_png_seg  # keep a reference
导入四种口罩图像,实现代码如下所示:
    def mask0(self, event):
        self.mask = Image.open('pic/mask.png')
        self.show_morpher_pic()

    def mask1(self, event):
        self.mask = Image.open('pic/mask1.png')
        self.show_morpher_pic()

    def mask3(self, event):
        self.mask = Image.open('pic/mask3.png')
        self.show_morpher_pic()

    def mask4(self, event):
        self.mask = Image.open('pic/mask4.png')
        self.show_morpher_pic()
3、器官识别
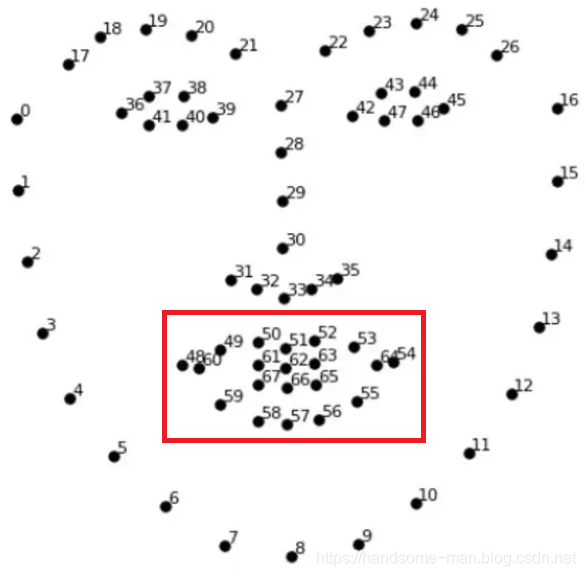
页面功能实现后就是依托Dlib库实现人脸器官关键点的识别,分析出嘴部位置及尺寸,这里为了方便各位直观了解,写了一个测试Demo,将人物脸部关键点都显示出来,代码如下所示:
#coding=utf-8
#图片检测 - Dlib版本
import cv2
import dlib
import time
t=time.time()
path = "./pic/im.jpg"
img = cv2.imread(path)
gray = cv2.cvtColor(img, cv2.COLOR_BGR2GRAY)

#人脸分类器
detector = dlib.get_frontal_face_detector()
# 获取人脸检测器
predictor = dlib.shape_predictor(
    "./shape_predictor_68_face_landmarks.dat"
)

dets = detector(gray, 1)
for face in dets:
    shape = predictor(img, face)  # 寻找人脸的68个标定点
    # 遍历所有点,打印出其坐标,并圈出来
    for pt in shape.parts():
        pt_pos = (pt.x, pt.y)
        cv2.circle(img, pt_pos, 1, (0, 255, 0), 2)
    cv2.imshow("image", img)
print('所用时间为{}'.format(time.time()-t))
cv2.waitKey(0)
#cv2.destroyAllWindows()
time.sleep(5)
效果如下所示:

在本系统中这些关键点无需绘制显示,直接使用就可以,实现代码如下所示:
    def get_mouth(self, img):
        img_gray = cv2.cvtColor(img, cv2.COLOR_BGR2GRAY)
        detector = dlib.get_frontal_face_detector()
        predictor = dlib.shape_predictor('./shape_predictor_68_face_landmarks.dat')
        faces = detector(img_gray, 0)
        for k, d in enumerate(faces):
            x = []
            y = []
            # 人脸大小的高度
            height = d.bottom() - d.top()
            # 人脸大小的宽度
            width = d.right() - d.left()
            shape = predictor(img_gray, d)
            # 48-67 为嘴唇部分
            for i in range(48, 68):
                x.append(shape.part(i).x)
                y.append(shape.part(i).y)
            # 根据人脸的大小扩大嘴唇对应口罩的区域
            y_max = (int)(max(y) + height / 3)
            y_min = (int)(min(y) - height / 3)
            x_max = (int)(max(x) + width / 3)
            x_min = (int)(min(x) - width / 3)
            size = ((x_max - x_min), (y_max - y_min))
            return x_min, x_max, y_min, y_max, size
4、退出系统
退出系统非常简单,一行Demo即可实现,如下所示:
    def quit(self):
        self.root.destroy()
作者:华为云特约供稿开发者 不脱发的程序猿