Docker部署NETCORE应用程序
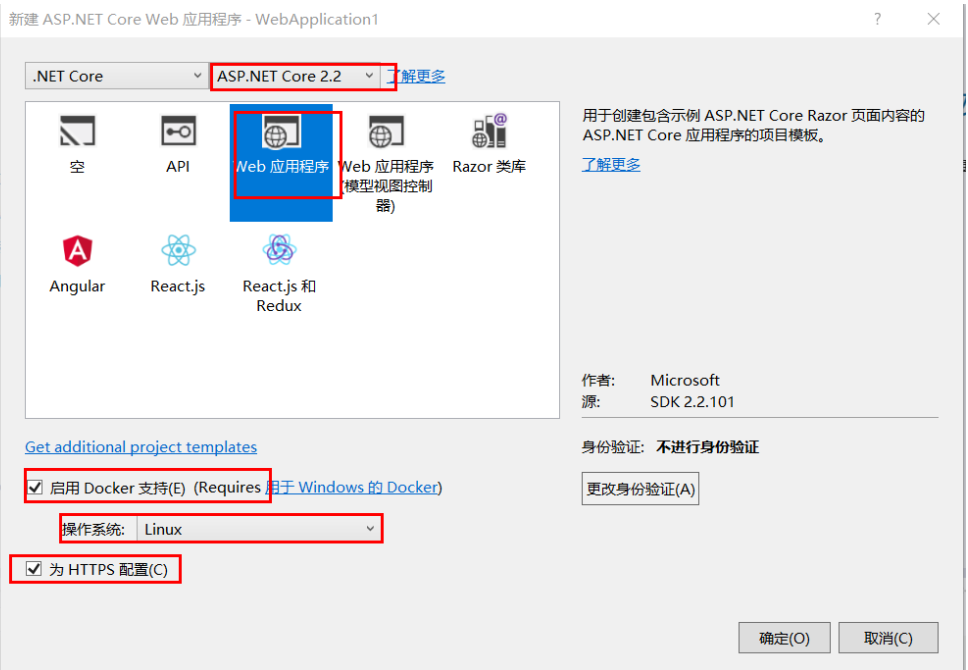
创建.netcore项目,本文以ASP.NET Core2.2 版本为例
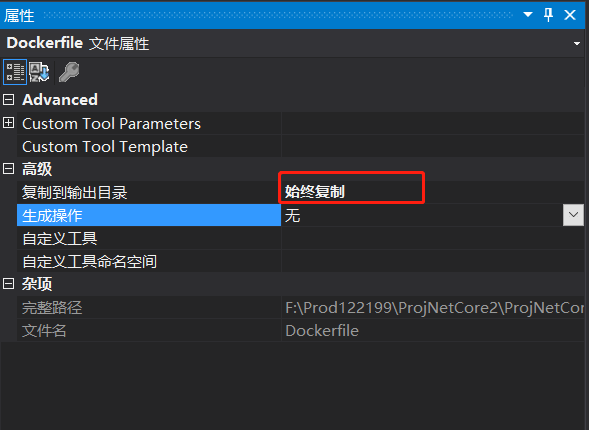
设置Dockerfile属性始终复制
编辑Dockerfile内容
FROM microsoft/dotnet:2.2-aspnetcore-runtime
MAINTAINER lihongyuan
LABEL description="this is a test website"
LABEL version="1.0"
WORKDIR /app
COPY . .
EXPOSE 8888
ENTRYPOINT ["dotnet", "ProjNetCore2.dll"]
说明:
FROM microsoft/dotnet:2.2-aspnetcore-runtime  #基础镜像为dotnetcore
MAINTAINER demo                    #作者

LABEL description="this is a test website"  #描述
LABEL version="1.0"                 #描述

WORKDIR /app                    #工作目录
COPY . .                      #将当前目录下的文件,复制到WORKDIR目录
EXPOSE 8888                    #容器暴漏8888端口,与Program.cs中设置的端口一致
ENTRYPOINT ["dotnet","demo.dll"]      #运行容器的命令
修改Program.cs文件,默认端口的指向为 8888 与Dockerfile 文中一致。
       public static IWebHostBuilder CreateWebHostBuilder(string[] args) =>
            WebHost.CreateDefaultBuilder(args)
                  .UseUrls("http://*:8888")
                .UseStartup<Startup>();
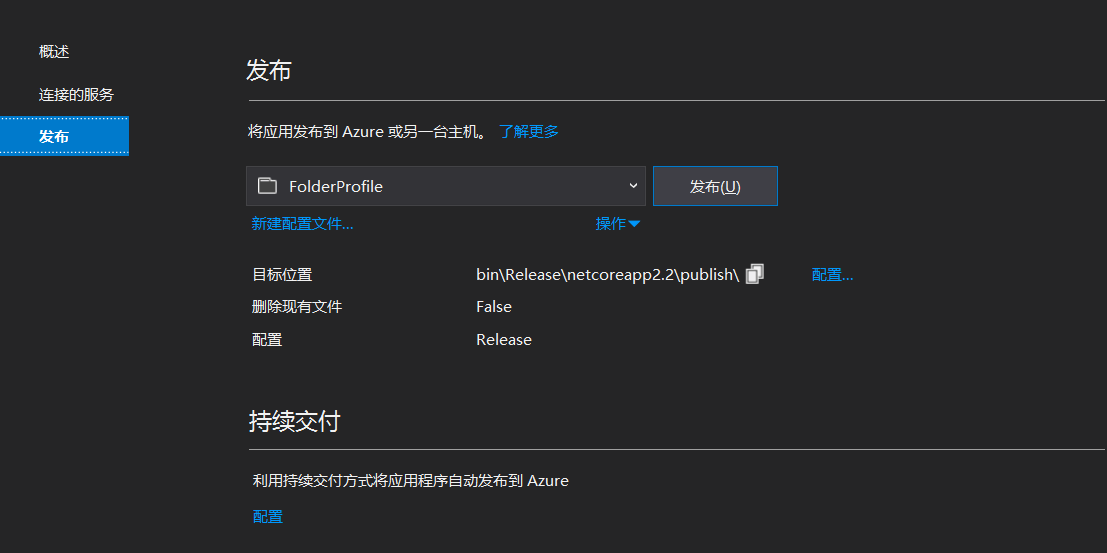
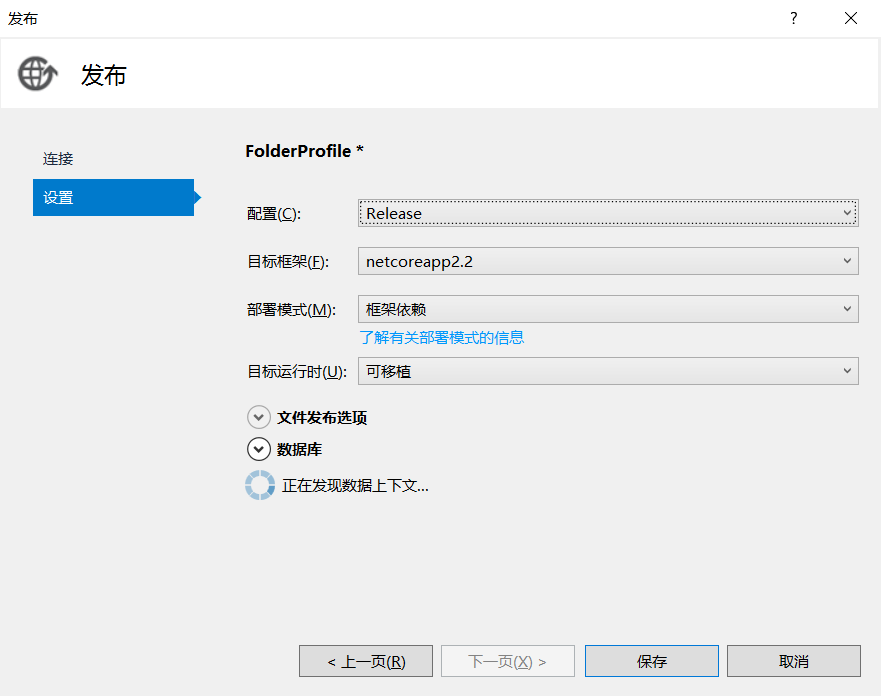
发布项目
使用WinSCP 把发布后的项目上传到 服务器上。
些处上传目录为 /tmp/web
[root@localhost ~]# cd /tmp/web/
[root@localhost web]#
[root@localhost web]# ls
publish
[root@localhost web]#
根据当前目录下dockerfile配置文件,进行打包(demo 为自己定义的镜像名)
docker build -t demo .
[root@localhost ~]#
[root@localhost ~]# cd /tmp/web/publish/
[root@localhost publish]# ls
appsettings.Development.json  Dockerfile              ProjNetCore2.dll  ProjNetCore2.runtimeconfig.json  ProjNetCore2.Views.pdb  wwwroot
appsettings.json              ProjNetCore2.deps.json  ProjNetCore2.pdb  ProjNetCore2.Views.dll           web.config
[root@localhost publish]#
[root@localhost publish]# docker build -t imagedemo .
Sending build context to Docker daemon  4.212MB
Step 1/8 : FROM microsoft/dotnet:2.2-aspnetcore-runtime
 ---> ccf4063f0898
Step 2/8 : MAINTAINER lihongyuan
 ---> Running in 176e4b1eba2b
Removing intermediate container 176e4b1eba2b
 ---> 5d384a0303f9
Step 3/8 : LABEL description="this is a test website"
 ---> Running in 09664d85b4dd
Removing intermediate container 09664d85b4dd
 ---> e9890e799c19
Step 4/8 : LABEL version="1.0"
 ---> Running in 93724ba2ac89
Removing intermediate container 93724ba2ac89
 ---> b91ff0f19154
Step 5/8 : WORKDIR /app
 ---> Running in 338a59ca24b3
Removing intermediate container 338a59ca24b3
 ---> 64098342a151
Step 6/8 : COPY . .
 ---> 26ab61b0731b
Step 7/8 : EXPOSE 8888
 ---> Running in 4c0ee7ff2687
Removing intermediate container 4c0ee7ff2687
 ---> 5760b9754387
Step 8/8 : ENTRYPOINT ["dotnet", "ProjNetCore2.dll"]
 ---> Running in 979a9b8c68b3
Removing intermediate container 979a9b8c68b3
 ---> 5ae0691c4556
Successfully built 5ae0691c4556
Successfully tagged imagedemo:latest
[root@localhost publish]#
打镜像成功:
[root@localhost publish]# docker images
REPOSITORY                                        TAG                      IMAGE ID            CREATED              SIZE
imagedemo                                         latest                   5ae0691c4556        About a minute ago   265MB
nginx                                             latest                   540a289bab6c        2 weeks ago          126MB
microsoft/dotnet                                  2.2-aspnetcore-runtime   ccf4063f0898        3 weeks ago          261MB
nginx                                             <none>                   ab56bba91343        7 weeks ago          126MB
rancher/rancher-agent                             v2.2.8                   d499bdb8fd09        2 months ago         285MB
rancher/rancher                                   latest                   59caa36aff1e        2 months ago         482MB
rancher/rke-tools                                 v0.1.42                  6fb74f33a5e1        2 months ago         131MB
rancher/hyperkube                                 v1.14.6-rancher1         4c0a26e51da8        2 months ago         1.05GB
sonatype/nexus3                                   latest                   35ca857d5b19        2 months ago         599MB
rancher/nginx-ingress-controller                  0.21.0-rancher3          2b37f252629b        8 months ago         569MB
rancher/kube-api-auth                             v0.1.3                   2817cb463960        8 months ago         149MB
rancher/coredns-coredns                           1.3.1                    eb516548c180        9 months ago         40.3MB
rancher/calico-node                               v3.4.0                   a89b45f36d5e        11 months ago        75.9MB
rancher/calico-cni                                v3.4.0                   d531d047a4e2        11 months ago        75.4MB
rancher/coreos-etcd                               v3.3.10-rancher1         643c21638c1c        13 months ago        39.5MB
rancher/cluster-proportional-autoscaler           1.3.0                    33813c948942        13 months ago        45.8MB
rancher/nginx-ingress-controller-defaultbackend   1.5-rancher1             b5af743e5984        13 months ago        5.13MB
rancher/metrics-server                            v0.3.1                   61a0c90da56e        13 months ago        40.8MB
rancher/coreos-flannel                            v0.10.0                  f0fad859c909        21 months ago        44.6MB
rancher/pause                                     3.1                      da86e6ba6ca1        22 months ago        742kB
[root@localhost publish]#
运行Docker容器
docker run --name mydemo -d -p 8888:8888 imagedemo
说明:
--name 后面跟容器名称
-p是进行宿主和容器之间端口的映射,(-p 宿主端口:容器端口)
-d命令,容器就会一直运行,即使关掉终端窗口
imagedemo为前面生成的项目镜像
以后台模式启动一个容器,将容器的 8888 端口映射到主机的 8888 端口
运行后,可查看到新的容器:

访问网站:http://192.168.122.199:8888/

完成!
Docker 进入容器命令:
docker exec -it 775c7c9ee1e1 /bin/bash
退出容器:exit