原文地址https://blog.csdn.net/mad1989/article/details/38087737
Monkey
什么是Monkey
Monkey是Android中的一个命令行工具,可以运行在模拟器里或实际设备中。它向系统发送伪随机的用户事件流(如按键输入、触摸屏输入、手势输入等),实现对正在开发的应用程序进行压力测试。Monkey测试是一种为了测试软件的稳定性、健壮性的快速有效的方法。
Monkey的特征
1、 测试的对象仅为应用程序包,有一定的局限性。
2、 Monky测试使用的事件流数据流是随机的,不能进行自定义。
3、 可对Test的对象,事件数量,类型,频率等进行设置。
Monkey的基本用法
基本语法如下:
- adb shell monkey [options] <event-count>
| options | event-count |
| 这个是配置monkey的设置,例如,指定启动那个包,不指定将会随机启动所有程序 | 这个是让monkey发送多少次事件 |
详细的monkey介绍,和options的参数请查看 (http://developer.android.com/guide/developing/tools/monkey.html)
如果不指定options,Monkey将以无反馈模式启动,并把事件任意发送到安装在目标环境中的全部包。
Monkey测试的停止条件
1、如果限定了Monkey运行在一个或几个特定的包上,那么它会监测试图转到其它包的操作,并对其进行阻止。
2、如果应用程序崩溃或接收到任何失控异常,Monkey将停止并报错。
3、如果应用程序产生了应用程序不响应(application not responding)的错误,Monkey将会停止并报错。
实例
下面是一个更为典型的命令行示例,它启动指定的应用程序,并向其发送500个伪随机事件:
- adb shell monkey -p your.package.name -vvv 500 > monkeytest.txt
-p表示对象包 -v 为 verbose的缩写(信息级别就是日志的详细程度),就是详细输出事件等级,这个3个v就是输出等级1至3的所有事件.(使用管道命令将输出结果放到一个文本里面方便查看)
举例:
eclipse连接真机设备,Window打开CMD,命令行输入:adb shell,进入shell界面后:
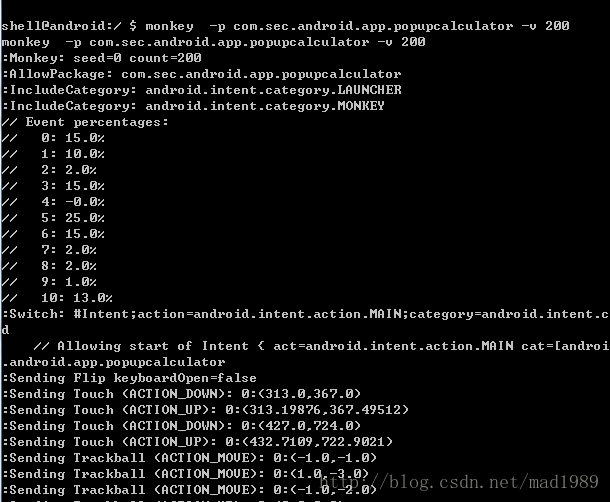
我运行的是手机上的 计算器 程序,具体你可以指定自己的APP包名就可以了~
真机效果:
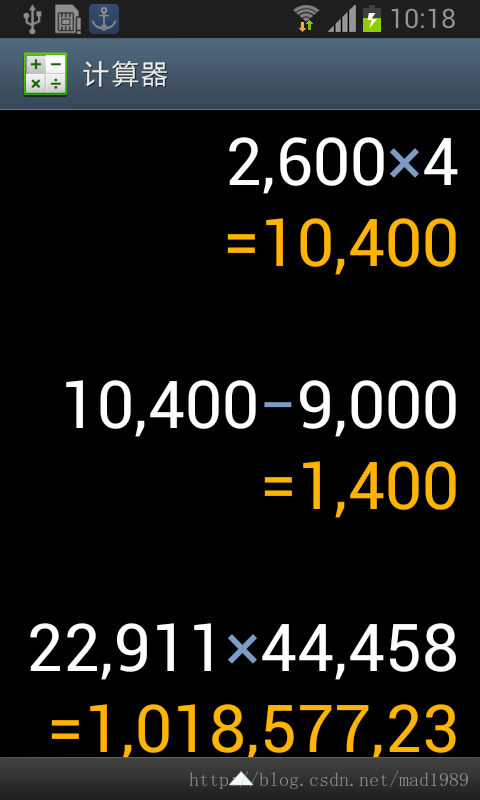
如图所示,它真的就是随机输入数值,随机按钮,随机.....的...................缺点是我们不能控制触摸或按钮事件,接下来MonkeyRunner就要登场了~
MonkeyRunner
什么是monkeyrunner
monkeyrunner工具提供了一个API,使用此API写出的程序可以在Android代码之外控制Android设备和模拟器。通过monkeyrunner,您可以写出一个Python程序去安装一个Android应用程序或测试包,运行它,向它发送模拟击键,截取它的用户界面图片,并将截图存储于工作站上。monkeyrunner工具的主要设计目的是用于测试功能/框架水平上的应用程序和设备,或用于运行单元测试套件。
monkeyrunner同monkey的区别
Monkey工具直接运行在设备或模拟器的adb shell中,生成用户或系统的伪随机事件流。monkeyrunner工具则是在工作站上通过API定义的特定命令和事件控制设备或模拟器,它支持,自己编写插件,控制事件,随时截图,简而言之,任何你在模拟器/设备中能干的事情,MonkeyRunner都能干,而且还可以记录和回放。
monkeyrunner的测试类型
1、多设备控制:monkeyrunner API可以跨多个设备或模拟器实施测试套件。您可以在同一时间接上所有的设备或一次启动全部模拟器(或统统一起),依据程序依次连接到每一个,然后运行一个或多个测试。您也可以用程序启动一个配置好的模拟器,运行一个或多个测试,然后关闭模拟器。
2、 功能测试: monkeyrunner可以为一个应用自动贯彻一次功能测试。您提供按键或触摸事件的输入数值,然后观察输出结果的截屏。
3、 回归测试:monkeyrunner可以运行某个应用,并将其结果截屏与既定已知正确的结果截屏相比较,以此测试应用的稳定性。
4、 可扩展的自动化:由于monkeyrunner是一个API工具包,您可以基于Python模块和程序开发一整套系统,以此来控制Android设备。除了使用monkeyrunner API之外,您还可以使用标准的Python os和subprocess模块来调用Android Debug Bridge这样的Android工具。
运行monkeyrunner
您可以直接使用一个代码文件运行monkeyrunner,抑或在交互式对话中输入monkeyrunner语句。不论使用哪种方式,您都需要调用SDK目录的tools子目录下的monkeyrunner命令。如果您提供一个文件名作为运行参数,则monkeyrunner将视文件内容为Python程序,并加以运行;否则,它将提供一个交互对话环境。
monkeyrunner基本语法
- monkeyrunner -plugin <plugin_jar> <program_filename> <program_options>
具体介绍…看官方文档(http://developer.android.com/guide/developing/tools/monkeyrunner_concepts.html)
实例
连接真机(模拟器),打开CMD,进入:E:android-sdk-windows ools文件夹内(里面有monkeyrunner.bat)
创建一个Python脚本文件:testrunner.py,内容如下:
注意!如果monkeyrunner脚本文件要使用中文,记得格式保存为utf8,不然会ASCNII无法支持错误
- #导入我们需要用到的包和类并且起别名
- import sys
- from com.android.monkeyrunner import MonkeyRunner as mr
- from com.android.monkeyrunner import MonkeyDevice as md
- from com.android.monkeyrunner import MonkeyImage as mi
- #connect device 连接设备
- #第一个参数为等待连接设备时间
- #第二个参数为具体连接的设备
- device = mr.waitForConnection(1.0,'e0d98451')
- if not device:
- print >> sys.stderr,"fail"
- sys.exit(1)
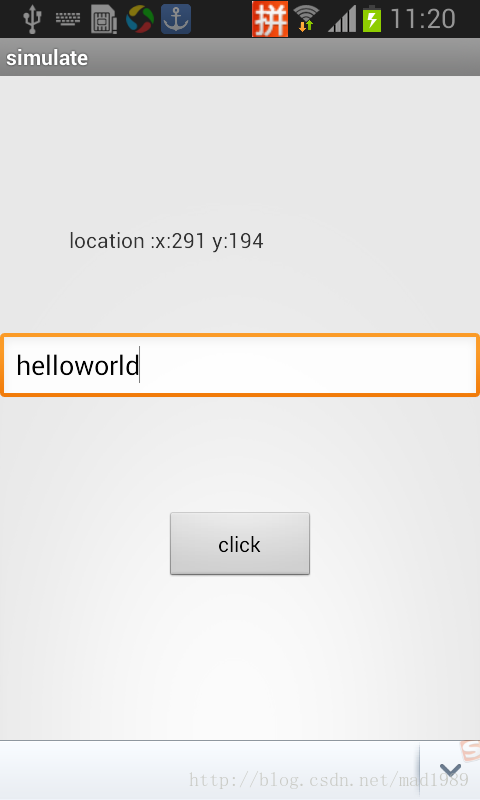
- #定义要启动的Activity
- componentName='com.example.simulate/.ShellActivity'
- #启动特定的Activity
- device.startActivity(component=componentName)
- mr.sleep(3.0)
- #do someting 进行我们的操作
- #输入 helloworld
- device.type('helloworld')
- #输入回车
- device.press('KEYCODE_ENTER')
- #return keyboard
- #device.press('KEYCODE_BACK')
- #------
- #takeSnapshot截图
- mr.sleep(3.0)
- result = device.takeSnapshot()
- #save to file 保存到文件
- result.writeToFile('./shot1.png','png');
接下来命令行输入:
- monkeyrunner testrunner.py

这是一个小的脚本文件,主要是启动com.example.simulate包名下的ShellActivity界面,接下来按下Enter按钮,最后截屏,并保存在当前目录下为shot1.png,可以在toosl文件夹下查看。
这个脚本的实质就是一个python脚本,懂python的朋友,可以利用这个实现非常强悍的功能~~~~~~~~~~~~~~~~~~~~~~~~
monkeyRunner 的记录和回放
这才是真正实用的功能,直接看代码,创建一个recoder.py:
- #!/usr/bin/env monkeyrunner
- # Copyright 2010, The Android Open Source Project
- #
- # Licensed under the Apache License, Version 2.0 (the "License");
- # you may not use this file except in compliance with the License.
- # You may obtain a copy of the License at
- #
- # http://www.apache.org/licenses/LICENSE-2.0
- #
- # Unless required by applicable law or agreed to in writing, software
- # distributed under the License is distributed on an "AS IS" BASIS,
- # WITHOUT WARRANTIES OR CONDITIONS OF ANY KIND, either express or implied.
- # See the License for the specific language governing permissions and
- # limitations under the License.
- from com.android.monkeyrunner import MonkeyRunner as mr
- from com.android.monkeyrunner.recorder import MonkeyRecorder as recorder
- device = mr.waitForConnection()
- recorder.start(device)
命令行下运行:
- monkeyrunner monkey_recorder.py
这时会弹出这样的界面:
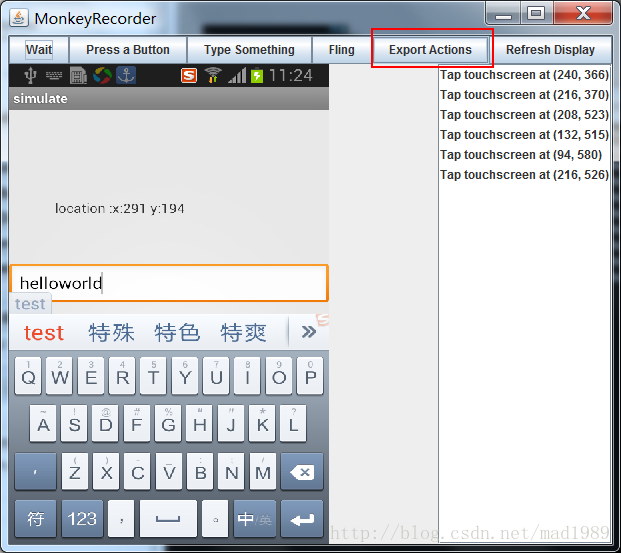
按钮以及一些功能说明:
| Button | Description |
| Wait | 等待时间 |
| Press a Button | 发送,MENU,HOME,or SEARCH 按钮.Press,Down,or Up事件 |
| Type Something | 发送一些字符串 |
| Fling | 用来操作虚拟键盘  |
| Export Action | 将我们的脚本导出来 |
| Refresh Display | 刷新当前界面 |
自己随心所以创建一些事件脚本,想做什么就可以做什么,通过MonkeyRecorder这个工具来操作设备界面,事件编辑完后选择Export Actions,导出到我们tools目录下命名为:action.mr
我们看一下工具生成的action.mr脚本,如下:
- TOUCH|{'x':297,'y':533,'type':'downAndUp',}
- WAIT|{'seconds':2.0,}
- TOUCH|{'x':136,'y':278,'type':'downAndUp',}
- WAIT|{'seconds':2.0,}
- TOUCH|{'x':123,'y':356,'type':'downAndUp',}
- WAIT|{'seconds':10.0,}
- PRESS|{'name':'HOME','type':'downAndUp',}
- WAIT|{'seconds':2.0,}
- TOUCH|{'x':235,'y':720,'type':'downAndUp',}
- WAIT|{'seconds':2.0,}
- TOUCH|{'x':303,'y':630,'type':'downAndUp',}
- WAIT|{'seconds':2.0,}
- TOUCH|{'x':16,'y':71,'type':'downAndUp',}
- WAIT|{'seconds':2.0,}
- TOUCH|{'x':244,'y':735,'type':'downAndUp',}
然后需要制作一个运行这一系列动作的脚本:monkey_playback.py,保存到tools目录下:
- #!/usr/bin/env monkeyrunner
- # Copyright 2010, The Android Open Source Project
- #
- # Licensed under the Apache License, Version 2.0 (the "License");
- # you may not use this file except in compliance with the License.
- # You may obtain a copy of the License at
- #
- # http://www.apache.org/licenses/LICENSE-2.0
- #
- # Unless required by applicable law or agreed to in writing, software
- # distributed under the License is distributed on an "AS IS" BASIS,
- # WITHOUT WARRANTIES OR CONDITIONS OF ANY KIND, either express or implied.
- # See the License for the specific language governing permissions and
- # limitations under the License.
- import sys
- from com.android.monkeyrunner import MonkeyRunner
- # The format of the file we are parsing is very carfeully constructed.
- # Each line corresponds to a single command. The line is split into 2
- # parts with a | character. Text to the left of the pipe denotes
- # which command to run. The text to the right of the pipe is a python
- # dictionary (it can be evaled into existence) that specifies the
- # arguments for the command. In most cases, this directly maps to the
- # keyword argument dictionary that could be passed to the underlying
- # command.
- # Lookup table to map command strings to functions that implement that
- # command.
- CMD_MAP = {
- 'TOUCH': lambda dev, arg: dev.touch(**arg),
- 'DRAG': lambda dev, arg: dev.drag(**arg),
- 'PRESS': lambda dev, arg: dev.press(**arg),
- 'TYPE': lambda dev, arg: dev.type(**arg),
- 'WAIT': lambda dev, arg: MonkeyRunner.sleep(**arg)
- }
- # Process a single file for the specified device.
- def process_file(fp, device):
- for line in fp:
- (cmd, rest) = line.split('|')
- try:
- # Parse the pydict
- rest = eval(rest)
- except:
- print 'unable to parse options'
- continue
- if cmd not in CMD_MAP:
- print 'unknown command: ' + cmd
- continue
- CMD_MAP[cmd](device, rest)
- def main():
- file = sys.argv[1]
- fp = open(file, 'r')
- device = MonkeyRunner.waitForConnection()
- process_file(fp, device)
- fp.close();
- if __name__ == '__main__':
- main()
接下来运行我们的保存的脚本,然后,你就看到真机(模拟器),进行你刚才一样的操作~
- E:android-sdk-windows ools>monkeyrunner monkey_playback.py action.mr
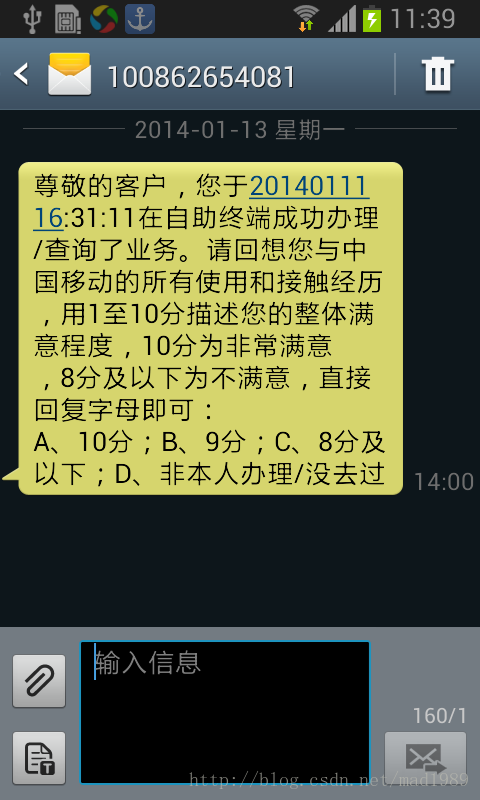
我的脚本是执行一些press down 和press up动作,同时会有延迟,之后按下home按钮,最后打开桌面的短信程序,并打开某一条信息~是不是有点像按键精灵的感觉?但是得依靠命令行执行脚本~~~
至此,monkey和monkeyrunner介绍完毕。
附件传送门地址,网上一位朋友写好的常用的recorder、playback脚本,包括我以上所列py,你可以自己看着修改,别人的资源,免费共享: