u-boot start_armboot函数分析
- u-boot start_armboot函数分析
- 一、start_armboot概述
- 二、函数体分析
- global_data的建立
init_sequencecpu_initboard_initinterrupt_initenv_init./include/lib_arm/board.c — init_baudrateserial_initconsole_init_fdisplay_bannerprint_cpuinfocheckboarddram_initdisplay_dram_config- flash_init与display_flash_config
mem_malloc_initmmc_initializeenv_relocate- IP地址与MAC地址
devices_initjumptable_init./common/console.c — console_init_renable_interruptsloadaddr&bootfileboard_late_initeth_initializex210_preboot_init- boot mode
main_loop
- 三、关键函数及其位置
- 四、我认为有用的步骤
- u-boot start_armboot函数分析
u-boot start_armboot函数分析
一、start_armboot概述
1.为何要分析
start_armboot相当于BL2。代码被复制到DDR上之后(BL1)跳转执行start_armboot。
2.位置
该函数位于./lib_arm/board.c中。
3.关键结构体分析
a.global_data
typedef	struct	global_data {
	bd_t		*bd;			// board information
	unsigned long	flags;
	unsigned long	baudrate;
	unsigned long	have_console;	/* serial_init() was called */
	unsigned long	reloc_off;	/* Relocation Offset */
	unsigned long	env_addr;	/* Address  of Environment struct */
	unsigned long	env_valid;	/* Checksum of Environment valid? */
	unsigned long	fb_base;	/* base address of frame buffer */
	void		**jt;		/* jump table */
} gd_t; 文件路径./include/asm-arm/global_data.h
b.board_information
bd_info的位置在./include/asm-arm/u-boot.h,实际编译时,因为符号链接的原因应该是./include/asm/u-boot.h。
typedef struct bd_info {
    int			bi_baudrate;	/* serial console baudrate */
    unsigned long	bi_ip_addr;	/* IP Address */
    unsigned char	bi_enetaddr[6]; /* Ethernet adress */
    struct environment_s	       *bi_env;
    ulong	        bi_arch_number;	/* unique id for this board */
    ulong	        bi_boot_params;	/* where this board expects params */

	struct				/* RAM configuration */
    {
		ulong start;
		ulong size;
    }			bi_dram[CONFIG_NR_DRAM_BANKS];

} bd_t; 其中struct environment_s文件路径为./include/environment.h如下所示:
typedef	struct environment_s {
	uint32_t	crc;		/* CRC32 over data bytes	*/
#ifdef CFG_REDUNDAND_ENVIRONMENT
	unsigned char	flags;		/* active/obsolete flags	*/
#endif
	unsigned char	data[ENV_SIZE]; /* Environment data		*/
} env_t;
二、函数体分析
global_data的建立
	//	uboot			0x33e0_0000 2M-0x1000
	//	stack			512k
	//	heap			16k+896k = 912k
	//	gd	+ bd		maybe 36bytes + maybe 44bytes = 80bytes
	//	内存间隔
	gd_base = CFG_UBOOT_BASE + CFG_UBOOT_SIZE - CFG_MALLOC_LEN - CFG_STACK_SIZE - sizeof(gd_t);

	//	手动给global_data分配空间
	gd = (gd_t *)gd_base;

	memset ((void*)gd, 0, sizeof (gd_t));

	//	手动给board_information分配空间
	gd->bd = (bd_t*)((char*)gd - sizeof(bd_t));
	memset (gd->bd, 0, sizeof (bd_t));

	// 定义了一个全局变量名字叫gd,这个变量为指针类型,占4Bytes,
	// 用volatile修饰可变的,用register表示放在寄存器中
	// asm("r8")是gcc支持的一种语法,意思是需要把gd放在寄存器r8中
	// 类型为global data
	#define DECLARE_GLOBAL_DATA_PTR     register volatile gd_t *gd asm ("r8")
init_sequence
	//	init_fnc_t为函数类型
	typedef int (init_fnc_t) (void);

	//	函数指针数组
	init_fnc_t **init_fnc_ptr;

	//	init_sequence为函数指针数组
	for (init_fnc_ptr = init_sequence; *init_fnc_ptr; ++init_fnc_ptr) {
		if ((*init_fnc_ptr)() != 0) {
			hang ();
		}
	}
cpu_init
什么都没干。
board_init
-
dm9000_pre_init
网卡相关初始化。 -
arch_number&boot_params
bi_arch_number主要作用是在uboot和linux内核之间进行比对和适配
bi_boot_params是内核传参的内存地址
	gd->bd->bi_arch_number = MACH_TYPE;
	gd->bd->bi_boot_params = (PHYS_SDRAM_1+0x100);
interrupt_init
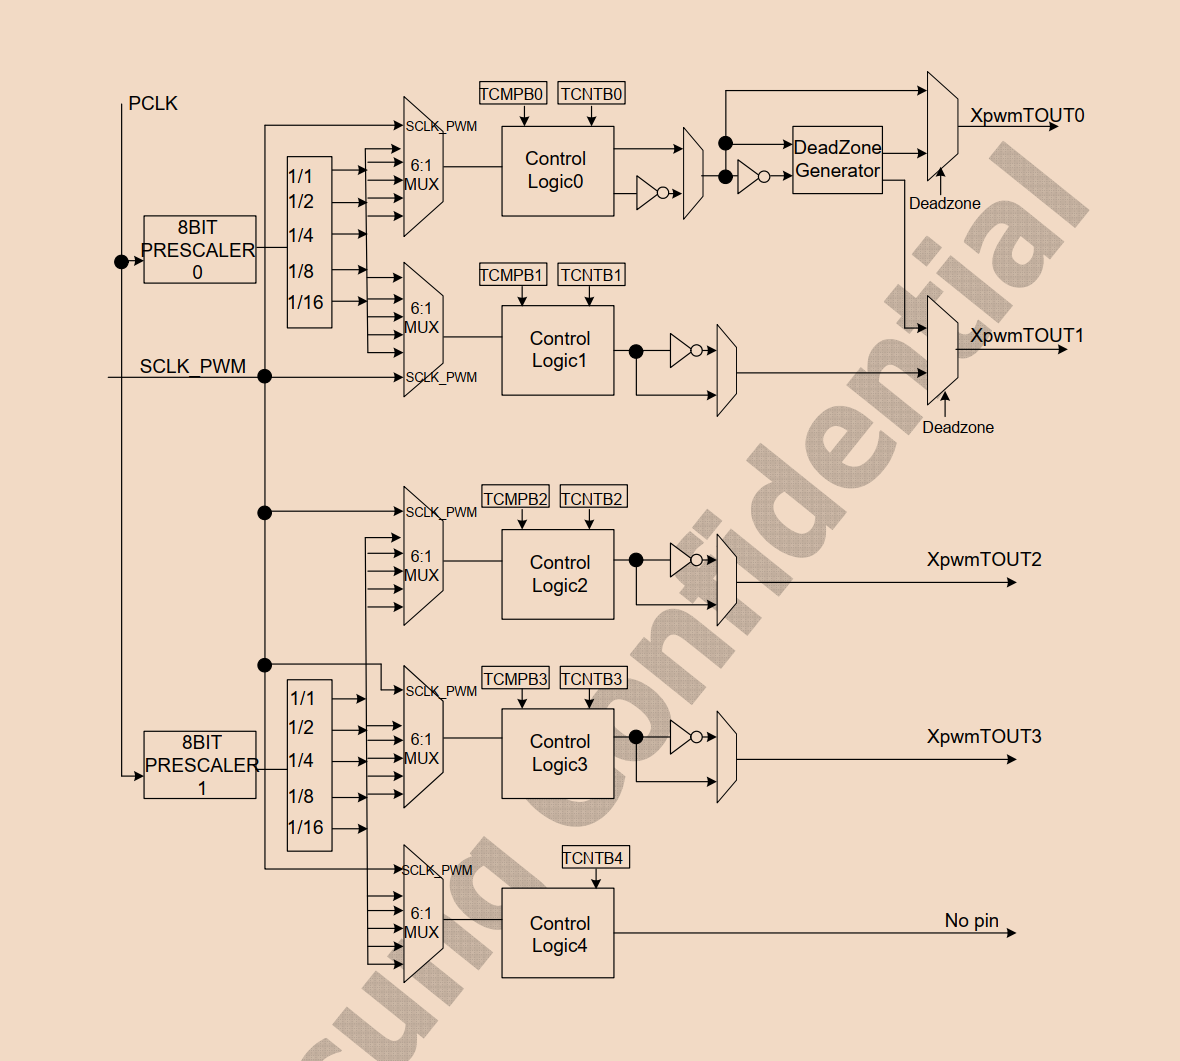
挂羊头,卖狗肉。以为中断相关,进入之后发现是初始化定时器4,将其定为10ms。uboot跟定时相关的实现都和这个定时器有关系。
int interrupt_init(void)
{

	S5PC11X_TIMERS *const timers = S5PC11X_GetBase_TIMERS();

	/* use PWM Timer 4 because it has no output */
	/* prescaler for Timer 4 is 16 */
	timers->TCFG0 = 0x0f00;
	if (timer_load_val == 0) {
		/*
		 * for 10 ms clock period @ PCLK with 4 bit divider = 1/2
		 * (default) and prescaler = 16. Should be 10390
		 * @33.25MHz and  @ 66 MHz
		 */
		timer_load_val = get_PCLK() / (16 * 100);
	}

	/* load value for 10 ms timeout */
	lastdec = timers->TCNTB4 = timer_load_val;
	/* auto load, manual update of Timer 4 */
	timers->TCON = (timers->TCON & ~0x00700000) | TCON_4_AUTO | TCON_4_UPDATE;
	/* auto load, start Timer 4 */
	timers->TCON = (timers->TCON & ~0x00700000) | TCON_4_AUTO | COUNT_4_ON;
	timestamp = 0;


	return (0);
}

需要分析,读一下TCNTB4的值到底是多少
env_init
看似初始化环境变量,实际上只是在判断目前DDR中的环境变量是否可用。
./include/lib_arm/board.c — init_baudrate
看似初始化波特率,实际上:

serial_init
看似初始化串口,实际上啥都没干,因为串口早就在BL1初始化过了。
console_init_f
控制台第一阶段的初始化,一般只是将global_data中的have_console置1,其他什么都没干。
display_banner
const char version_string[] =
	U_BOOT_VERSION" (" __DATE__ " - " __TIME__ ")"CONFIG_IDENT_STRING;

printf ("

%s

", version_string);
print_cpuinfo
这个函数主要用于打印CPU的相关信息——时钟和串口,并且判断ARMCLOCK是否正常工作。

checkboard
这个函数输出开发板的信息。

dram_init
board_information中的内存数组初始化。说白了就是告诉board_information开发板接入几块什么样的内存。
display_dram_config
显示DRAM的总容量。

flash_init与display_flash_config
开发板上根本没有Flash,所以可能是移植导致的问题,定义该宏会导致其他问题出现。
mem_malloc_init
将堆区内存清零
mmc_initialize
初始化MMC,输出MMC容量
int mmc_initialize(bd_t *bis)
{
	struct mmc *mmc;
	int err;

	INIT_LIST_HEAD(&mmc_devices);
	cur_dev_num = 0;
	// 初始化链表

	//	board_mmc_init	如果SD/MMC控制器在开发板上
	//	cpu_mmc_init	如果SD/MMC控制器在SOC上
	if (board_mmc_init(bis) < 0)
		cpu_mmc_init(bis);

	mmc = find_mmc_device(0);

	if (mmc) {
		err = mmc_init(mmc);
		if (err)
			err = mmc_init(mmc);
		if (err) {
			printf("Card init fail!
");
			return err;
		}
	}
	printf("%ldMB
", (mmc->capacity/(1024*1024/(1<<9))));
	return 0;
}
env_relocate
从heap中分出一部分环境变量区,将环境变量copy到DDR上。

void env_relocate (void)
{
	/*
	 * We must allocate a buffer for the environment
	 */
	env_ptr = (env_t *)malloc (CFG_ENV_SIZE);

	if (gd->env_valid == 0) {
		set_default_env();
	}
	else {
		env_relocate_spec ();
	}
	gd->env_addr = (ulong)&(env_ptr->data);
} 其中set_default_env的目录为./common/env_common.c,env_relocate_spec的目录为./common/env_movi.c。
真正的从SD卡到DDR中重定位ENV的代码是在env_relocate_spec内部的movi_read_env完成的。
IP地址与MAC地址
此时环境变量已经读取完毕,所以可以直接使用环境变量给board_infotmation赋ipaddr。
MAC地址也是如此。
	/* IP Address */
	gd->bd->bi_ip_addr = getenv_IPaddr ("ipaddr");

	/* MAC Address */
	{
		int i;
		ulong reg;
		char *s, *e;
		char tmp[64];

		i = getenv_r ("ethaddr", tmp, sizeof (tmp));
		s = (i > 0) ? tmp : NULL;

		for (reg = 0; reg < 6; ++reg) {
			gd->bd->bi_enetaddr[reg] = s ? simple_strtoul (s, &e, 16) : 0;
			if (s)
				s = (*e) ? e + 1 : e;
		}
	}
devices_init
绝大多数代码移植自Linux的驱动,暂时看不懂。
int devices_init (void)
{
#ifndef CONFIG_ARM     /* already relocated for current ARM implementation */
	ulong relocation_offset = gd->reloc_off;
	int i;

	/* relocate device name pointers */
	for (i = 0; i < (sizeof (stdio_names) / sizeof (char *)); ++i) {
		stdio_names[i] = (char *) (((ulong) stdio_names[i]) +
						relocation_offset);
	}
#endif

	/* Initialize the list */
	devlist = ListCreate (sizeof (device_t));

	if (devlist == NULL) {
		eputs ("Cannot initialize the list of devices!
");
		return -1;
	}
#if defined(CONFIG_HARD_I2C) || defined(CONFIG_SOFT_I2C)
	i2c_init (CFG_I2C_SPEED, CFG_I2C_SLAVE);
#endif
#ifdef CONFIG_LCD
	drv_lcd_init ();
#endif
#if defined(CONFIG_VIDEO) || defined(CONFIG_CFB_CONSOLE)
	drv_video_init ();
#endif
#ifdef CONFIG_KEYBOARD
	drv_keyboard_init ();
#endif
#ifdef CONFIG_LOGBUFFER
	drv_logbuff_init ();
#endif
	drv_system_init ();
#ifdef CONFIG_SERIAL_MULTI
	serial_devices_init ();
#endif
#ifdef CONFIG_USB_TTY
	drv_usbtty_init ();
#endif
#ifdef CONFIG_NETCONSOLE
	drv_nc_init ();
#endif

	return (0);
}
jumptable_init
jumptable跳转表,本身是一个函数指针数组,里面记录了很多函数的函数名。看这阵势是要实现一个函数指针到具体函数的映射关系,将来通过跳转表中的函数指针就可以执行具体的函数。
uboot中似乎没有使用
./common/console.c — console_init_r
控制台第二阶段初始化。做console的软件初始化,并输出相应信息。

enable_interrupts
什么都没干。
loadaddr & bootfile
这两个变量均与内核启动有关。
board_late_init
软硬件全部初始化完毕,该函数为空。
eth_initialize
网卡芯片本身的一些初始化。但由于SoC的初始化在board_init()中,网卡芯片的初始化在驱动中。所以该函数为空。
x210_preboot_init
其中只调用了一个关键函数mpadfb_init。因为和frame buffer有关,所以猜测为LCD上的显示,以及其他初始化。
boot mode
	if(check_menu_update_from_sd()==0)//update mode
	{
		puts ("[LEFT DOWN] update mode
");
		run_command("fdisk -c 0",0);
		update_all();
	}
	else
		puts ("[LEFT UP] boot mode
");
uboot启动的最后阶段设计了一个自动更新的功能。就是:我们可以将要升级的镜像放到SD卡的固定目录中,然后开机时在uboot启动的最后阶段检查升级标志(是一个按键。按键中标志为"LEFT"的那个按键,这个按键如果按下则表示update mode,如果启动时未按下则表示boot mode)。如果进入update mode则uboot会自动从SD卡中读取镜像文件然后烧录到iNand中;如果进入boot mode则uboot不执行update,直接启动正常运行。
这种机制能够帮助我们快速烧录系统,常用于量产时用SD卡进行系统烧录部署。

main_loop

三、关键函数及其位置
| 函数 | 位置 |
|---|---|
| init_sequence | ./lib_arm/board.c |
| cpu_init | ./cpu/s5pc11x/cpu.c |
| board_init | ./board/samsung/x210/x210.c |
| interrupt_init | ./cpu/s5pc11x/interrupts.c |
| env_init | ./include/common/env_movi.c |
| init_baudrate | ./include/lib_arm/board.c |
| serial_init | ./include/s5pc11x/serial_init.c |
| console_init_f | ./include/common/console.c |
| display_banner | ./lib_arm/board.c |
| print_cpuinfo | ./include/cpu/s5pc11x/s5pc110/speed.c |
| checkboard | ./include/board/samsung/x210/x210.c |
| dram_init | ./include/board/samsung/x210/x210.c |
| display_dram_config | ./include/lib_arm/board.c |
| mem_malloc_init | ./include/lib_arm/board.c |
| mmc_initialize | ./include/drivers/mmc/mmc.c |
| env_relocate | ./common/env_common.c |
| devices_init | ./common/devices.c |
| jumptable_init | ./common/exports.c |
| console_init_r | ./common/console.c |
| enable_interrupts | ./cpu/lib_arm/interrupts.c |
| board_late_init | ./board/s5pc11x/s5pc110/x210.c |
| eth_initialize | ./net/eth.c |
| x210_preboot_init | ./board/samsung/x210/x210.c |
| main_loop | ./common/main.c |
四、我认为有用的步骤
