跨域的原因
浏览器的同源策略
同源策略是浏览器上为安全性考虑实施的非常重要的安全策略。
指的是从一个域上加载的脚本不允许访问另外一个域的文档属性。 举个例子:比如一个恶意网站的页面通过iframe嵌入了银行的登录页面(二者不同源), 如果没有同源限制,恶意网页上的javascript脚本就可以在用户登录银行的时候获取用户名和密码。
何谓同源
URL由协议、域名、端口和路径组成,如果两个URL的协议、域名和端口相同,则表示它们同源。
在浏览器中,<script>、<img>、<iframe>、<link>等标签都可以加载跨域资源,而不受同源限制,但浏览器会限制脚本中发起的跨域请求。比如,使用 XMLHttpRequest 对象和Fetch发起 HTTP 请求就必须遵守同源策略。Web 应用程序通过 XMLHttpRequest 对象或Fetch能且只能向同域名的资源发起 HTTP 请求,而不能向任何其它域名发起请求。不允许跨域访问并非是浏览器限制了发起跨站请求,而是跨站请求可以正常发起,但是返回结果被浏览器拦截了。
解决
jsonp(JSON with Padding)
-
原理
首先在http:\127.0.0.1:8000 est下有如下返回字符串‘ok’的视图:
 服务端
服务端from django.http import HttpResponse def test(request): return HttpResponse('ok')然后在http:\127.0.0.1:8001域下直接用ajax发起一个跨域请求:
 浏览器端
浏览器端<!DOCTYPE html> <html lang="en"> <head> <meta charset="UTF-8"> <title>Test</title> <script src="https://code.jquery.com/jquery-3.1.1.min.js"></script> </head> <body> <script> $.get('http://127.0.0.1:8000/test/', function (data) { alert(data) }) </script> </body> </html>
看效果(这里我使用的是火狐浏览器,提示更直观):

上面有提到过<script>等标签可以加载跨域资源,我们试一下直接让script标签的src属性指向http:\127.0.0.1:8000 est:
 浏览器端
浏览器端会发现script发出的请求成功拿到响应结果:

但是控制台有一个报错:

这个问题显然是返回的内容(也就是‘ok’)被浏览器直接当做脚本执行,但window中并没有定义名字对应为‘ok’的变量。
也就是说此方式请求在服务端返回的内容是可以直接调用浏览器端js脚本的,此时我们想,如果服务端返回一个方法调用,并这个方法在对应浏览器端js脚本中有存在,通过传参的方式,是不是可以间接拿到想要返回的内容。修改服务端和浏览器端:
 服务端
服务端from django.http import HttpResponse def test(request): return HttpResponse('func("ok")') 浏览器端
浏览器端<!DOCTYPE html> <html lang="en"> <head> <meta charset="UTF-8"> <title>Test</title> <script src="https://code.jquery.com/jquery-3.1.1.min.js"></script> </head> <body> <script> function func(data){ console.info(data) } </script> <script src="http:\127.0.0.1:8000 est"></script> </body> </html>
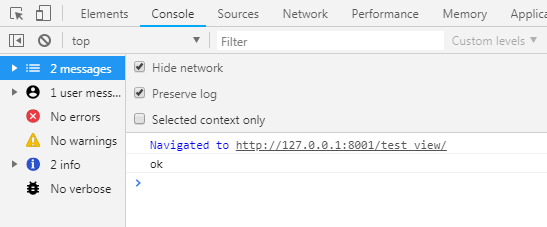
此时会发现,浏览器端函数被成功调用,并且拿到了服务端返回的内容:

在这里上面的script标签是硬编码,显然也可以通过dom操作动态创建标签间接发起请求,下面要介绍的jquery的ajax就帮我们简化了这些操作。
-
jquery提供的jsonp
<!DOCTYPE html>
<html lang="en">
<head>
    <meta charset="UTF-8">
    <title>Test</title>
    <script src="https://code.jquery.com/jquery-3.1.1.min.js"></script>
</head>
<body>
<script>
    $.ajax({
        url: "http://127.0.0.1:8000/test/",
        dataType: "jsonp",  // 指定服务器返回的数据类型。
        // jsonp: "funcKey",   // 指定参数名称。
                   // 如果指定,请求url会带有一组参数:funcKey=func。
                   // 不指定默认为callback=func,具体视服务端情况而定。
        jsonpCallback: "func",  // 指定回调函数名称。
        success: function (data) {
            console.info(data);
        }
    });
</script>
</body>
</html>
因为jquery提供的jsonp的实现方式其实就是<script>脚本请求地址的方式一样,只是ajax的jsonp对其做了封装,可想而知,jsonp是不支持POST方式的。
cors(Cross-origin resource sharing)
-
使用
我们重新看下之前跨域失败的错误:

其实浏览器已经很明显的告诉了我们原因:服务端响应缺少一个‘
 服务端
服务端from django.http import HttpResponse def test(request): response = HttpResponse('ok') response["Access-Control-Allow-Origin"] = "*" return response修改客户端发送普通ajax请求:
 客户端
客户端<!DOCTYPE html> <html lang="en"> <head> <meta charset="UTF-8"> <title>Test</title> <script src="https://code.jquery.com/jquery-3.1.1.min.js"></script> </head> <body> <script> $.get('http://127.0.0.1:8000/test/',function(data){ console.info(data) }) </script> </body> </html>
此时我们会发现,加上该响应头后客户端就可以像访问本源地址访问跨域地址:

-
响应头说明
-
Access-Control-Allow-Origin(必须)
Access-Control-Allow-Origin=* //允许任何域名访问
Access-Control-Allow-Origin=http://127.0.0.1:8000 //仅允许指定域名访问
该请求头必须包含在所有合法的CORS响应头中;否则,省略该响应头会导致CORS请求失败。该值要么与请求头Origin的值一样(如上述例子),要么设置成星号‘*’,以匹配任意Origin。如果你想任何站点都能获取到你的数据,那么就使用‘*’吧。但是,如果你想有效的控制,就将该值设置为一个实际的值。
-
Access-Control-Allow-Credentials(可选)
Access-Control-Allow-Credentials=true
默认情况下,发送CORS请求,cookies是不会附带发送的。但是,通过使用该响应头就可以让cookies包含在CORS请求中。注意,该响应头只有唯一的合法值true(全部小写)。如果你不需要cookies值,就不要包含该响应头了,而不是将该响应头的值设置成false。该响应头Access-Control-Allow-Credentials需要与XMLHttpRequest2对象的withCredentials属性配合使用。当这两个属性同时设置为true时,cookies才能附带。例如,withCredentials被设置成true,但是响应头中不包含 Access-Control-Allow-Credentials响应头,那么该请求就会失败(反之亦然)。发送CORS请求时,最好不要携带cookies,除非你确定你想在请求中包含cookie。
-
Access-Control-Expose-Headers(可选)
Access-Control-Expose-Headers
XMLHttpRequest2对象有一个getResponseHeader()方法,该方法返回一个特殊响应头值。在一个CORS请求中,getResponseHeader()方法仅能获取到简单的响应头,如下:
Cache-Control
Content-Language
Content-Type
Expires
Last-Modified
Pragma
如果你想客户端能够获取到其他的头部信息,你必须设置Access-Control-Expose-Headers响应头。该响应头的值可以为响应头的名称,多个时需要利用逗号隔开,这样客户端就能通过getResponseHeader方法获取到了。
-
-
简单请求&复杂请求
-
条件
1、请求方式:HEAD、GET、POST
2、请求头信息:
        Accept
        Accept-Language
        Content-Language
        Last-Event-ID
        Content-Type 对应的值是以下三个中的任意一个
                                application/x-www-form-urlencoded
                                multipart/form-data
                                text/plain
注意:同时满足以上两个条件时,则是简单请求,否则为复杂请求。 -
区别
简单请求:一次请求。 复杂请求:两次请求,在发送数据之前会先发一次请求用于做“预检”,只有“预检”通过后才再发送一次请求用于数据传输。 -
关于预检
- 请求方式:OPTIONS
- “预检”其实做检查,检查如果通过则允许传输数据,检查不通过则不再发送真正想要发送的消息
- 如何“预检”
     => 如果请求是PUT等复杂请求,则服务端需要设置允许某请求,否则“预检”不通过
        Access-Control-Request-Method
     => 如果复杂请求设置了请求头,则服务端需要设置允许某请求头,否则“预检”不通过
        Access-Control-Request-Headers
-
复杂请求示例
a、支持跨域,复杂请求。
1、“预检”请求时,在服务端设置允许的请求方式:Access-Control-Request-Method
2、“预检”请求时,在服务端设置允许的响应头:Access-Control-Request-Headers
3、“预检”缓存时间,服务器设置响应头:Access-Control-Max-Age
 HTML
HTML<!DOCTYPE html> <html lang="en"> <head> <meta charset="UTF-8"> <title>CorsTest</title> <script src="https://code.jquery.com/jquery-3.1.1.min.js"></script> </head> <body> <script> (function JqSendRequest(){ $.ajax({ url: "http://127.0.0.1:8001/test/", type: 'PUT', dataType: 'text', headers: {'k1': 'v1'}, success: function(data, statusText, xmlHttpRequest){ console.log(data); } }) })() </script> </body> </html>
 Django
from django.shortcuts import render, HttpResponse

from django.views import View


class TestView(View):
    def options(self, request, *args, **kwargs):
        response = HttpResponse()
        response['Access-Control-Allow-Origin'] = "http://127.0.0.1:8000"
        response['Access-Control-Allow-Headers'] = "k1,k2"
        response['Access-Control-Allow-Methods'] = "PUT,DELETE"
        response['Access-Control-Max-Age'] = 1
        return response

    def put(self, request, *args, **kwargs):
        response = HttpResponse()
        response['Access-Control-Allow-Origin'] = "http://127.0.0.1:8000"
        return HttpResponse('ok')
b、跨域获取自定义响应头。
默认获取到的所有响应头只有基本信息,如果想要获取自定义的响应头,则需要再服务器端设置Access-Control-Expose-Headers。
 HTML
HTML<!DOCTYPE html> <html lang="en"> <head> <meta charset="UTF-8"> <title>CorsTest</title> <script src="https://code.jquery.com/jquery-3.1.1.min.js"></script> </head> <body> <script> ( function JqSendRequest(){ $.ajax({ url: "http://127.0.0.1:8001/test/", type: 'PUT', dataType: 'text', headers: {'k1': 'v1'}, success: function(data, statusText, xmlHttpRequest){ console.log(data); // 获取响应头 console.log(xmlHttpRequest.getAllResponseHeaders()); } }) })() </script> </body> </html>

 Django
from django.shortcuts import render, HttpResponse

from django.views import View


class TestView(View):
    def options(self, request, *args, **kwargs):
        response = HttpResponse()
        response['Access-Control-Allow-Origin'] = "http://127.0.0.1:8000"
        response['Access-Control-Allow-Headers'] = "k1,k2"
        response['Access-Control-Allow-Methods'] = "PUT,DELETE"
        response['Access-Control-Max-Age'] = 1
        return response

    def put(self, request, *args, **kwargs):
        response = HttpResponse('ok')
        response['Access-Control-Allow-Origin'] = "http://127.0.0.1:8000"
        response['testkey1'] = "testval1"
        response['testkey2'] = "testval2"
        response['Access-Control-Expose-Headers'] = "testkey1,testkey2"
        return response
c、跨域传输cookie。
在跨域请求中,默认情况下,HTTP Authentication信息,Cookie头以及用户的SSL证书无论在预检请求中或是在实际请求都是不会被发送。

如果想要发送:
    浏览器端:XMLHttpRequest的withCredentials为true
    服务器端:Access-Control-Allow-Credentials为true
    注意:服务器端响应的 Access-Control-Allow-Origin 不能是通配符 *
 HTML
HTML<!DOCTYPE html> <html lang="en"> <head> <meta charset="UTF-8"> <title>CorsTest</title> <script src="https://code.jquery.com/jquery-3.1.1.min.js"></script> </head> <body> <script> ( function JqSendRequest() { $.ajax({ url: "http://127.0.0.1:8001/test/", type: 'PUT', dataType: 'text', headers: {'k1': 'v1'}, xhrFields: {withCredentials: true}, success: function (data, statusText, xmlHttpRequest) { console.log(data); } }) })() </script> </body> </html>
 Django
from django.shortcuts import render, HttpResponse

from django.views import View


class TestView(View):
    def options(self, request, *args, **kwargs):
        response = HttpResponse()
        response['Access-Control-Allow-Origin'] = "http://127.0.0.1:8000"
        response['Access-Control-Allow-Headers'] = "k1,k2"
        response['Access-Control-Allow-Methods'] = "PUT,DELETE"
        response['Access-Control-Max-Age'] = 1
        response['Access-Control-Allow-Credentials'] = 'true'
        return response

    def put(self, request, *args, **kwargs):
        response = HttpResponse('ok')
        response['Access-Control-Allow-Origin'] = "http://127.0.0.1:8000"
        response['Access-Control-Allow-Credentials'] = 'true'
        response['testkey1'] = "testval1"
        response['testkey2'] = "testval2"
        response['Access-Control-Expose-Headers'] = "testkey1,testkey2"
        response.set_cookie('my_cookie', 'cookie value')
        return response
-
