什么是内存池?
在上一篇 C++内存管理:new / delete 和 cookie 中谈到,频繁的调用 malloc 会影响运行效率以及产生额外的 cookie, 而内存池的思想是预先申请一大块内存,当有内存申请需求时,从内存池中取出一块内存分配给目标对象。
它的实现过程为:
- 预先申请 chunk 大小的内存池, 将内存池划按照对象大小划分成多个内存块。
- 以链表的形式,即通过指针将内存块相连,头指针指向第一个空闲块。
- 当有内存申请需求时,首先检查头指针是否指向空闲块,如果是则将头指针指向的第一个空闲块分配出去(从链表移除),同时头指针指向下一个空闲块;若头指针为空,说明当前内存池已分配完,需要重新申请新的内存池。
- 当有内存释放需求时,将释放的内存块重新加入链表的表头,调整头指针指向新加入的空闲块。这也意味着,如果申请了多个内存池,在内存释放的过程中会慢慢的合并到一起。
初步实现

#include <iostream>
using namespace std;


class Screen {
public:
	Screen(int x) : i(x) { };
	int get() { return i; }

	void* operator new(size_t);
	void  operator delete(void*, size_t);

private:
	Screen* next;
	static Screen* freeStore;  //头指针
	static const int screenChunk;  //内存块数量
private:
	int i;
};

Screen* Screen::freeStore = 0;
const int Screen::screenChunk = 5;

void* Screen::operator new(size_t size){
	Screen *p;
	if (!freeStore) {  //内存池是空的
		size_t chunk = screenChunk * size;
		freeStore = p = reinterpret_cast<Screen*>(new char[chunk]);
		for (; p != &freeStore[screenChunk - 1]; ++p) {  //以链表的形式串联起来
			p->next = p + 1;
		}
		p->next = 0;
	}
	p = freeStore;
	freeStore = freeStore->next;
	return p;
}

void Screen::operator delete(void *p, size_t){
	//将内存块重新加入链表表头,同时调整头指针
	(static_cast<Screen*>(p))->next = freeStore;
	freeStore = static_cast<Screen*>(p);
}

//-------------
void test(){

	cout << "Size: " << sizeof(Screen) << endl;

	size_t const N = 100;
	Screen* p[N];

	for (int i = 0; i < N; ++i)
		p[i] = new Screen(i);

	for (int i = 0; i < 10; ++i)  //输出地址观察
		cout << i << ": " << p[i] << endl;

	for (int i = 0; i < N; ++i)
		delete p[i];
}

int main(){
	test();
	return 0;
}
在上面的代码中设置一个内存池为5个内存块,当我们进行100次内存申请后,打印出前10个地址查看,可以看到前5个地址是连续的,后5个也是连续的,但中间由于重新申请了内存池,所以不是连续的。
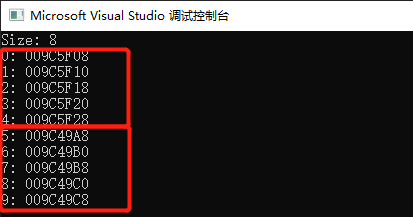
但是这样的方法还存在着问题,那就是引入了额外的指针内存消耗,接下来将使用embedded pointer进行改进。
使用嵌入指针改进
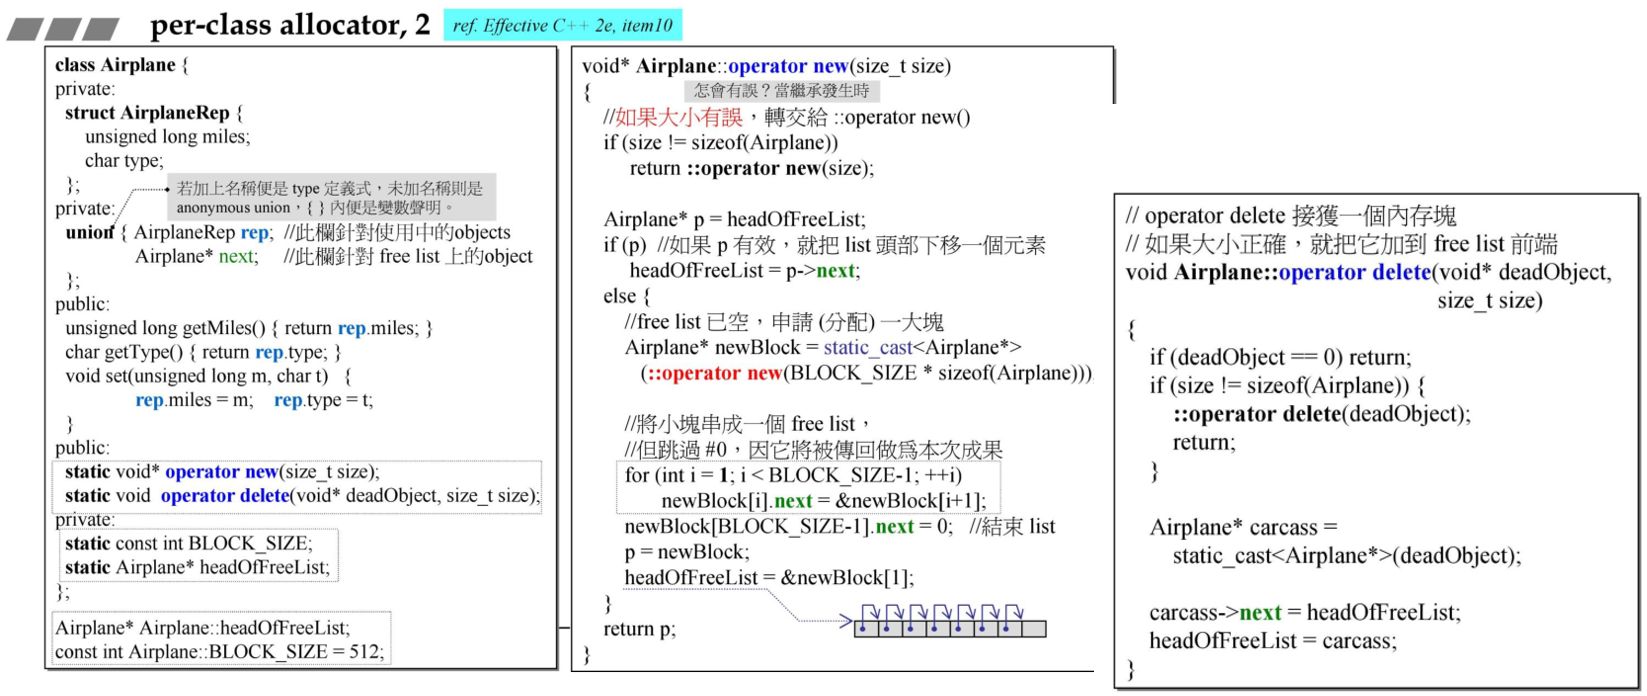
上面就使用到了嵌入指针,一个 AirplaneRep 对象的大小为 8 字节,而一个 Airplane 的指针大小为 4 字节或 8 字节。在 32 位机器下, 指针可以借用 AirplaneRep 对象所占的 8 字节内存空间中的前 4 个字节,用来连接空闲的内存块。而当内存块需要被分配给对象时,此时它已从链表中移除,也就不需要指针来连接了。此时的 8 字节内存空间由 AirplaneRep 占据。当内存释放时也是同理,由于 Rep 和 next 不会同时用到,所以 embedded pointer 的做法可以减少内存消耗。
更简化:static allocator
前面的实现需要为每个类都重写 operator new 和 operator delete,由于内容是一样的,使用另一个类来完成这些重复的操作。
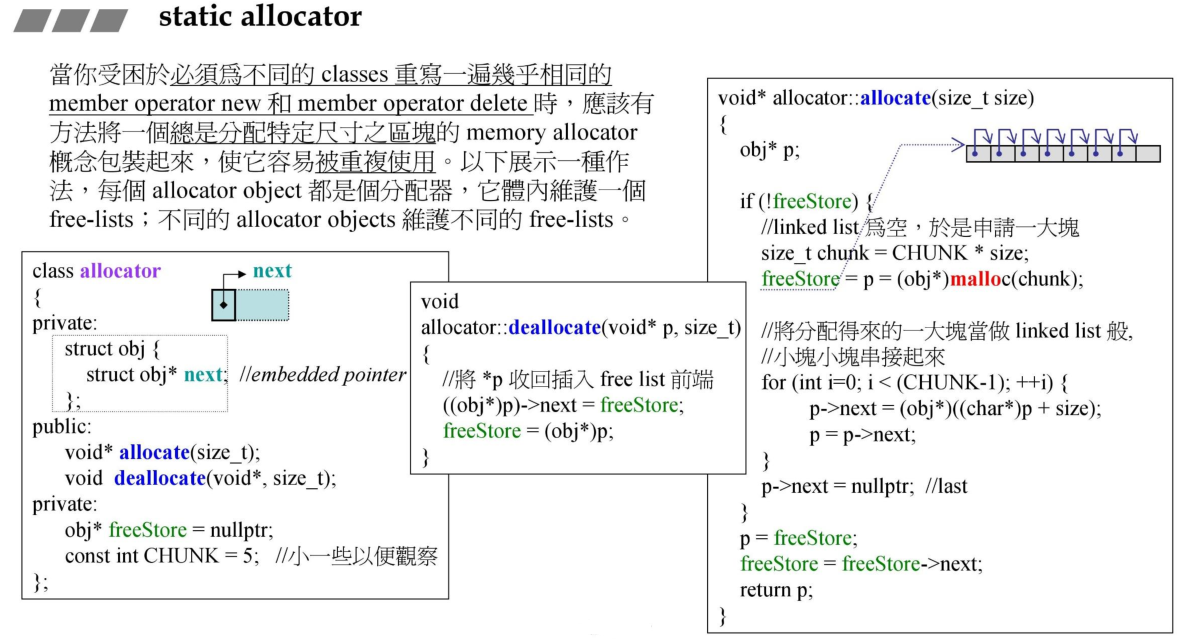
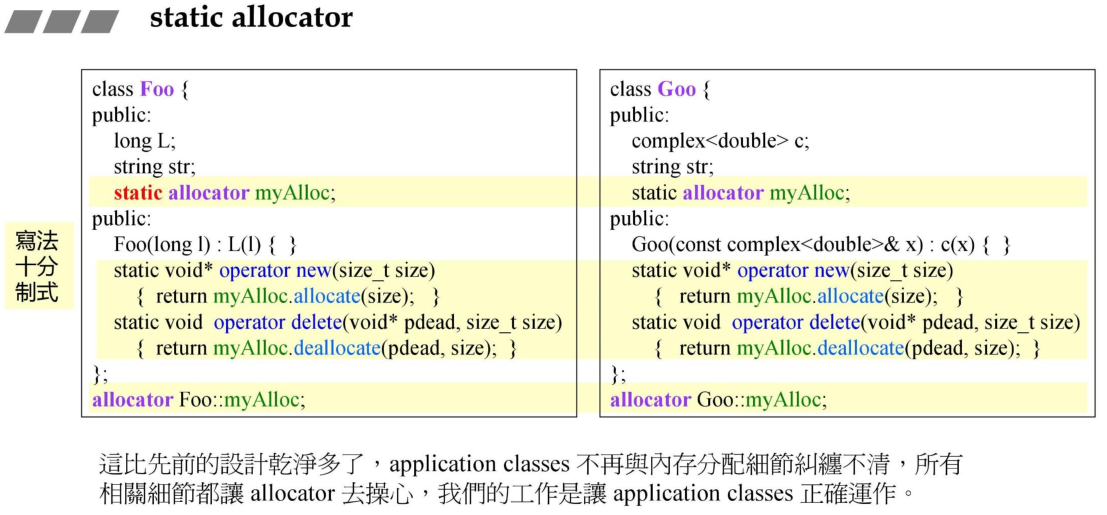
如此一来,我们的 class 只需要去调用 allocator 即可完成内存的申请和释放工作。
#include <iostream>
#include <complex>
using namespace std;

namespace jj09{
	class allocator{
	private:
		struct obj {
			struct obj* next;  //embedded pointer
		};
	public:
		void* allocate(size_t);
		void  deallocate(void*, size_t);
		void  check();

	private:
		obj* freeStore = nullptr;
		const int CHUNK = 5;
	};

	void* allocator::allocate(size_t size){
		obj* p;

		if (!freeStore) {
			size_t chunk = CHUNK * size;
			freeStore = p = (obj*)malloc(chunk);

			for (int i = 0; i < (CHUNK - 1); ++i) {
				p->next = (obj*)((char*)p + size);
				p = p->next;
			}
			p->next = nullptr;  //last
		}
		p = freeStore;
		freeStore = freeStore->next;

		return p;
	}

	void allocator::deallocate(void* p, size_t){
		((obj*)p)->next = freeStore;
		freeStore = (obj*)p;
	}

	void allocator::check(){
		obj* p = freeStore;
		int count = 0;

		while (p) {
			cout << p << endl;
			p = p->next;
			count++;
		}
		cout << count << endl;
	}
	//--------------

	class Foo {
	public:
		long L;
		string str;
		static allocator myAlloc;
	public:
		Foo(long l) : L(l) {  }
		static void* operator new(size_t size){
			return myAlloc.allocate(size);
		}
		static void  operator delete(void* pdead, size_t size){
			return myAlloc.deallocate(pdead, size);
		}
	};
	allocator Foo::myAlloc;


	class Goo {
	public:
		complex<double> c;
		string str;
		static allocator myAlloc;
	public:
		Goo(const complex<double>& x) : c(x) {  }
		static void* operator new(size_t size){
			return myAlloc.allocate(size);
		}
		static void  operator delete(void* pdead, size_t size){
			return myAlloc.deallocate(pdead, size);
		}
	};
	allocator Goo::myAlloc;

	//-------------
	void test_static_allocator_3(){

		Foo* p[100];

		cout << "sizeof(Foo)= " << sizeof(Foo) << endl;
		for (int i = 0; i < 23; ++i) {	//23,任意数, 随意看看结果
			p[i] = new Foo(i);
			cout << p[i] << ' ' << p[i]->L << endl;
		}
		//Foo::myAlloc.check();

		for (int i = 0; i < 23; ++i) {
			delete p[i];
		}
		//Foo::myAlloc.check();


		{
			Goo* p[100];

			cout << "sizeof(Goo)= " << sizeof(Goo) << endl;
			for (int i = 0; i < 17; ++i) {	//17,任意数, 随意看看结果
				p[i] = new Goo(complex<double>(i, i));
				cout << p[i] << ' ' << p[i]->c << endl;
			}
			//Goo::myAlloc.check();

			for (int i = 0; i < 17; ++i) {
				delete p[i];
			}
			//Goo::myAlloc.check();
		}

	}
} //namespace

int main(void)
{
	jj09::test_static_allocator_3();
	return 0;
}
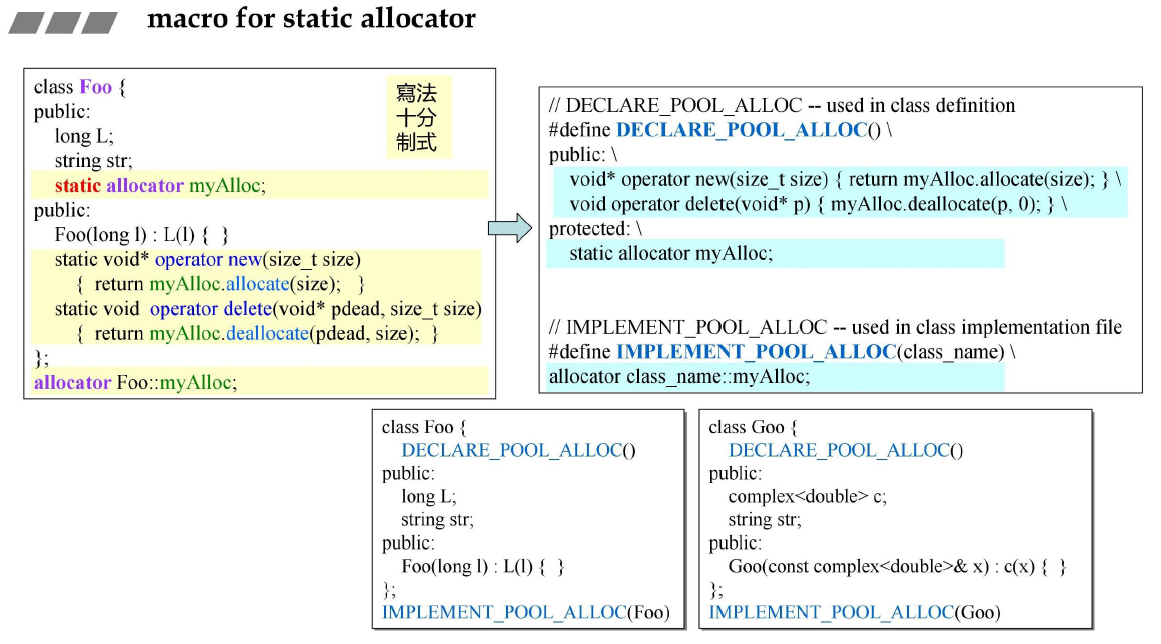
macor for static allocator
在上面的 Foo 和 Goo 中,每次还要写一大堆重复的内容,于是可以使用宏进一步简化:
参考: