效果图:
效果描述:
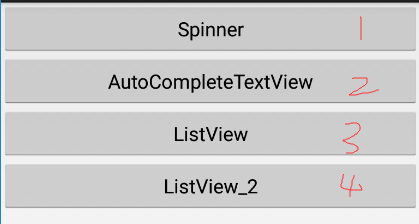
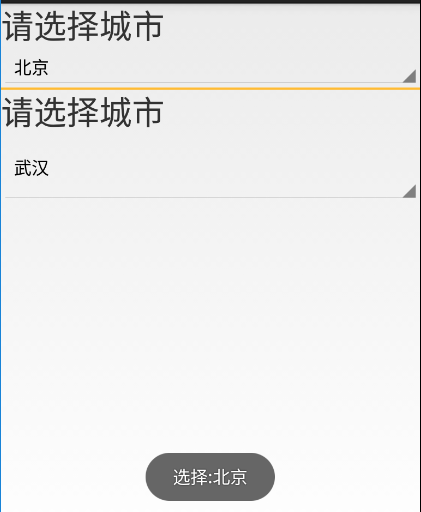
1、当点击 1 按钮后,进入选择城市的页面,会监听到你选中的城市名称;动态为Spinner绑定数据
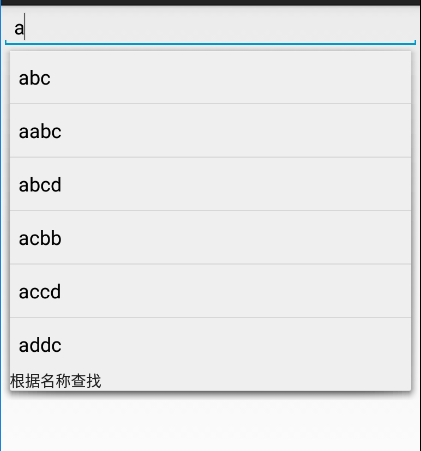
2、当点击 2 按钮后,进入自动查询数据页面,只要输入首字母,就会动态查找以该字母为首字母的单词
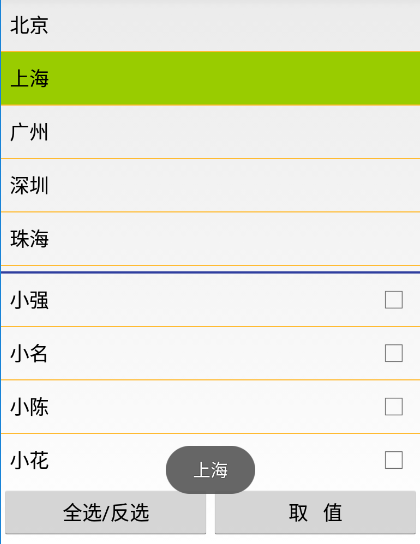
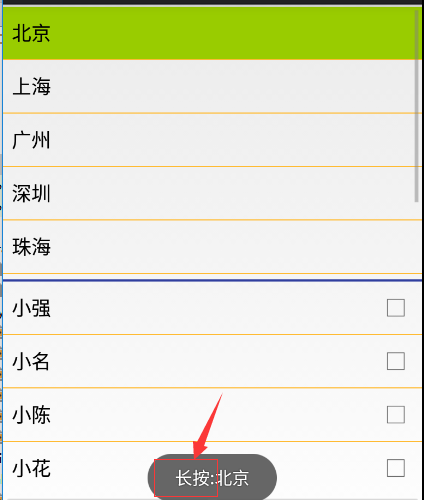
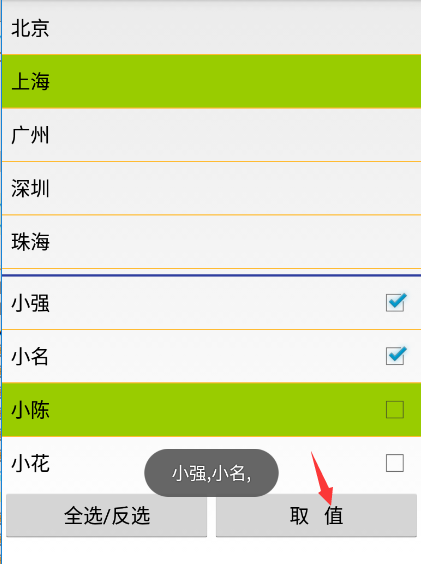
3、当点击 3 按钮后,进入一个列表中,会监听到你点击的列表;会监听你长按的列表;会全选/反选复选框;能获取选中的数据
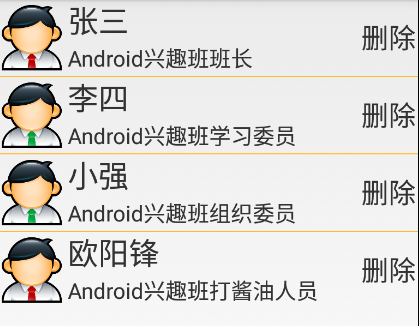
4、当点击 4 按钮后,进入一个列表中,这里会设置每一列的数据
1、activity_main.xml
描述:
定义了四个按钮
第一个:下拉列表
第二个:自动查询数据
第三个:全选/反选 和 listView取值
第四个:设计一个ListView的内容
<?xml version="1.0" encoding="utf-8"?>
<LinearLayout xmlns:android="http://schemas.android.com/apk/res/android"
    android:id="@+id/activity_main"
    android:layout_width="match_parent"
    android:layout_height="match_parent"
    android:orientation="vertical">

    <Button
        android:id="@+id/btn1"
        android:layout_width="match_parent"
        android:layout_height="wrap_content"
        android:text="Spinner"/>
    <Button
        android:id="@+id/btn2"
        android:layout_width="match_parent"
        android:layout_height="wrap_content"
        android:text="AutoCompleteTextView"/>
    <Button
        android:id="@+id/btn3"
        android:layout_width="match_parent"
        android:layout_height="wrap_content"
        android:text="ListView"/>
    <Button
        android:id="@+id/btn4"
        android:layout_width="match_parent"
        android:layout_height="wrap_content"
        android:text="ListView_2"/>
</LinearLayout>
2、MainActivity.java
描述:
设置了一个按钮点击监听事件,实现在一个Activity中控制多个按钮
package com.example.andorid_ui_2;

import android.app.Activity;
import android.content.DialogInterface;
import android.content.Intent;
import android.os.Bundle;
import android.view.View;
import android.widget.Button;
import android.widget.ListView;

public class MainActivity extends Activity implements View.OnClickListener{
    private Button btn1;
    private Button btn2;
    private Button btn3;
    private Button btn4;

    @Override
    protected void onCreate(Bundle savedInstanceState) {
        super.onCreate(savedInstanceState);
        setContentView(R.layout.activity_main);
        btn1=(Button) findViewById(R.id.btn1);
        btn1.setOnClickListener(this);
        btn2=(Button) findViewById(R.id.btn2);
        btn2.setOnClickListener(this);
        btn3=(Button) findViewById(R.id.btn3);
        btn3.setOnClickListener(this);
        btn4=(Button) findViewById(R.id.btn4);
        btn4.setOnClickListener(this);
    }

    @Override
    public void onClick(View view) {
        Intent intent = null;
        switch (view.getId()){
            case R.id.btn1:
                intent=new Intent(this,SpinnerActivity.class);
                break;
            case R.id.btn2:
                intent=new Intent(this,AutoCompleteActivity.class);
                break;
            case R.id.btn3:
                intent=new Intent(this,ListActivity.class);
                break;
            case R.id.btn4:
                intent=new Intent(this,ListViewActivity.class);
                break;
        }
        if (intent!=null)
            startActivity(intent);
    }
}
下列列表
1、activity_spinner.xml
描述:
定义了两个下拉列表供用户选择相应的城市名称
<?xml version="1.0" encoding="utf-8"?>
<LinearLayout xmlns:android="http://schemas.android.com/apk/res/android"
    android:orientation="vertical"
    android:id="@+id/activity_spinner"
    android:layout_width="match_parent"
    android:layout_height="match_parent">
    <TextView
        android:text="请选择城市"
        android:textSize="30sp"
        android:layout_width="match_parent"
        android:layout_height="wrap_content" />
    <Spinner
        android:id="@+id/spinner_1"
        android:entries="@array/citys"
        android:spinnerMode="dialog"
        android:prompt="@string/select_city"
        android:layout_width="match_parent"
        android:layout_height="wrap_content"/>
    <LinearLayout
        android:layout_width="match_parent"
        android:layout_height="2dp"
        android:background="@android:color/holo_orange_light"/>
    <TextView
        android:text="请选择城市"
        android:textSize="30sp"
        android:layout_width="match_parent"
        android:layout_height="wrap_content" />
    <Spinner
        android:id="@+id/spinner_2"
        android:spinnerMode="dialog"
        android:prompt="@string/select_city"
        android:layout_width="match_parent"
        android:layout_height="wrap_content"/>
</LinearLayout>
2、修改资源文件Strings.xml
描述:
资源文件中定义好一些城市名
<resources>
    <string name="app_name">Android_UI_2</string>

    <string name="select_city">请选择城市</string>
    <array name="citys">
        <item>北京</item>
        <item>上海</item>
        <item>广州</item>
        <item>深圳</item>
        <item>珠海</item>
        <item>中山</item>
        <item>江门</item>
    </array>
</resources>
3、SpinnerActivity.java
package com.example.andorid_ui_2;

import android.app.Activity;
import android.os.Bundle;
import android.view.View;
import android.widget.AdapterView;
import android.widget.ArrayAdapter;
import android.widget.Spinner;
import android.widget.Toast;

public class SpinnerActivity extends Activity {
  //获取下拉列表控件
    private Spinner spinner_1,spinner_2;
    @Override
    protected void onCreate(Bundle savedInstanceState) {
        super.onCreate(savedInstanceState);
        setContentView(R.layout.activity_spinner);

        spinner_1=(Spinner)findViewById(R.id.spinner_1);
     //获取到你当前选中的项转化为字符串
        String city=spinner_1.getSelectedItem().toString();
     //弹出你选中的项的内容
        //Toast.makeText(this,"默认选择:"+city,Toast.LENGTH_SHORT).show();

        //监听选择改变事件
        spinner_1.setOnItemSelectedListener(new AdapterView.OnItemSelectedListener() {
            @Override
       //Adapter是适配器,
            public void onItemSelected(AdapterView<?> adapterView, View view, int i, long l) {
                //从资源中取出所有的城市
                String[] citys=getResources().getStringArray(R.array.citys);
         //弹出你选中的城市名称
                Toast.makeText(SpinnerActivity.this,"选择:"+citys[i],Toast.LENGTH_SHORT).show();
            }
            @Override
            public void onNothingSelected(AdapterView<?> adapterView) {

            }
        });

        //==============动态为Spinner绑定数据================//
        spinner_2=(Spinner)findViewById(R.id.spinner_2);
        String[] citys={"武汉","重庆","成都","锦州","荆门","襄阳"};
        //构建一个ArrayAdapter对象
        ArrayAdapter adapter=new ArrayAdapter(this,android.R.layout.simple_spinner_dropdown_item,citys);
        spinner_2.setAdapter(adapter);
    }
}
自动查询数据
1、activity_auto_complete.xml
描述:
AutoCompleteTextView 自动提示文本内容控件
<?xml version="1.0" encoding="utf-8"?>
<LinearLayout xmlns:android="http://schemas.android.com/apk/res/android"
    android:id="@+id/activity_auto_complete"
    android:layout_width="match_parent"
    android:layout_height="match_parent"
    android:orientation="vertical">

    <AutoCompleteTextView
        android:id="@+id/autoText"
        android:completionHint="根据名称查找"
        android:completionThreshold="1"
        android:layout_width="match_parent"
        android:layout_height="wrap_content" />
</LinearLayout>
2、AutoCompleteActivity.java
package com.example.andorid_ui_2;
import android.app.Activity;
import android.os.Bundle;
import android.widget.ArrayAdapter;
import android.widget.AutoCompleteTextView;

public class AutoCompleteActivity extends Activity {
  //获取控件
    private AutoCompleteTextView autoText;
    @Override
    protected void onCreate(Bundle savedInstanceState) {
        super.onCreate(savedInstanceState);
        setContentView(R.layout.activity_auto_complete);

        autoText=(AutoCompleteTextView)findViewById(R.id.autoText);
        //为autoText绑定数据源
        String[] names={"abc","aabc","abcd","acbb","accd","addc"};
     //构建ArrayAdapter对象,为AutocompleteView动态绑定数据
        ArrayAdapter adapter=new ArrayAdapter(this,android.R.layout.simple_list_item_1,names);
        autoText.setAdapter(adapter);
    }
}
全选/反选 和 listView取值
1、activity_list.xml
描述:
橙色分割线:
<LinearLayout
        android:layout_width="match_parent"
        android:layout_height="2dp"
        android:background="@color/colorPrimaryDark"/>
选中的项颜色变为绿色:
android:listSelector="@android:color/holo_green_light"
<?xml version="1.0" encoding="utf-8"?>
<LinearLayout xmlns:android="http://schemas.android.com/apk/res/android"
    xmlns:tools="http://schemas.android.com/tools"
    android:id="@+id/activity_list"
    android:layout_width="match_parent"
    android:layout_height="match_parent"
    android:paddingTop="2dp"
    android:orientation="vertical">
    <ListView
        android:id="@+id/listView_1"
        android:entries="@array/citys"
        android:divider="@android:color/holo_orange_light"
        android:dividerHeight="1dp"
        android:listSelector="@android:color/holo_green_light"
        android:choiceMode="multipleChoice"
        android:keepScreenOn="true"
        android:layout_width="match_parent"
        android:layout_height="250dp"/>
    <LinearLayout
        android:layout_width="match_parent"
        android:layout_height="2dp"
        android:background="@color/colorPrimaryDark"/>
    <ListView
        android:id="@+id/listView_2"
        android:divider="@android:color/holo_orange_light"
        android:dividerHeight="1dp"
        android:choiceMode="multipleChoice"
        android:listSelector="@android:color/holo_green_light"
        android:layout_width="match_parent"
        android:layout_height="wrap_content"/>
    <LinearLayout
        android:layout_width="match_parent"
        android:layout_height="wrap_content"
        android:orientation="horizontal">
        <Button
            android:layout_width="match_parent"
            android:layout_weight="1"
            android:onClick="doSelect"
            android:text="全选/反选"
            android:layout_height="wrap_content" />
        <Button
            android:layout_width="match_parent"
            android:layout_weight="1"
            android:onClick="getValues"
            android:text="取   值"
            android:layout_height="wrap_content" />
    </LinearLayout>
</LinearLayout>
2、ListActivity.java
描述:
单击和长按事件的使用
长按删除选项
动态绑定数据到listView
package com.example.andorid_ui_2;

import android.app.Activity;
import android.os.Bundle;
import android.view.View;
import android.widget.AdapterView;
import android.widget.ArrayAdapter;
import android.widget.ListView;
import android.widget.Toast;

import java.util.ArrayList;
import java.util.List;

public class ListActivity extends Activity {
   //获取控件
    private ListView listView_1,listView_2;
    private ArrayAdapter adapter;
    private List userList;
    @Override
    protected void onCreate(Bundle savedInstanceState) {
        super.onCreate(savedInstanceState);
        setContentView(R.layout.activity_list);

        listView_1=(ListView)findViewById(R.id.listView_1);
     //获取资源文件中的城市
        final String[] citys=getResources().getStringArray(R.array.citys);
        //ListView常用事件_单击
        listView_1.setOnItemClickListener(new AdapterView.OnItemClickListener() {
            @Override
            public void onItemClick(AdapterView<?> adapterView, View view, int i, long l) {
                Toast.makeText(ListActivity.this,citys[i],Toast.LENGTH_SHORT).show();
            }
        });

        //长按事件
        listView_1.setOnItemLongClickListener(new AdapterView.OnItemLongClickListener() {
            @Override
            public boolean onItemLongClick(AdapterView<?> adapterView, View view, int i, long l) {
                Toast.makeText(ListActivity.this,"长按:"+citys[i],Toast.LENGTH_SHORT).show();
                return true;
            }
        });

        //================为ListView动态绑定数据===================//
        listView_2=(ListView)findViewById(R.id.listView_2);
        userList=new ArrayList();
        userList.add("小强");userList.add("小名");
        userList.add("小陈");userList.add("小花");
     //构建ArrayAdapter对象
        adapter=new ArrayAdapter(this,android.R.layout.simple_list_item_multiple_choice,userList);
        listView_2.setAdapter(adapter);

        //长按时删除该项
        listView_2.setOnItemLongClickListener(new AdapterView.OnItemLongClickListener() {
            @Override
            public boolean onItemLongClick(AdapterView<?> adapterView, View view, int i, long l) {
          //移除某一项数据
                userList.remove(i);

                adapter.notifyDataSetChanged();
                return false;
            }
        });
    }

    //执行全选或反选
    public void doSelect(View view){
        //获取当前被选中项的数量
        int count=listView_2.getCheckedItemCount();
        boolean isFlag=true;
     //如果有被选中的项,则isFlag的值就为false,否则则为true
        isFlag=count>0?false:true;
        for (int i=0;i<listView_2.getCount();i++){
            listView_2.setItemChecked(i,isFlag);
        }

    }

    //取出选中项的值
    public void getValues(View view){
     //构建一个带有缓存数据的StringBuffer
        StringBuffer sb=new StringBuffer();
        for (int i=0;i<listView_2.getCount();i++){
            if(listView_2.isItemChecked(i)){
          //将选中的数据追加并保存到sb
                sb.append(listView_2.getItemAtPosition(i)+",");
            }
        }
     //转化为字符串弹出
        Toast.makeText(this,sb.toString(),Toast.LENGTH_LONG).show();
    }
}
一个ListView的内容
资源:


1、activity_List_View.xml
描述:
choiceMode的值有:1.none;2.singleChoice;3multipleChoice
1是什么都没有,2是单选模式,3是多选模式
<?xml version="1.0" encoding="utf-8"?>
<LinearLayout xmlns:android="http://schemas.android.com/apk/res/android"
    android:id="@+id/activity_list_view"
    android:layout_width="match_parent"
    android:layout_height="match_parent"
    android:orientation="vertical">
    <ListView
        android:id="@+id/userListView"
        android:divider="@android:color/holo_orange_light"
        android:dividerHeight="1dp"
        android:choiceMode="multipleChoice"
        android:listSelector="@android:color/holo_green_light"
        android:layout_width="match_parent"
        android:layout_height="wrap_content"/>
</LinearLayout>
2、ListViewActivity.java
package com.example.andorid_ui_2;

import android.app.Activity;
import android.os.Bundle;
import android.widget.ListView;
import android.widget.SimpleAdapter;

import java.util.ArrayList;
import java.util.HashMap;
import java.util.List;
import java.util.Map;
import java.util.Objects;

public class ListViewActivity extends Activity {

    private ListView userListView;
  //适配器
    private SimpleAdapter adapter;
    private List<Map<String,Object>> data;
    @Override
    protected void onCreate(Bundle savedInstanceState) {
        super.onCreate(savedInstanceState);
        setContentView(R.layout.activity_list_view);

        userListView=(ListView)findViewById(R.id.userListView);
        //绑定数据 :用户头像、用户名、用户信息
        String[] from={"userImage","userName","userInfo"};
     //通过id获取用户头像、用户名、用户信息
        int[] to={R.id.userImage,R.id.userName,R.id.userInfo};
        getData();
     //构建适配器
        adapter=new SimpleAdapter(this,data,R.layout.layout_userlist,from,to);
        //绑定适配器
     userListView.setAdapter(adapter);
    }

    private void getData(){
        data=new ArrayList<Map<String,Object>>();
        //每一项的数据
        Map<String,Object> map=new HashMap<String,Object>();
        map.put("userImage",R.drawable.user1);
        map.put("userName","张三");
        map.put("userInfo","Android兴趣班班长");
        data.add(map);

        map=new HashMap<String,Object>();
        map.put("userImage",R.drawable.user2);
        map.put("userName","李四");
        map.put("userInfo","Android兴趣班学习委员");
        data.add(map);

        map=new HashMap<String,Object>();
        map.put("userImage",R.drawable.user2);
        map.put("userName","小强");
        map.put("userInfo","Android兴趣班组织委员");
        data.add(map);

        map=new HashMap<String,Object>();
        map.put("userImage",R.drawable.user1);
        map.put("userName","欧阳锋");
        map.put("userInfo","Android兴趣班打酱油人员");
        data.add(map);
    }
}
3、layout_userlist.xml
描述:
用户头像
用户名
用户信息
删除用户
<?xml version="1.0" encoding="utf-8"?>
<LinearLayout xmlns:android="http://schemas.android.com/apk/res/android"
    android:orientation="vertical" android:layout_width="match_parent"
    android:layout_height="match_parent"
    android:layout_marginLeft="5dp"
    >
    <LinearLayout
        android:layout_width="match_parent"
        android:layout_height="70dp"
        android:orientation="horizontal">
        <ImageView
            android:id="@+id/userImage"
            android:layout_width="60dp"
            android:layout_height="70dp" />
        <LinearLayout
            android:orientation="horizontal"
            android:layout_marginLeft="3dp"
            android:layout_width="match_parent"
            android:layout_height="match_parent">
            <LinearLayout
                android:orientation="vertical"
                android:layout_weight="5"
                android:layout_width="0dp"
                android:layout_height="match_parent">
                <TextView
                    android:id="@+id/userName"
                    android:textSize="28sp"
                    android:layout_width="match_parent"
                    android:layout_height="40dp" />
                <TextView
                    android:id="@+id/userInfo"
                    android:textSize="20sp"
                    android:layout_width="match_parent"
                    android:layout_height="30dp" />
            </LinearLayout>
            <TextView
                android:id="@+id/deleteText"
                android:textSize="25sp"
                android:gravity="center"
                android:text="删除"
                android:layout_weight="1"
                android:layout_gravity="right"
                android:layout_width="0dp"
                android:layout_height="match_parent" />
        </LinearLayout>
    </LinearLayout>
</LinearLayout>