1.什么是路由钩子
beforeRouteEnter:在进入路由前执行beforeRouteLeave:在离开路由前执行
  export default {
    props: ['id'],
    name: "UserProfile",
    beforeRouteEnter: (to, from, next) => {
      console.log("准备进入个人信息页");
      next();
    },
    beforeRouteLeave: (to, from, next) => {
      console.log("准备离开个人信息页");
      next();
    }
  }
参数说明:
- to:路由将要跳转的路径信息
- from:路径跳转前的路径信息
-
next:路由的控制参数
- next() 跳入下一个页面
- next('/path') 改变路由的跳转方向,使其跳到另一个路由
- next(false) 返回原来的页面
- next((vm)=>{}) 仅在 beforeRouteEnter 中可用,vm 是组件实例
2.导入
注:npm不行就用cnpm,cnpm不行就用npm
npm install --save axios vue-axios
cnpm install
3.main.js中配置
1 // 安装异步通信工具
2 import axios from 'axios'
3 import VueAxios from 'vue-axios'
4
5 Vue.use(VueAxios, axios);
4.准备数据
在static文件夹中建立mock文件夹,在建立一个data.json文件
 1 {
 2   "name": "第一个Axios程序",
 3   "url": "https://www.cnblogs.com/zhihaospace/p/12078861.html",
 4   "page": 1,
 5   "isNonProfit": true,
 6   "address": {
 7     "street": "科大南区",
 8     "city": "安徽",
 9     "country": "中国"
10   },
11   "links": [
12     {
13       "name": "海恋天",
14       "url": "https://www.cnblogs.com/zhihaospace/"
15     },
16     {
17       "name": "Vue的组件",
18       "url": "https://www.cnblogs.com/zhihaospace/p/12078835.html"
19     },
20     {
21       "name": "Vue的双向绑定",
22       "url": "https://www.cnblogs.com/zhihaospace/p/12078708.html"
23     }
24   ]
25 }
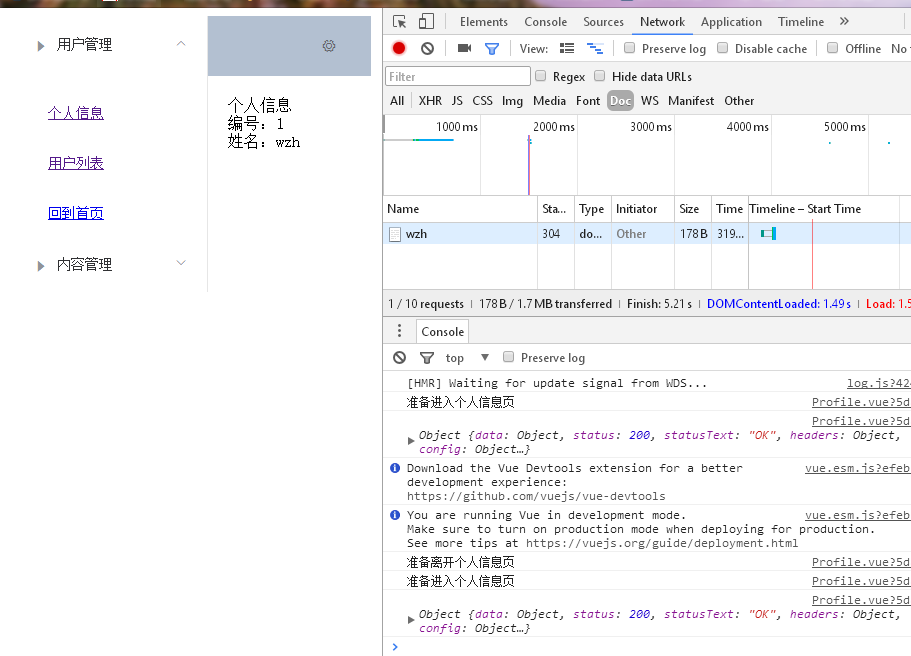
5.修改Profile.vue文件
 1 <template>
 2   <div>
 3     <div>个人信息</div>
 4     编号:{{$route.params.userId}}
 5     <br>
 6     姓名:{{$route.params.userName}}
 7   </div>
 8
 9 </template>
10
11 <script>
12
13   export default {
14     name: "UserProfile",
15     beforeRouteEnter: (to, from, next) => {
16       console.log("准备进入个人信息页");
17       // 注意,一定要在 next 中请求,因为该方法调用时 Vue 实例还没有创建,此时无法获取到 this 对象,在这里使用官方提供的回调函数拿到当前实例
18       next(vm => {
19         vm.getData();
20       });
21     },
22     beforeRouteLeave: (to, from, next) => {
23       console.log("准备离开个人信息页");
24       next();
25     },
26     methods: {
27       getData: function () {
28         this.axios({
29           method: 'get',
30           url: 'http://localhost:8080/static/mock/data.json'
31         }).then(function (repos) {
32           console.log(repos);
33         }).catch(function (error) {
34           console.log(error);
35         });
36       }
37     }
38   }
39 </script>
40
41
42 <style scoped>
43
44 </style>
展示:
