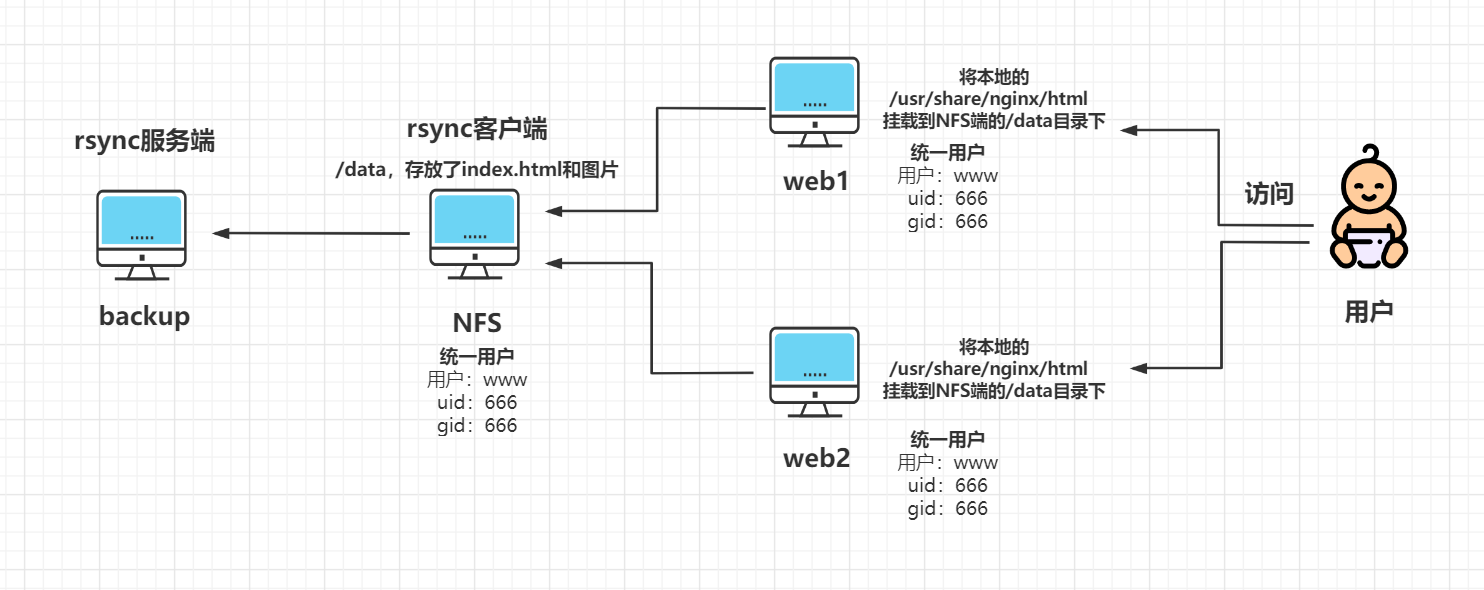
backup
用于备份nfs服务器中的/data目录,是rsync的服务端
#安装rsync
yum install rsync -y

#写配置文件(/etc/rsyncd.conf)
vim /etc/rsyncd.conf
uid = rsync
gid = rsync
port = 873
fake super = yes
use chroot = no
max connections = 200
timeout = 600
ignore errors
read only = false
list = false
auth users = baimo
secrets file = /etc/rsync.passwd
log file = /var/log/rsyncd.log

[backup]
comment = welcome to my backup!
path = /backup

#增加用户
[root@backup ~]# useradd rsync -s /sbin/nologin -M

#创建密码文件并授权
[root@backup ~]# echo "baimo:123" > /etc/rsync.passwd
[root@backup ~]# chmod -R 600 /etc/rsync.passwd

#创建备份目录并授权
[root@backup ~]# mkdir /backup
[root@backup ~]# chown -R rsync.rsync /backup

#启动服务并验证
[root@backup ~]# systemctl start rsyncd
[root@backup ~]#  netstat -lntp | grep 873
tcp        0      0 0.0.0.0:873             0.0.0.0:*               LISTEN      1812/rsync
tcp6       0      0 :::873                  :::*                    LISTEN      1812/rsync
nfs
用于存放共享的文件,通过inotify+rsync推送给backup,是rsync的服务端
#安装rsync
yum install rsync nfs-utils rpcbind -y

#编辑密码文件
[root@nfs ~]# echo "export RSYNC_PASSWORD=123" > /etc/profile.d/HJBL.sh
#重启客户端让文件生效

#创建/data目录并统一www用户
[root@nfs ~]# mkdir /data
[root@nfs ~]# groupadd www -g 666
[root@nfs ~]# useradd www -u 666 -g 666
[root@nfs ~]# chown -R www.www /data

#编写inotify脚本
#!/bin/bash
#实时推送备份文件脚本

export RSYNC_PASSWORD=123

dir=/data   #监控的文件
inotifywait -mrq --format '%Xe %w %f' -e create,modify,delete,attrib,close_write ${dir} | while read line; do rsync -avz /data baimo@192.168.15.41::backup; done &>/dev/null &

#测试
#nfs端
[root@nfs ~]# bash inotify_rsync.sh
[root@nfs ~]# cd /data && touch a.txt
#backup端
[root@backup ~]# cd /backup/
[root@backup backup]# ll
total 0
drwxr-xr-x 2 rsync rsync 32 Apr 21 19:37 data
[root@backup backup]# cd data/
[root@backup data]# ll
total 0
-rw-r--r-- 1 rsync rsync 0 Apr 21 19:34 1.txt
-rw-r--r-- 1 rsync rsync 0 Apr 21 19:37 a.txt
---------------------rsync配置结束,可以同步,下面是NFS---------------------

#编写配置(/etc/exports)
vim /etc/exports
/data 192.168.15.0/24(rw,sync,all_squash,anonuid=666,anongid=666)

#检查配置
[root@nfs ~]# systemctl restart nfs
[root@nfs ~]# cat /var/lib/nfs/etab
/data	192.168.15.0/24(rw,sync,wdelay,hide,nocrossmnt,secure,root_squash,all_squash,no_subtree_check,secure_locks,acl,no_pnfs,anonuid=666,anongid=666,sec=sys,rw,secure,root_squash,all_squash)
web01,web02
服务器,是NFS的客户端,两个操作一样
#配置nginx官方源
[root@web01 ~]# cat >/etc/yum.repos.d/nginx.repo<<EOF
[nginx-stable]
name=nginx stable repo
baseurl=http://nginx.org/packages/centos/7/$basearch/
gpgcheck=1
enabled=1
gpgkey=https://nginx.org/keys/nginx_signing.key
module_hotfixes=true
EOF
[root@web01 ~]# yum clean all && yum makecache

#安装nginx和nfs
yum install nginx nfs-utils rpcbind -y

#启动rpcbind和nfs
[root@web02 ~]# systemctl start rpcbind nfs

#查看挂载点
[root@web01 ~]# showmount -e 192.168.15.31
Export list for 192.168.15.31:
/data 192.168.15.0/24

#统一用户权限/
[root@web01 ~]# groupadd www -g 666
[root@web01 ~]# useradd www -u 666 -g 666
[root@web01 ~]# chown -R www.www /usr/share/nginx/html

#挂载
[root@web01 ~]# mount -t nfs 192.168.15.31:/data /usr/share/nginx/html

#检查挂载
[root@web02 ~]# df -h
Filesystem               Size  Used Avail Use% Mounted on
devtmpfs                 475M     0  475M   0% /dev
tmpfs                    487M     0  487M   0% /dev/shm
tmpfs                    487M  7.6M  479M   2% /run
tmpfs                    487M     0  487M   0% /sys/fs/cgroup
/dev/mapper/centos-root   99G  2.6G   97G   3% /
/dev/sda1               1014M  163M  852M  17% /boot
tmpfs                     98M     0   98M   0% /run/user/0
192.168.15.31:/data       99G  2.6G   97G   3% /usr/share/nginx/html

#测试权限是否满足
#拉取代码到/usr/share/nginx/html下,并解压
[root@web01 html]# unzip kaoshi.zip
Archive:  kaoshi.zip
  inflating: index.html
  inflating: info.php
  inflating: upload_file.php
[root@web01 html]# ll
total 16
-rw-r--r-- 1 www www 2633 May  4  2018 index.html
-rw-r--r-- 1 www www   52 May 10  2018 info.php
-rw-r--r-- 1 www www 2434 Apr 21 17:19 kaoshi.zip
-rw-r--r-- 1 www www 1192 Jan 10  2020 upload_file.php

#web02只需要重复上述步骤到挂载即可
访问并查看两个服务器
[root@web02 ~]# systemctl start nginx

