一般拿到这种需求想到可能存在几种方案:
方案一:直接贴图,图片和内容之间的衔接,需要注意
// sass文件
body{
    margin:0;
    padding:0;
    background: #efefef;
    .curves-wrapper{
      background:#fff;
      .curves-before{
        100%;
        img{
          100%;
          height:0.667rem;
        }
        position: relative;
        top:-0.667rem;
      }
      .curves{
        position: relative;
        top: -0.3rem;
        background: #FFFFFF;
        text-align: center;
      }
    }
    .curves-after{
      100%;
      img{
        100%;
        height:0.667rem;
      }
    }
}
在html中引入
<!DOCTYPE html>
<html lang="en">
<head>
  <meta charset="UTF-8">
  <meta name="viewport" content="width=device-width, initial-scale=1.0">
  <title>Document</title>
  <link rel="stylesheet" href="./curves.css">
</head>
<body>
  <div class="curves-wrapper">
    <div class="curves-before">
      <img src="./imgs/ct.png">
    </div>
    <div class="curves">
      YOUR CONTENT
    </div>
  </div>
    <div class="curves-after">
      <img src="./imgs/cb.png">
    </div>
</body>
</html>
效果展示如下:

方案二:纯css实现上下的弧度
scss文件 直接利用vscode中的live sass compiler编译一下即可
body{
    margin:0;
    padding:0;
    background: #efefef;
  .div-ani2 {
    position: relative;
    align-items: center;
    min-height: 9vw;
    background-color: rgb(27, 112, 240);
    overflow: hidden;
    margin-top:2vh;
    &:after {
        content: "";
        position: absolute;
        left: 50%;
        min- 300vw;
        min-height: 300vw;
        background-color: #fff;
        animation-name: rotate;
        animation-iteration-count: infinite;
        animation-timing-function: linear;
    }
    &:after {
        bottom: -6vw;
        border-radius: 50%;
        transform: translate(-50%, -2%) rotateZ(180deg);
    }
  }
  .div-ani2-content{
    height:10vw;
    line-height:10vw;
    100vw;
    background-color: rgb(27, 112, 240);
    text-align:center;
}
  .div-ani2-bottom {
    position: relative;
    align-items: center;
    min-height: 9vw;
    background-color: rgb(27, 112, 240);
    overflow: hidden;
    margin-bottom:2vh;
    &:before {
        content: "";
        position: absolute;
        left: 50%;
        top: 72%;
        min- 300vw;
        min-height: 300vw;
        background-color: #fff;
        animation-name: rotate;
        animation-iteration-count: infinite;
        animation-timing-function: linear;
    }
    &:before {
        bottom: 12vh;
        border-radius: 50%;
        transform: translate(-50%, -2%) rotateZ(180deg);
    }
  }
  // 原理即整个圆形定位在不同位置,overflow:hidden
  .div-ani3 {
    margin-top:90vw;
    position: relative;
    align-items: center;
    min-height: 15vh;
    background-color: #f01b5a;
    30vw;
    margin-left:35vw;
    margin-bottom:20vw;

    &:after {
        content: "";
        position: absolute;
        left: 50%;
        min- 100vw;
        min-height: 100vw;
        background-color: #f16369;
        animation-name: rotate;
        animation-iteration-count: infinite;
        animation-timing-function: linear;
    }
    &:after {
        bottom: 1vh;
        border-radius: 50%;
        transform: translate(-50%, -2%) rotateZ(180deg);
    }
  }
}
直接在html中引入
<!DOCTYPE html>
<html lang="en">
<head>
  <meta charset="UTF-8">
  <meta name="viewport" content="width=device-width, initial-scale=1.0">
  <title>Document</title>
  <link rel="stylesheet" href="./curves.css">
</head>
<body>
  <div class="div-ani2"></div>
  <div class="div-ani2-content">
    your content
  </div>
  <div class="div-ani2-bottom"></div>
  <div class="div-ani3">
  </div>
</body>
</html>
效果图如下:

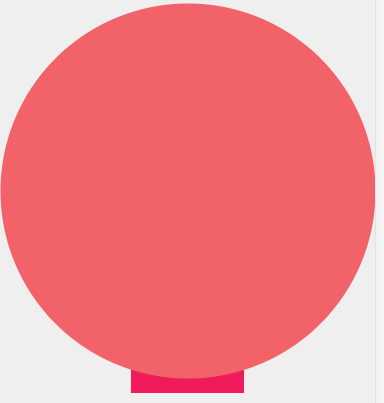
纯css实现的原理即是,设置一个超级大的圆形,只显示其中的一小部分;将全部内容展示出来就了解其原理了
// html
  <div class="div-ani3"></div>

// sass 原理即整个圆形定位在不同位置,overflow:hidden
  .div-ani3 {
    margin-top:90vw;
    position: relative;
    align-items: center;
    min-height: 15vh;
    background-color: #f01b5a;
    30vw;
    margin-left:35vw;
    margin-bottom:20vw;

    &:after {
        content: "";
        position: absolute;
        left: 50%;
        min- 100vw;
        min-height: 100vw;
        background-color: #f16369;
        animation-name: rotate;
        animation-iteration-count: infinite;
        animation-timing-function: linear;
    }
    &:after {
        bottom: 1vh;
        border-radius: 50%;
        transform: translate(-50%, -2%) rotateZ(180deg);
    }
  }
展示图:

其中下面哪个小部分既是我们要的效果图:
参考文章地址:https://www.cnblogs.com/coco1s/archive/2017/07/18/7197662.html