本博文的主要内容有
.HBase的单机模式(1节点)安装
.HBase的单机模式(1节点)的启动
.HBase的伪分布模式(1节点)安装
.HBase的伪分布模式(1节点)的启动
.HBase的分布模式(3、5节点)安装
.HBase的分布模式(3、5节点)的启动
见博客: HBase HA的分布式集群部署
.HBase环境搭建60010端口无法访问问题解决方案
------------- 注意 HBase1.X版本之后,没60010了。 -------------
参考:http://blog.csdn.net/tian_li/article/details/50601210
.进入HBase Shell
.为什么在HBase,需要使用zookeeper?
.关于HBase的更多技术细节,强烈必多看
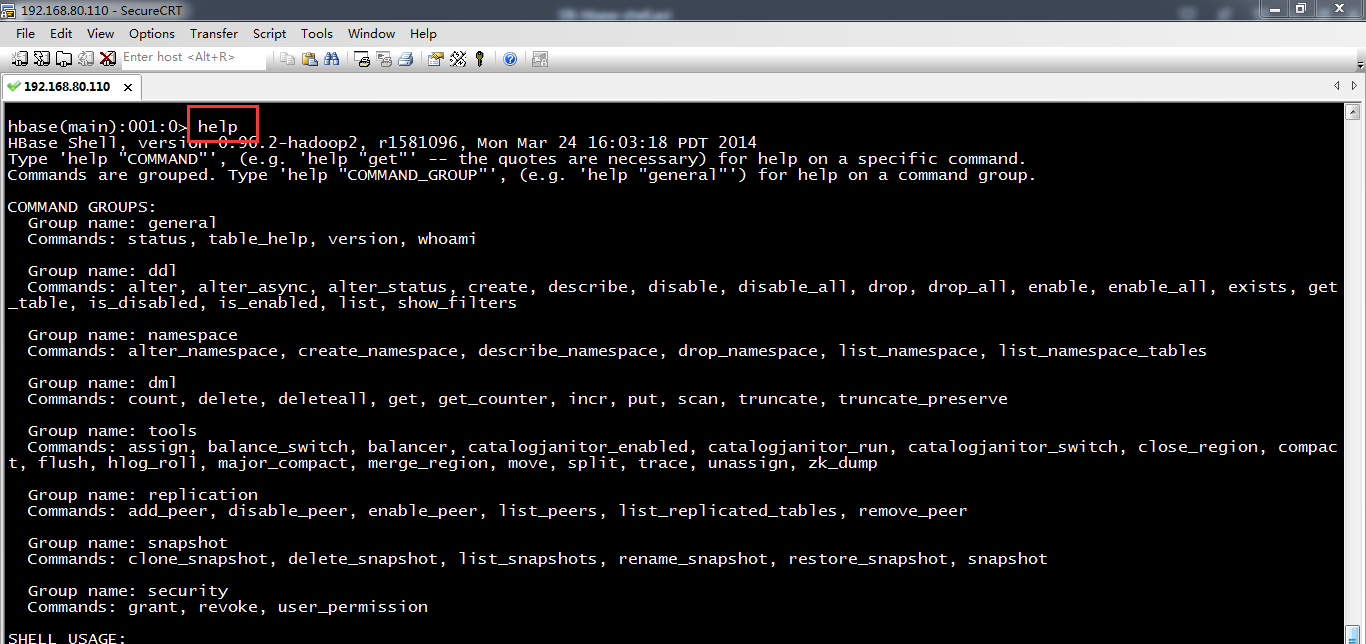
.获取命令列表:help帮助命令
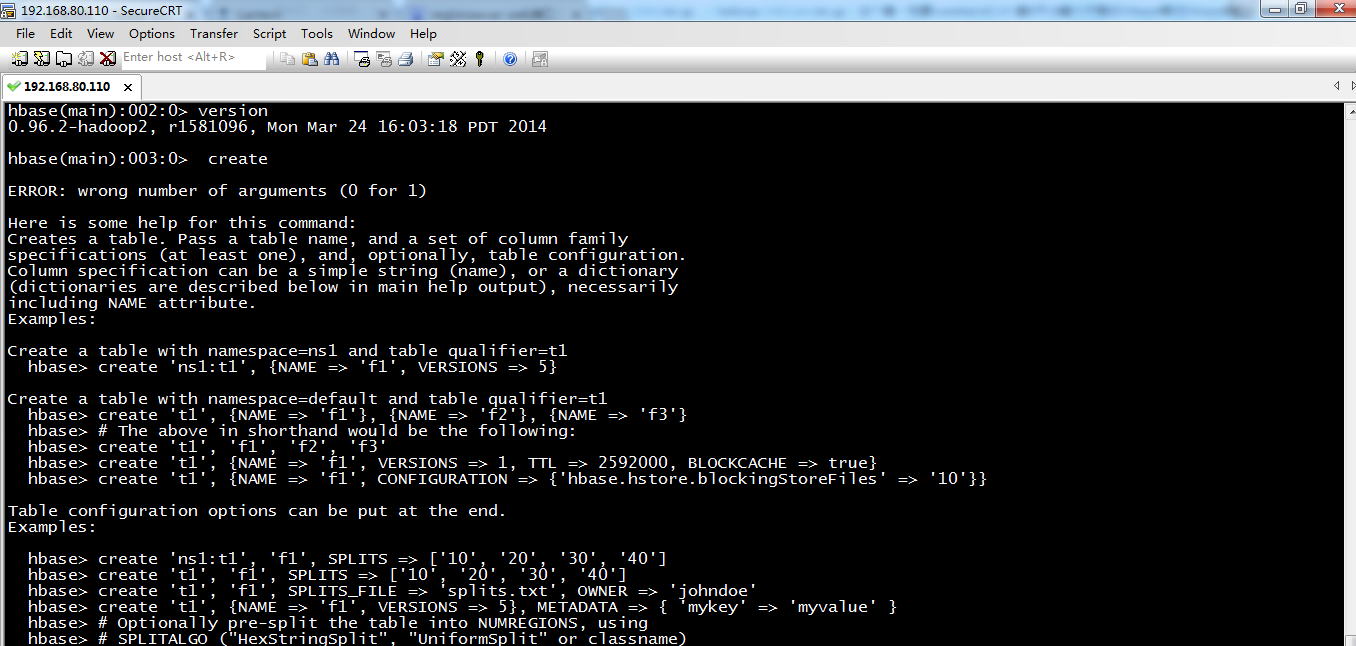
.创建表:create命令
.向表中加入行:put命令
.从表中检索行:get命令
.读取多行:scan命令
.统计表中的行数:count命令
.删除行:delete命令
.清空表:truncate命令
.删除表:drop命令
.更换表 :alter命令
想说的是,
HBase的安装包里面有自带zookeeper的。很多系统部署也是直接启动上面的zookeeper。 本来也是没有问题的,想想吧,系统里也只有hbase在用zookeeper。
先启动zookeeper,再将hbase起来就好了 。
但是今天遇到了一个很蛋疼的问题。和同事争论了很久。  因为我们是好多hbase集群共用一个zookeeper的,其中一个集群需要从hbase 0.90.2 升级到hbase 0.92上,自然,包也要更新。
但是其中一台regionserver上面同时也有跑zookeeper,而zookeeper还是用hbase 0.90.2 自带的zookeeper在跑。
现在好了,升级一个regionserver,连着zookeeper也要受到牵连,看来必须要重启,不然,jar包替换掉,可能会影响到zk正在跑的经常。
但是重启zk毕竟对正在连接这个zk的client端会有短暂的影响。
真是蛋疼。本来只是升级hbase,zk却强耦合了。
虽然后来证明zookeeper只要启动了,哪怕jar包删除也不会影响到正在跑的zk进程,但是这样的不规范带来的风险,实在是没有必要。
 所以作为运维,我强烈建议zk 和hbase分开部署,就直接部署官方的zk 好了,因为zk本身就是一个独立的服务,没有必要和hbase 耦合在一起。
在分布式的系统部署上面,一个角色就用一个专门的文件夹管理,不要用同一个目录下,这样子真的容易出问题。
当然datanode和tasktracker另当别论,他们本身关系密切。
当然,这里,我是玩的单节点的集群,来安装HBase而已,只是来玩玩。所以,完全,只需用HBase的安装包里自带的zookeeper就好了。
除非,是多节点的分布式集群,最好用外部的zookeeper。
HDFS的版本,不同,HBase里的内部也不一样。

http://hbase.apache.org/
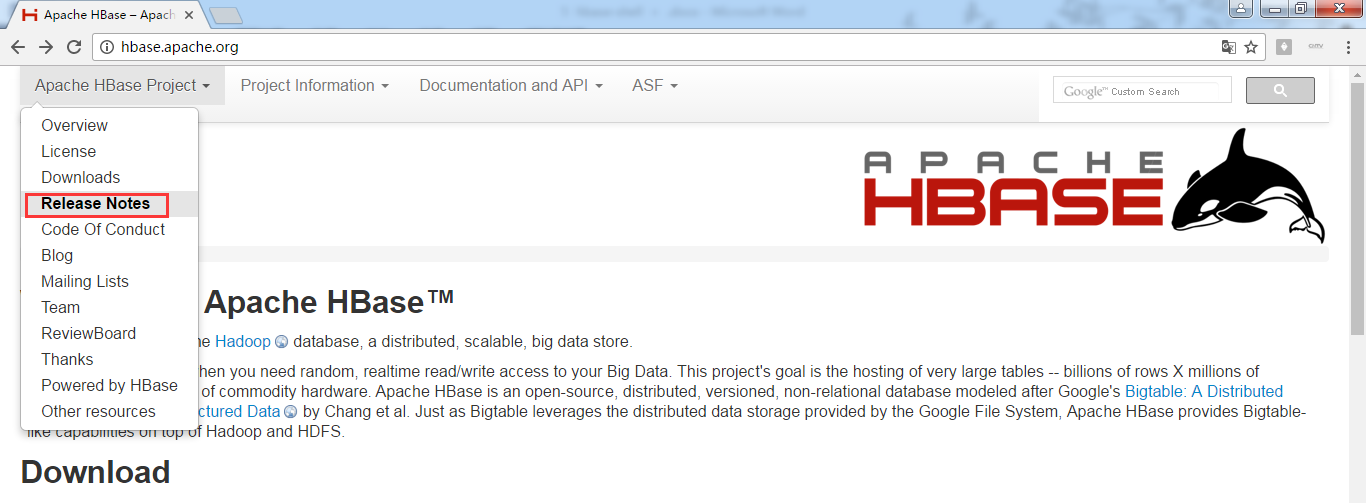
https://issues.apache.org/jira/browse/HBASE/?selectedTab=com.atlassian.jira.jira-projects-plugin:summary-panel

.HBase的单机模式安装

[hadoop@weekend110 app]$ ls
hadoop-2.4.1 hbase-0.96.2-hadoop2 hive-0.12.0 jdk1.7.0_65
[hadoop@weekend110 app]$ cd hbase-0.96.2-hadoop2/
[hadoop@weekend110 hbase-0.96.2-hadoop2]$ ls
bin CHANGES.txt conf docs hbase-webapps lib LICENSE.txt logs NOTICE.txt README.txt
[hadoop@weekend110 hbase-0.96.2-hadoop2]$ cd conf/
[hadoop@weekend110 conf]$ ls
hadoop-metrics2-hbase.properties hbase-env.cmd hbase-env.sh hbase-policy.xml hbase-site.xml log4j.properties regionservers
[hadoop@weekend110 conf]$ vim hbase-env.sh
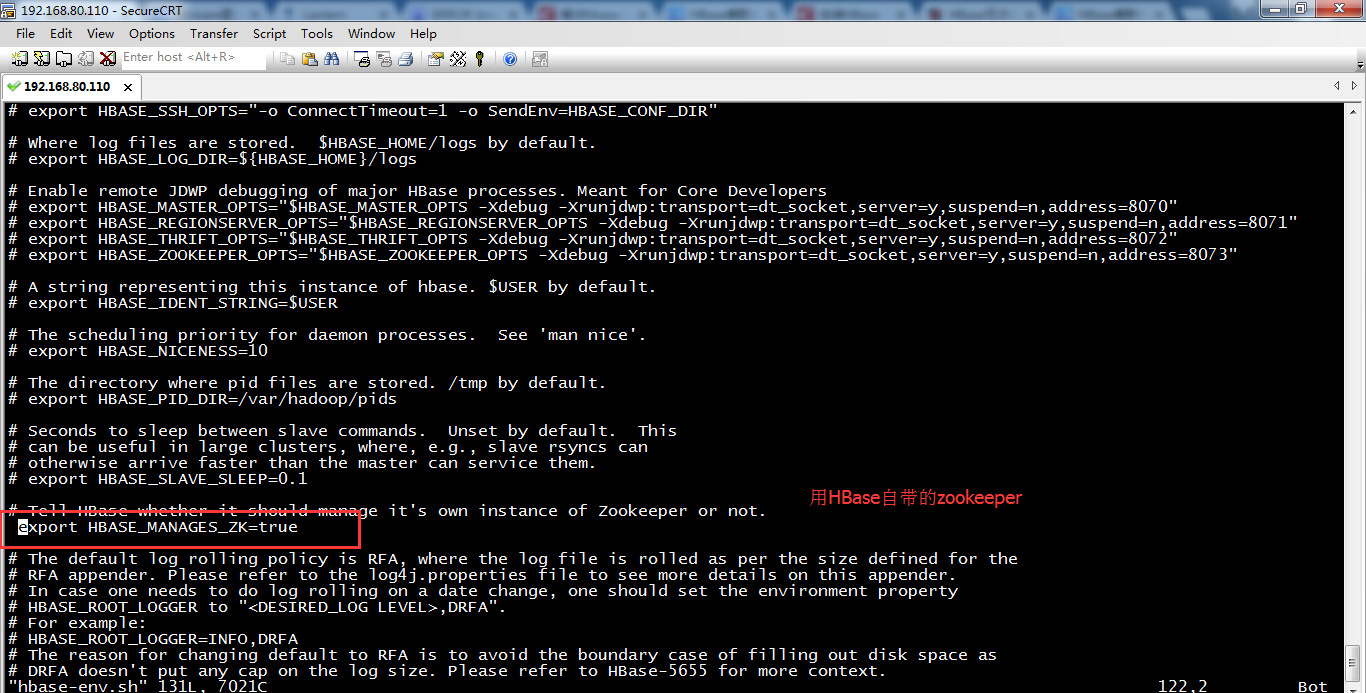
# Tell HBase whether it should manage it's own instance of Zookeeper or not.
export HBASE_MANAGES_ZK=true
设HBASE_MANAGES_ZK=true,在启动HBase时,HBase把Zookeeper作为自身的一部分运行。
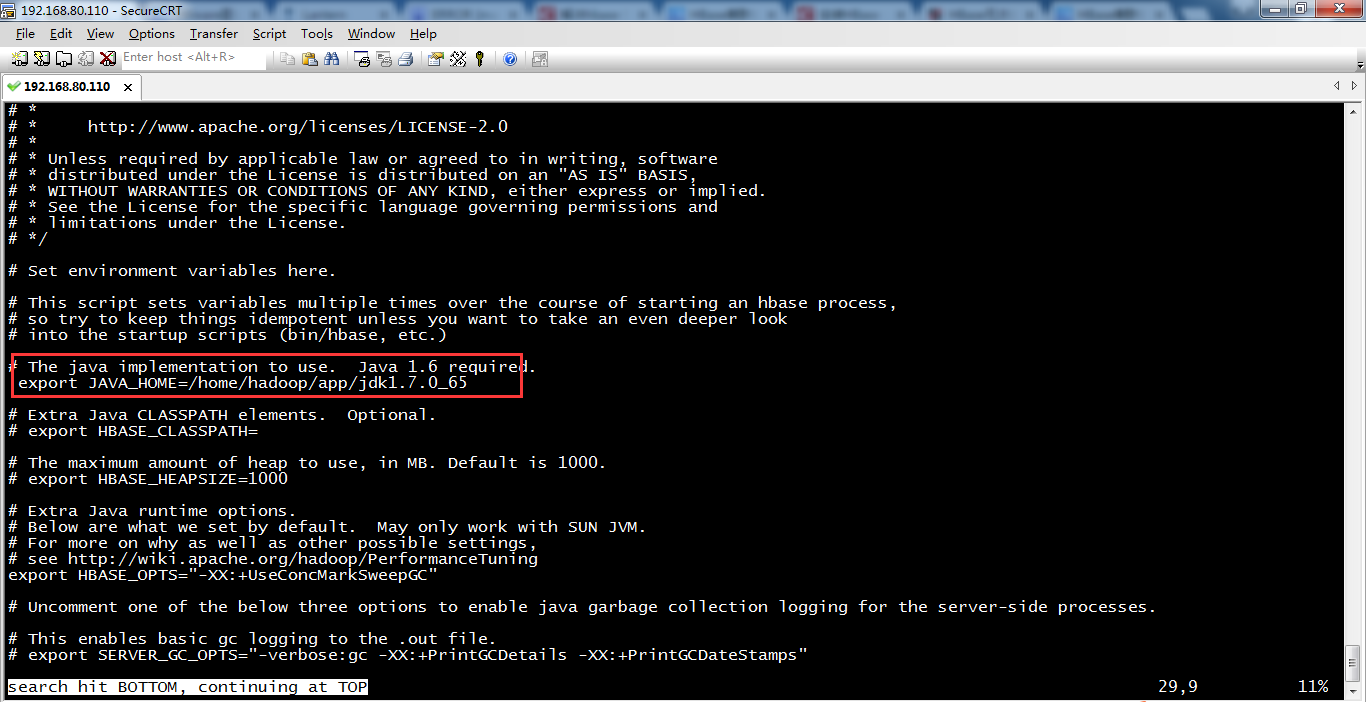
export JAVA_HOME=/home/hadoop/app/jdk1.7.0_65

[hadoop@weekend110 conf]$ ls
hadoop-metrics2-hbase.properties hbase-env.cmd hbase-env.sh hbase-policy.xml hbase-site.xml log4j.properties regionservers
[hadoop@weekend110 conf]$ vim hbase-site.xml
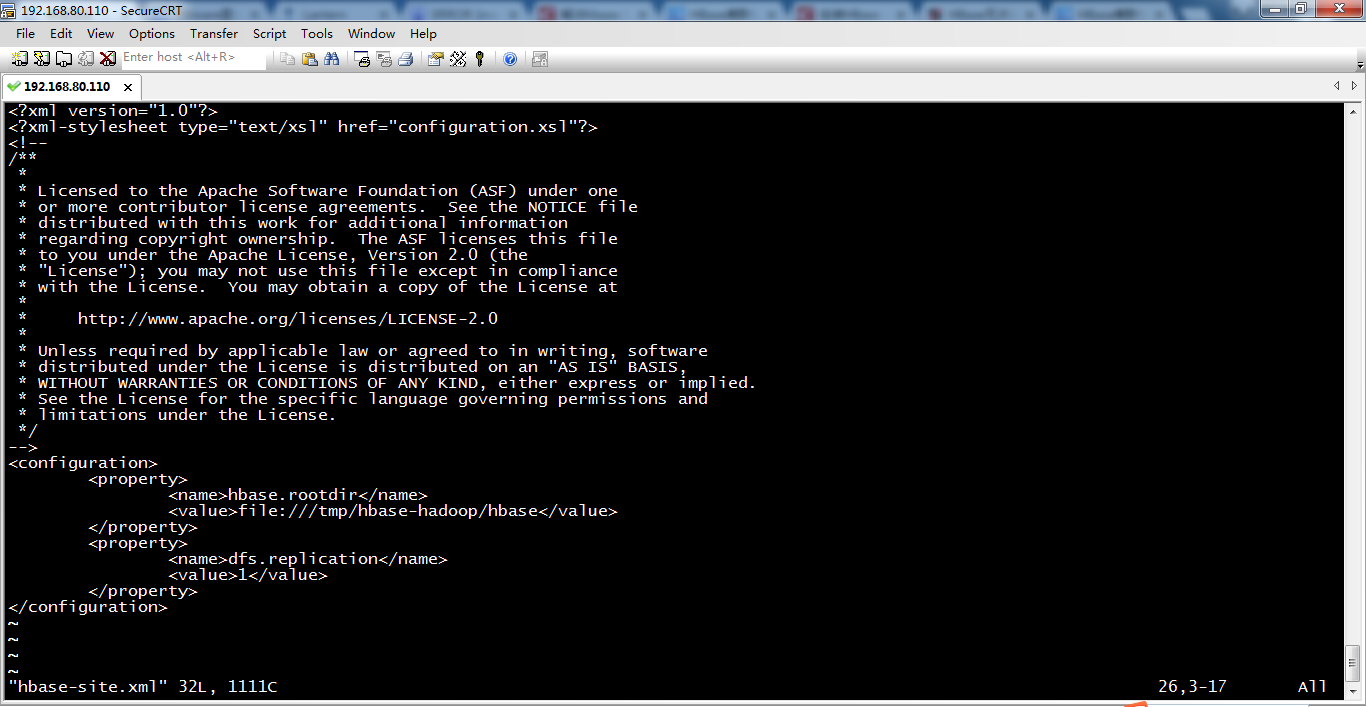
<configuration>
<property>
<name>hbase.rootdir</name>
<value>file:///tmp/hbase-hadoop/hbase</value>
</property>
<property>
<name>dfs.replication</name>
<value>1</value>
</property>
</configuration>
在这里,有些资料上说,file:///tmp/hbase-${user.name}/hbase
可以看到,默认情况下HBase的数据存储在根目录下的tmp文件夹下的。熟悉Linux的人知道,此文件夹为临时文件夹。也就是说,当系统重启的时候,此文件夹中的内容将被清空。这样用户保存在HBase中的数据也会丢失,这当然是用户不想看到的事情。因此,用户需要将HBase数据的存储位置修改为自己希望的存储位置。
比如,可以,/home/hadoop/data/hbase,当然,我这里,是因为,伪分布模式和分布式模式,都玩过了。方便,练习加强HBase的shell操作。而已,拿单机模式玩玩。
.HBase的单机模式的启动
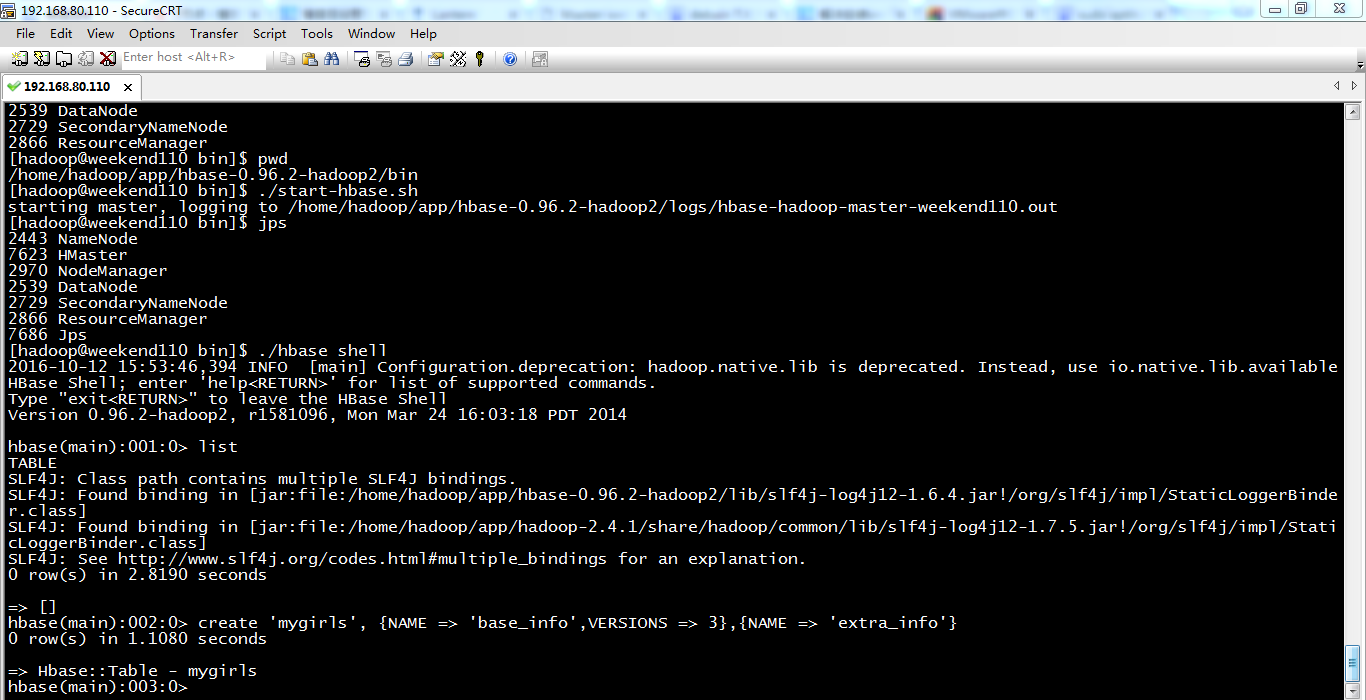
总结就是:先启动hadoop集群的进程,再启动hbase的进程
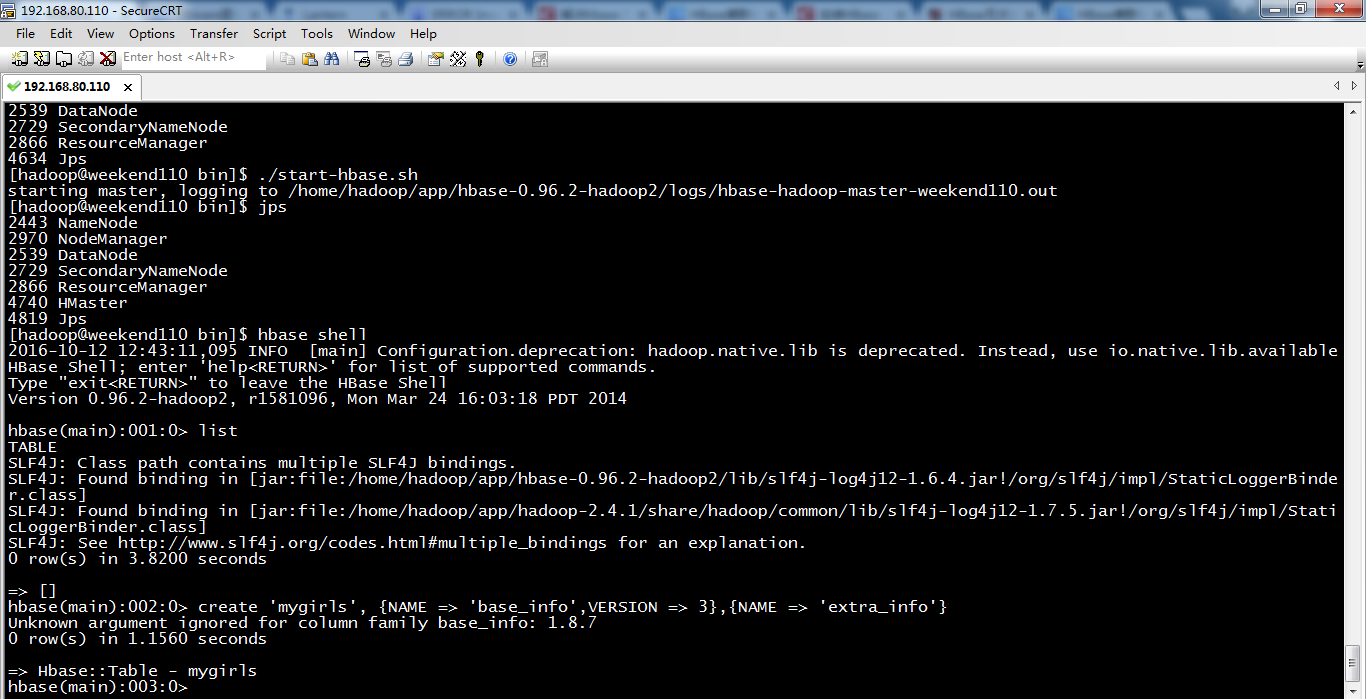
[hadoop@weekend110 hbase-0.96.2-hadoop2]$ cd bin
[hadoop@weekend110 bin]$ ls
get-active-master.rb hbase-common.sh hbase-jruby region_mover.rb start-hbase.cmd thread-pool.rb
graceful_stop.sh hbase-config.cmd hirb.rb regionservers.sh start-hbase.sh zookeepers.sh
hbase hbase-config.sh local-master-backup.sh region_status.rb stop-hbase.cmd
hbase-cleanup.sh hbase-daemon.sh local-regionservers.sh replication stop-hbase.sh
hbase.cmd hbase-daemons.sh master-backup.sh rolling-restart.sh test
[hadoop@weekend110 bin]$ jps
2443 NameNode
2970 NodeManager
2539 DataNode
2729 SecondaryNameNode
2866 ResourceManager
4634 Jps
[hadoop@weekend110 bin]$ ./start-hbase.sh
starting master, logging to /home/hadoop/app/hbase-0.96.2-hadoop2/logs/hbase-hadoop-master-weekend110.out
[hadoop@weekend110 bin]$ jps
2443 NameNode
2970 NodeManager
2539 DataNode
2729 SecondaryNameNode
2866 ResourceManager
4740 HMaster
4819 Jps
[hadoop@weekend110 bin]$ hbase shell
2016-10-12 12:43:11,095 INFO [main] Configuration.deprecation: hadoop.native.lib is deprecated. Instead, use io.native.lib.available
HBase Shell; enter 'help<RETURN>' for list of supported commands.
Type "exit<RETURN>" to leave the HBase Shell
Version 0.96.2-hadoop2, r1581096, Mon Mar 24 16:03:18 PDT 2014
hbase(main):001:0> list
TABLE
SLF4J: Class path contains multiple SLF4J bindings.
SLF4J: Found binding in [jar:file:/home/hadoop/app/hbase-0.96.2-hadoop2/lib/slf4j-log4j12-1.6.4.jar!/org/slf4j/impl/StaticLoggerBinder.class]
SLF4J: Found binding in [jar:file:/home/hadoop/app/hadoop-2.4.1/share/hadoop/common/lib/slf4j-log4j12-1.7.5.jar!/org/slf4j/impl/StaticLoggerBinder.class]
SLF4J: See http://www.slf4j.org/codes.html#multiple_bindings for an explanation.
0 row(s) in 3.8200 seconds
=> []
hbase(main):002:0> create 'mygirls', {NAME => 'base_info',VERSION => 3},{NAME => 'extra_info'}
Unknown argument ignored for column family base_info: 1.8.7
0 row(s) in 1.1560 seconds
=> Hbase::Table - mygirls
hbase(main):003:0>
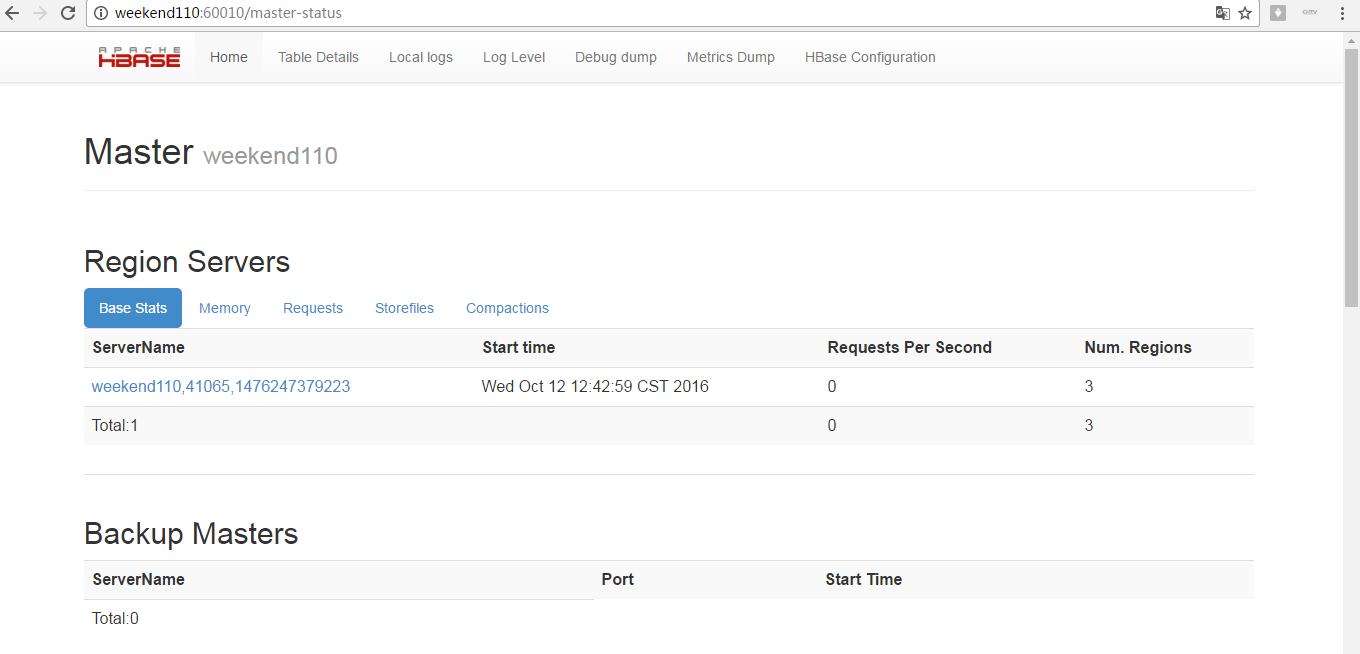
测试
http://weekend110:60010/
.HBase的伪分布模式(1节点)安装
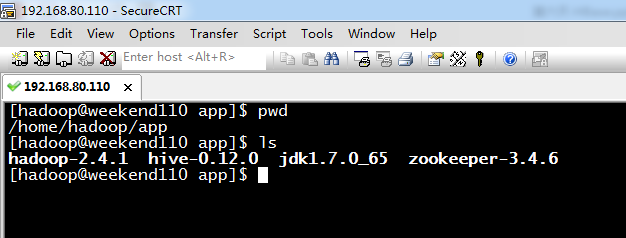
1、 hbase-0.96.2-hadoop2-bin.tar.gz压缩包的上传
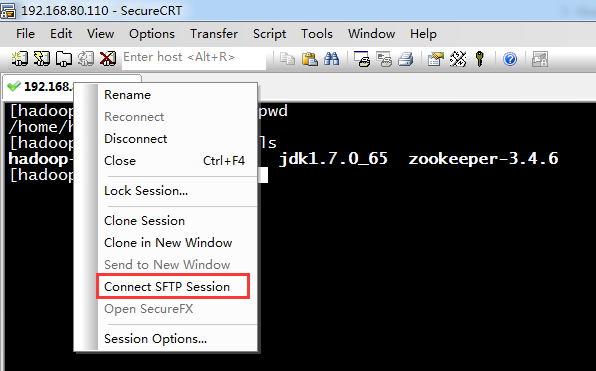


sftp> cd /home/hadoop/app
sftp> put c:/hbase-0.96.2-hadoop2-bin.tar.gz
Uploading hbase-0.96.2-hadoop2-bin.tar.gz to /home/hadoop/app/hbase-0.96.2-hadoop2-bin.tar.gz
100% 77507KB 19376KB/s 00:00:04
c:/hbase-0.96.2-hadoop2-bin.tar.gz: 79367504 bytes transferred in 4 seconds (19376 KB/s)
sftp>

或者,通过

这里不多赘述。具体,可以看我的其他博客
2、 hbase-0.96.2-hadoop2-bin.tar.gz压缩包的解压

[hadoop@weekend110 app]$ ls
hadoop-2.4.1 hbase-0.96.2-hadoop2-bin.tar.gz hive-0.12.0 jdk1.7.0_65 zookeeper-3.4.6
[hadoop@weekend110 app]$ ll
total 77524
drwxr-xr-x. 11 hadoop hadoop 4096 Jul 18 20:11 hadoop-2.4.1
-rw-r--r--. 1 root root 79367504 May 20 13:51 hbase-0.96.2-hadoop2-bin.tar.gz
drwxrwxr-x. 10 hadoop hadoop 4096 Oct 10 21:30 hive-0.12.0
drwxr-xr-x. 8 hadoop hadoop 4096 Jun 17 2014 jdk1.7.0_65
drwxr-xr-x. 10 hadoop hadoop 4096 Jul 30 10:28 zookeeper-3.4.6
[hadoop@weekend110 app]$ tar -zxvf hbase-0.96.2-hadoop2-bin.tar.gz
3、删除压缩包hbase-0.96.2-hadoop2-bin.tar.gz
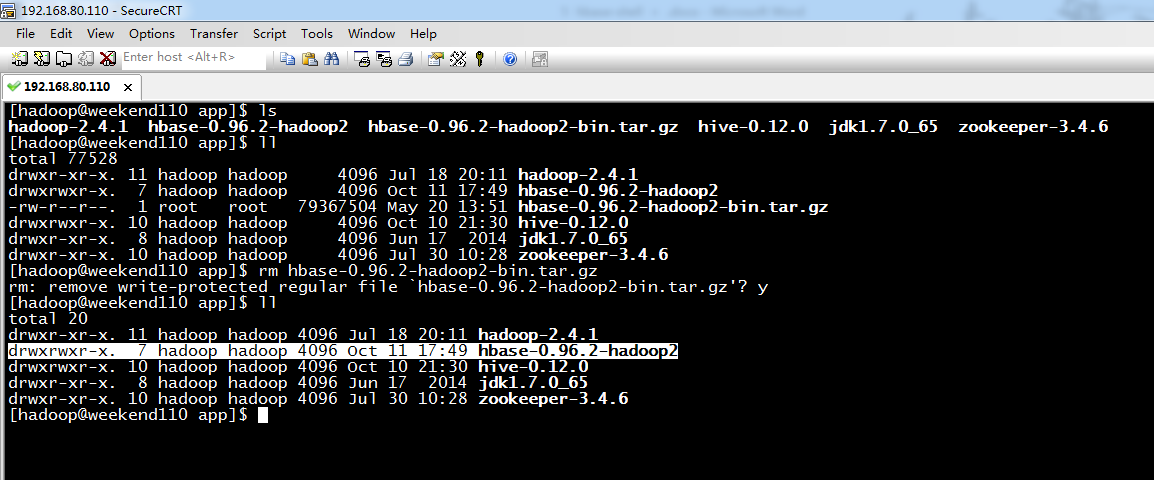
4、将HBase文件权限赋予给hadoop用户,这一步,不需。
5、HBase的配置

注意啦,在hbase-0.96.2-hadoop2的目录下,有hbase-webapps,即,说明,可以通过web网页来访问HBase。
[hadoop@weekend110 app]$ ls
hadoop-2.4.1 hbase-0.96.2-hadoop2 hive-0.12.0 jdk1.7.0_65 zookeeper-3.4.6
[hadoop@weekend110 app]$ cd hbase-0.96.2-hadoop2/
[hadoop@weekend110 hbase-0.96.2-hadoop2]$ ll
total 436
drwxr-xr-x. 4 hadoop hadoop 4096 Mar 25 2014 bin
-rw-r--r--. 1 hadoop hadoop 403242 Mar 25 2014 CHANGES.txt
drwxr-xr-x. 2 hadoop hadoop 4096 Mar 25 2014 conf
drwxr-xr-x. 27 hadoop hadoop 4096 Mar 25 2014 docs
drwxr-xr-x. 7 hadoop hadoop 4096 Mar 25 2014 hbase-webapps
drwxrwxr-x. 3 hadoop hadoop 4096 Oct 11 17:49 lib
-rw-r--r--. 1 hadoop hadoop 11358 Mar 25 2014 LICENSE.txt
-rw-r--r--. 1 hadoop hadoop 897 Mar 25 2014 NOTICE.txt
-rw-r--r--. 1 hadoop hadoop 1377 Mar 25 2014 README.txt
[hadoop@weekend110 hbase-0.96.2-hadoop2]$ cd conf/
[hadoop@weekend110 conf]$ ls
hadoop-metrics2-hbase.properties hbase-env.cmd hbase-env.sh hbase-policy.xml hbase-site.xml log4j.properties regionservers
[hadoop@weekend110 conf]$
对于,多节点里,安装HBase,这里不多说了。具体,可以看我的博客
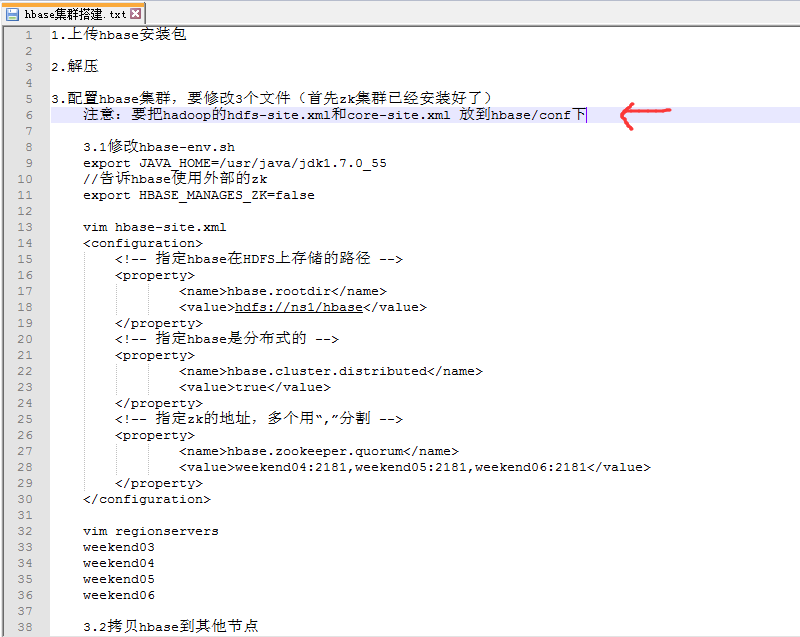
1.上传hbase安装包
2.解压
3.配置hbase集群,要修改3个文件(首先zk集群已经安装好了)
注意:要把hadoop的hdfs-site.xml和core-site.xml 放到hbase/conf下
3.1修改hbase-env.sh
export JAVA_HOME=/usr/java/jdk1.7.0_55
//告诉hbase使用外部的zk
export HBASE_MANAGES_ZK=false
vim hbase-site.xml
<configuration>
<!-- 指定hbase在HDFS上存储的路径 -->
<property>
<name>hbase.rootdir</name>
<value>hdfs://ns1/hbase</value>
</property>
<!-- 指定hbase是分布式的 -->
<property>
<name>hbase.cluster.distributed</name>
<value>true</value>
</property>
<!-- 指定zk的地址,多个用“,”分割 -->
<property>
<name>hbase.zookeeper.quorum</name>
<value>weekend04:2181,weekend05:2181,weekend06:2181</value>
</property>
</configuration>
vim regionservers
weekend03
weekend04
weekend05
weekend06
3.2拷贝hbase到其他节点
scp -r /weekend/hbase-0.96.2-hadoop2/ weekend02:/weekend/
scp -r /weekend/hbase-0.96.2-hadoop2/ weekend03:/weekend/
scp -r /weekend/hbase-0.96.2-hadoop2/ weekend04:/weekend/
scp -r /weekend/hbase-0.96.2-hadoop2/ weekend05:/weekend/
scp -r /weekend/hbase-0.96.2-hadoop2/ weekend06:/weekend/
4.将配置好的HBase拷贝到每一个节点并同步时间。
5.启动所有的hbase
分别启动zk
./zkServer.sh start
启动hbase集群
start-dfs.sh
启动hbase,在主节点上运行:
start-hbase.sh
6.通过浏览器访问hbase管理页面
192.168.1.201:60010
7.为保证集群的可靠性,要启动多个HMaster
hbase-daemon.sh start master
我这里,因,考虑到自己玩玩,伪分布集群里安装HBase。
hbase-env.sh

[hadoop@weekend110 conf]$ ls
hadoop-metrics2-hbase.properties hbase-env.cmd hbase-env.sh hbase-policy.xml hbase-site.xml log4j.properties regionservers
[hadoop@weekend110 conf]$ vim hbase-env.sh

/home/hadoop/app/jdk1.7.0_65
单节点的hbase-env.sh,需要修改2处。
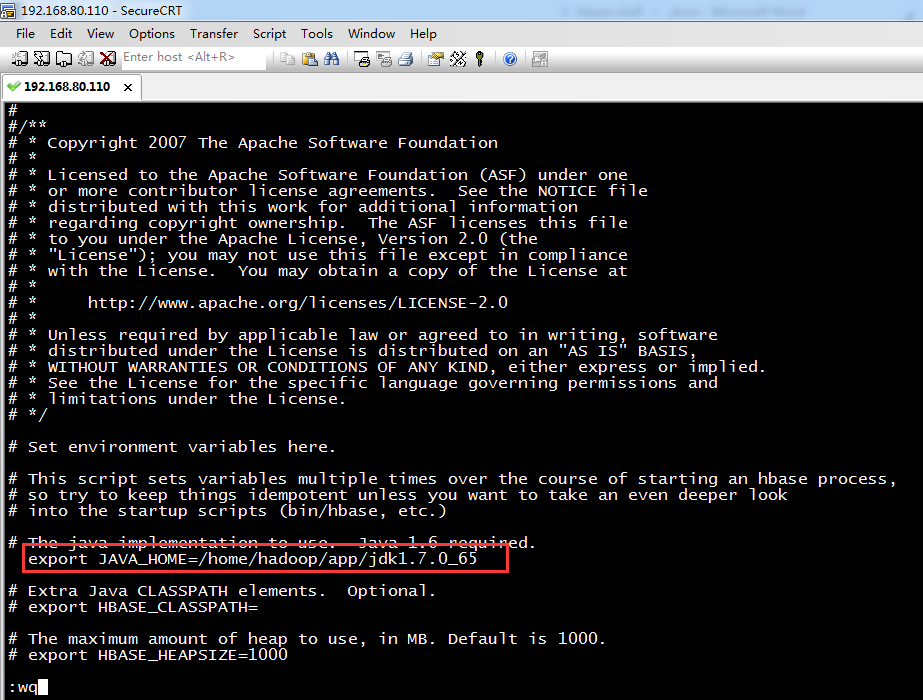
export JAVA_HOME=/home/hadoop/app/jdk1.7.0_65
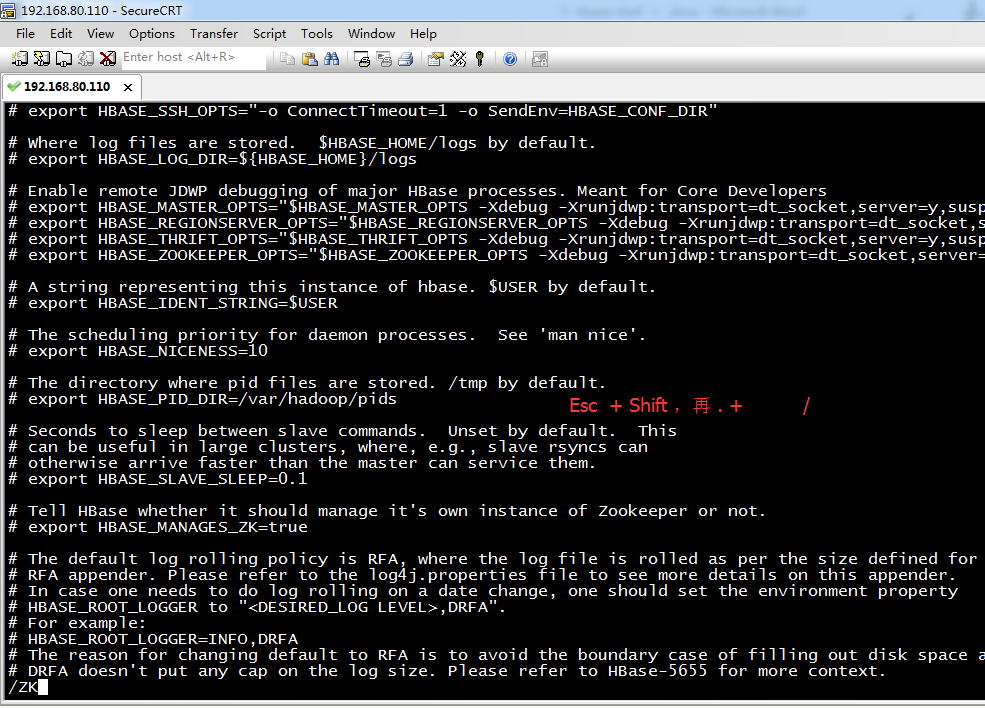
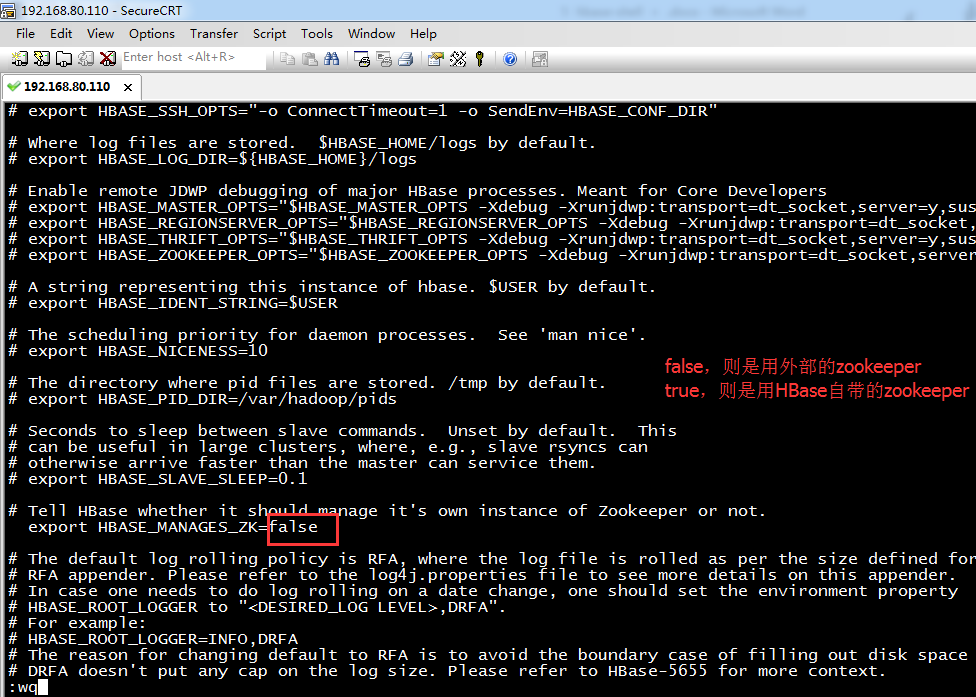
export HBASE_MANAGES_ZK=false
.为什么在HBase,需要使用zookeeper?
大家,很多人,都有一个疑问,为什么在HBase,需要使用zookeeper?至于为什么最好使用外部安装的zookeeper,而不是HBase自带的zookeeper,这里,我实在是不多赘述了。
zookeeper存储的是HBase中ROOT表和META表的位置。此外,zookeeper还负责监控多个机器的状态(每台机器到zookeeper中注册一个实例)。当某台机器发生故障时
,zookeeper会第一时间感知到,并通知HBase Master进行相应的处理。同时,当HBase Master发生故障的时候,zookeeper还负责HBase Master的恢复工作,能够保证还在同一时刻系统中只有一台HBase Master提供服务。
具体例子,见
HBase HA的分布式集群部署 的最低端。

hbase-site.xml

[hadoop@weekend110 conf]$ ls
hadoop-metrics2-hbase.properties hbase-env.cmd hbase-env.sh hbase-policy.xml hbase-site.xml log4j.properties regionservers
[hadoop@weekend110 conf]$ vim hbase-site.xml
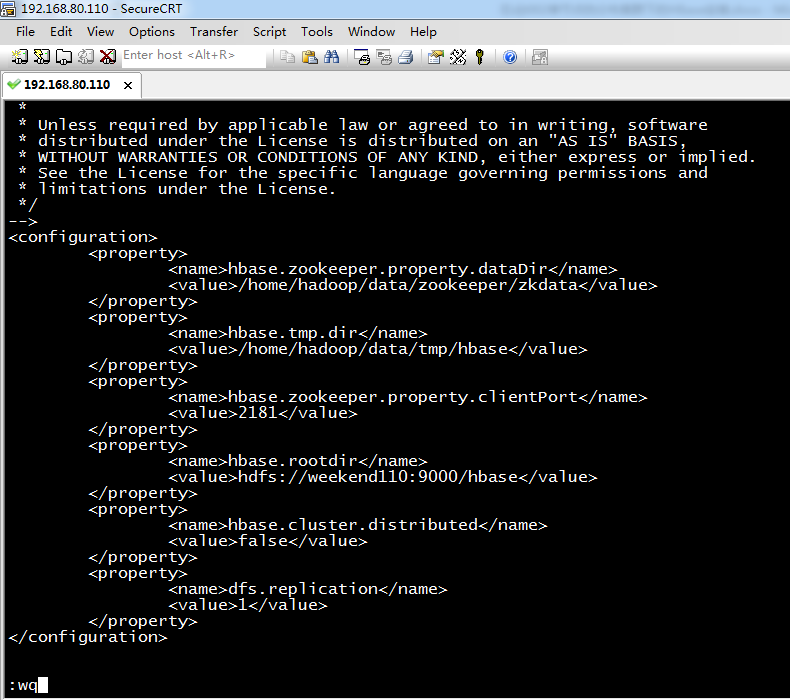
<configuration>
<property>
<name>hbase.zookeeper.property.dataDir</name>
<value>/home/hadoop/data/zookeeper/zkdata</value>
</property>
<property>
<name>hbase.tmp.dir</name>
<value>/home/hadoop/data/tmp/hbase</value>
</property>
<property>
<name>hbase.zookeeper.property.clientPort</name>
<value>2181</value>
</property>
<property>
<name>hbase.rootdir</name>
<value>hdfs://weekend110:9000/hbase</value>
</property>
<property>
<name>hbase.cluster.distributed</name>
<value>false</value>
</property>
<property>
<name>dfs.replication</name>
<value>1</value>
</property>
</configuration>
新建目录
/home/hadoop/data/zookeeper/zkdata
/home/hadoop/data/tmp/hbase

[hadoop@weekend110 conf]$ pwd
/home/hadoop/app/hbase-0.96.2-hadoop2/conf
[hadoop@weekend110 conf]$ mkdir -p /home/hadoop/data/zookeeper/zkdata
[hadoop@weekend110 conf]$ mkdir -p /home/hadoop/data/tmp/hbase
[hadoop@weekend110 conf]$
regionservers

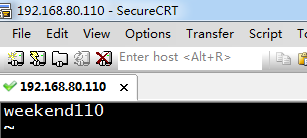
weekend110

[hadoop@weekend110 conf]$ ls
hadoop-metrics2-hbase.properties hbase-env.cmd hbase-env.sh hbase-policy.xml hbase-site.xml log4j.properties regionservers
[hadoop@weekend110 conf]$ cp /home/hadoop/app/hadoop-2.4.1/etc/hadoop/{core-site.xml,hdfs-site.xml} ./
[hadoop@weekend110 conf]$ ls
core-site.xml hbase-env.cmd hbase-policy.xml hdfs-site.xml regionservers
hadoop-metrics2-hbase.properties hbase-env.sh hbase-site.xml log4j.properties
[hadoop@weekend110 conf]$
vi /etc/profile

[hadoop@weekend110 conf]$ su root
Password:
[root@weekend110 conf]# vim /etc/profile
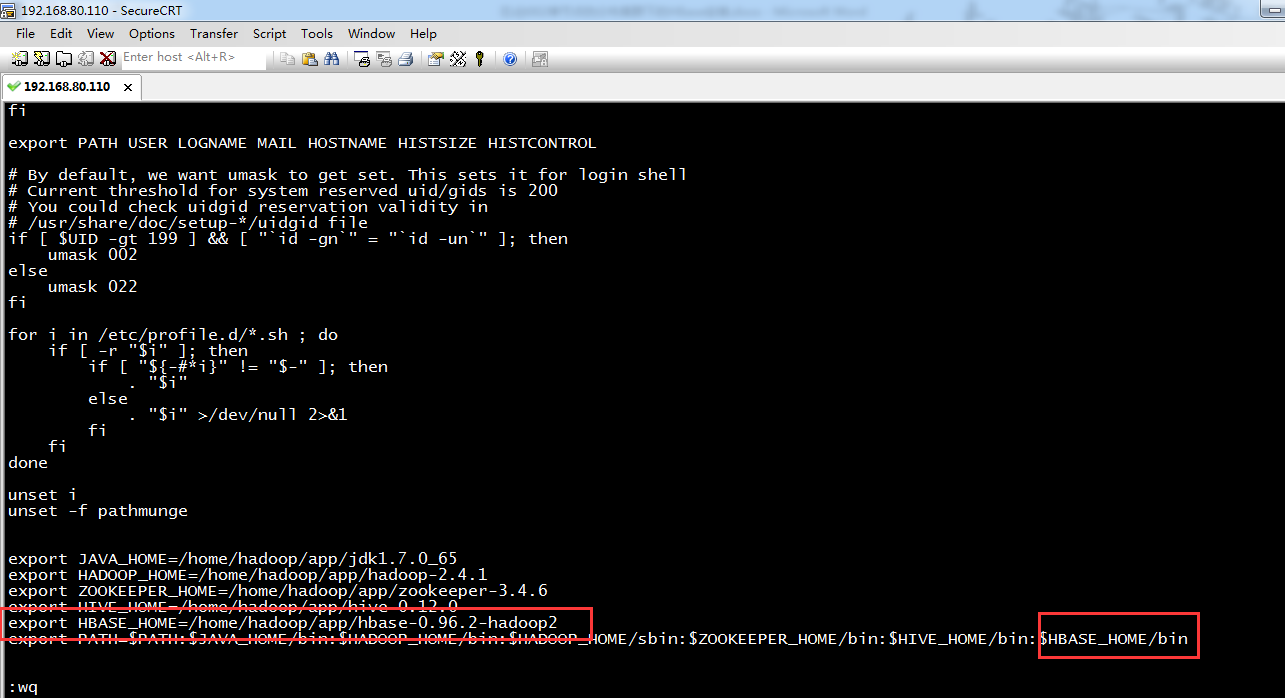
export JAVA_HOME=/home/hadoop/app/jdk1.7.0_65
export HADOOP_HOME=/home/hadoop/app/hadoop-2.4.1
export ZOOKEEPER_HOME=/home/hadoop/app/zookeeper-3.4.6
export HIVE_HOME=/home/hadoop/app/hive-0.12.0
export HBASE_HOME=/home/hadoop/app/hbase-0.96.2-hadoop2
export PATH=$PATH:$JAVA_HOME/bin:$HADOOP_HOME/bin:$HADOOP_HOME/sbin:$ZOOKEEPER_HOME/bin:$HIVE_HOME/bin:$HBASE_HOME/bin

[root@weekend110 conf]# source /etc/profile
[root@weekend110 conf]# su hadoop

.HBase的伪分布模式的启动
由于伪分布模式的运行基于HDFS,因此在运行HBase之前首先需要启动HDFS,
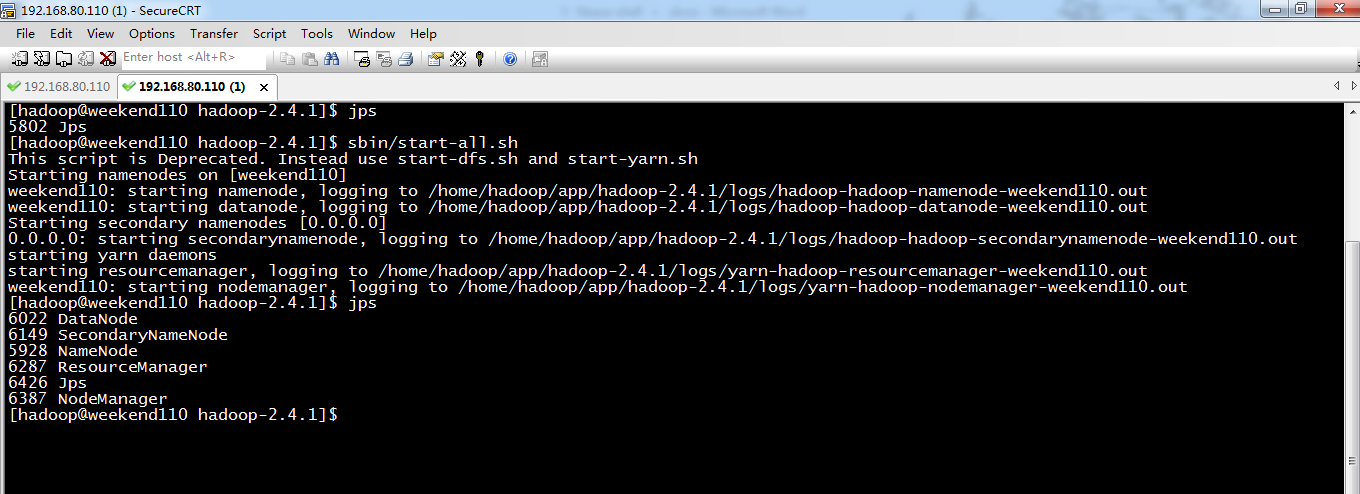
[hadoop@weekend110 hadoop-2.4.1]$ jps
5802 Jps
[hadoop@weekend110 hadoop-2.4.1]$ sbin/start-all.sh
This script is Deprecated. Instead use start-dfs.sh and start-yarn.sh
Starting namenodes on [weekend110]
weekend110: starting namenode, logging to /home/hadoop/app/hadoop-2.4.1/logs/hadoop-hadoop-namenode-weekend110.out
weekend110: starting datanode, logging to /home/hadoop/app/hadoop-2.4.1/logs/hadoop-hadoop-datanode-weekend110.out
Starting secondary namenodes [0.0.0.0]
0.0.0.0: starting secondarynamenode, logging to /home/hadoop/app/hadoop-2.4.1/logs/hadoop-hadoop-secondarynamenode-weekend110.out
starting yarn daemons
starting resourcemanager, logging to /home/hadoop/app/hadoop-2.4.1/logs/yarn-hadoop-resourcemanager-weekend110.out
weekend110: starting nodemanager, logging to /home/hadoop/app/hadoop-2.4.1/logs/yarn-hadoop-nodemanager-weekend110.out
[hadoop@weekend110 hadoop-2.4.1]$ jps
6022 DataNode
6149 SecondaryNameNode
5928 NameNode
6287 ResourceManager
6426 Jps
6387 NodeManager
[hadoop@weekend110 hadoop-2.4.1]$
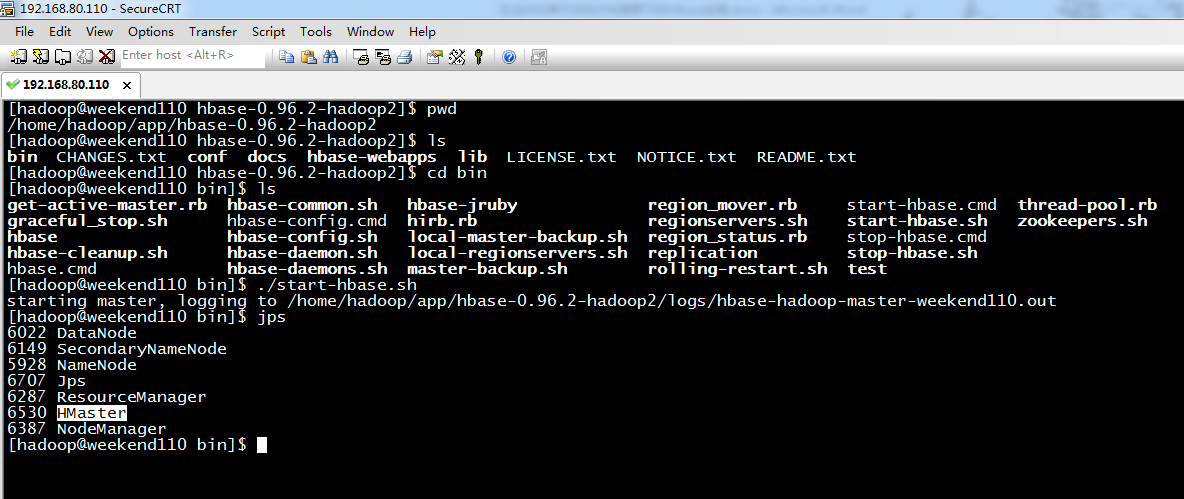
[hadoop@weekend110 hbase-0.96.2-hadoop2]$ pwd
/home/hadoop/app/hbase-0.96.2-hadoop2
[hadoop@weekend110 hbase-0.96.2-hadoop2]$ ls
bin CHANGES.txt conf docs hbase-webapps lib LICENSE.txt NOTICE.txt README.txt
[hadoop@weekend110 hbase-0.96.2-hadoop2]$ cd bin
[hadoop@weekend110 bin]$ ls
get-active-master.rb hbase-common.sh hbase-jruby region_mover.rb start-hbase.cmd thread-pool.rb
graceful_stop.sh hbase-config.cmd hirb.rb regionservers.sh start-hbase.sh zookeepers.sh
hbase hbase-config.sh local-master-backup.sh region_status.rb stop-hbase.cmd
hbase-cleanup.sh hbase-daemon.sh local-regionservers.sh replication stop-hbase.sh
hbase.cmd hbase-daemons.sh master-backup.sh rolling-restart.sh test
[hadoop@weekend110 bin]$ ./start-hbase.sh
starting master, logging to /home/hadoop/app/hbase-0.96.2-hadoop2/logs/hbase-hadoop-master-weekend110.out
[hadoop@weekend110 bin]$ jps
6022 DataNode
6149 SecondaryNameNode
5928 NameNode
6707 Jps
6287 ResourceManager
6530 HMaster
6387 NodeManager
[hadoop@weekend110 bin]$
http://weekend110:60010/
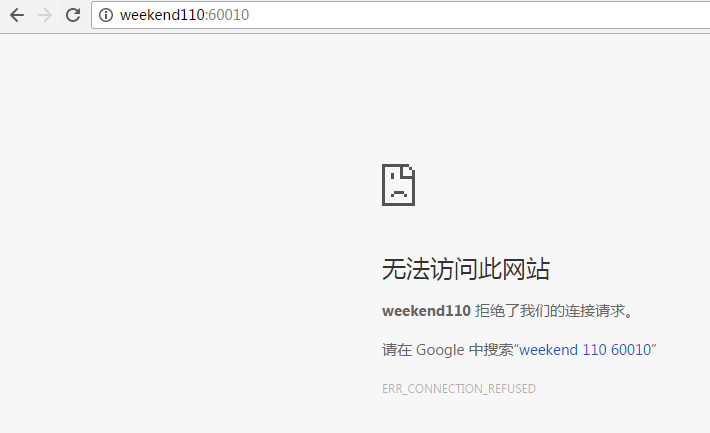
参考博客:http://blog.csdn.net/u013575812/article/details/46919011
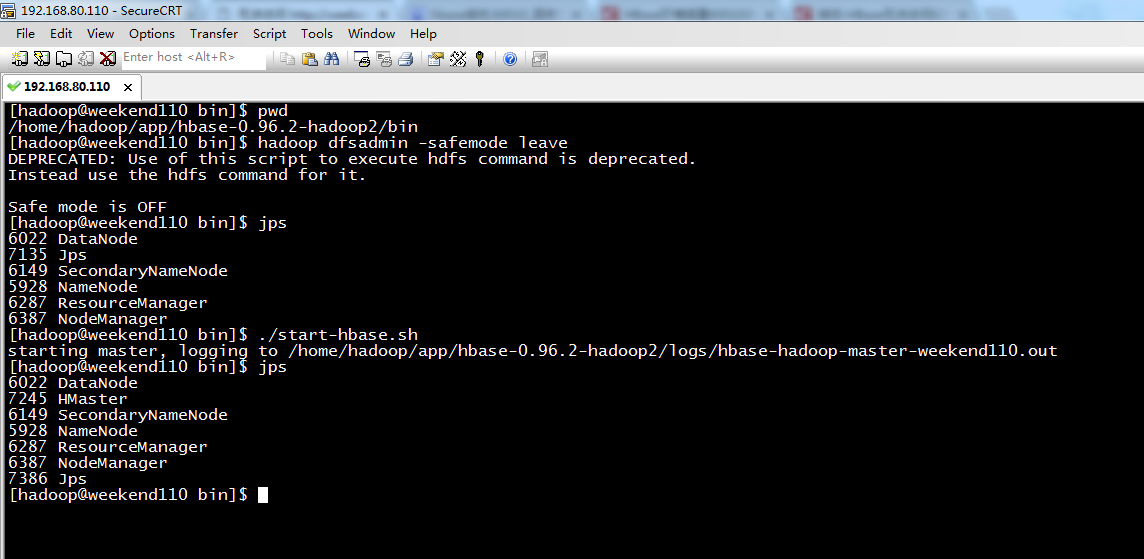
[hadoop@weekend110 bin]$ pwd
/home/hadoop/app/hbase-0.96.2-hadoop2/bin
[hadoop@weekend110 bin]$ hadoop dfsadmin -safemode leave
DEPRECATED: Use of this script to execute hdfs command is deprecated.
Instead use the hdfs command for it.
Safe mode is OFF
[hadoop@weekend110 bin]$ jps
6022 DataNode
7135 Jps
6149 SecondaryNameNode
5928 NameNode
6287 ResourceManager
6387 NodeManager
[hadoop@weekend110 bin]$ ./start-hbase.sh
starting master, logging to /home/hadoop/app/hbase-0.96.2-hadoop2/logs/hbase-hadoop-master-weekend110.out
[hadoop@weekend110 bin]$ jps
6022 DataNode
7245 HMaster
6149 SecondaryNameNode
5928 NameNode
6287 ResourceManager
6387 NodeManager
7386 Jps
[hadoop@weekend110 bin]$

依旧如此,继续...解决!
参考博客:http://www.th7.cn/db/nosql/201510/134214.shtml
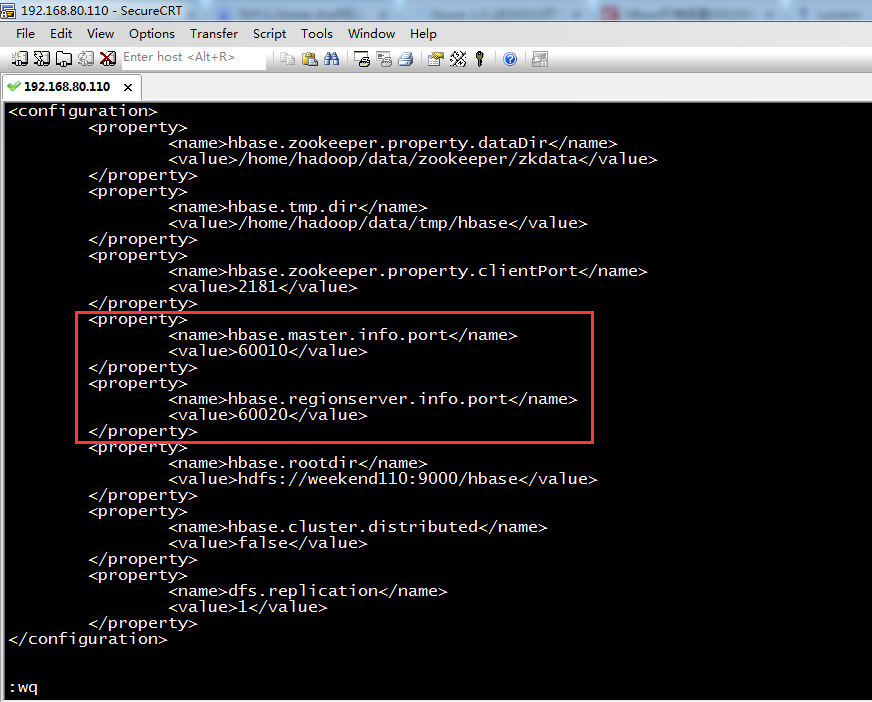
在安装hbase-0.96.2-hadoop2时发现一个问题,hbase能够正常使用,hbase shell 完全可用,但是60010页面却打不开,最后找到问题,是因为很多版本的hbase的master web 默认是不运行的,所以需要自己配置默认端口。
配置如下
在hbase-site.xml中加入一下内容即可
<property>
<name>hbase.master.info.port</name>
<value>60010</value>
</property>
<property>
<name>hbase.regionserver .info.port</name>
<value>60020</value>
</property>
<configuration>
<property>
<name>hbase.zookeeper.property.dataDir</name>
<value>/home/hadoop/data/zookeeper/zkdata</value>
</property>
<property>
<name>hbase.tmp.dir</name>
<value>/home/hadoop/data/tmp/hbase</value>
</property>
<property>
<name>hbase.zookeeper.property.clientPort</name>
<value>2181</value>
</property>
<property>
<name>hbase.master.info.port</name>
<value>60010</value>
</property>
<property>
<name>hbase.regionserver.info.port</name>
<value>60020</value>
</property>
<property>
<name>hbase.rootdir</name>
<value>hdfs://weekend110:9000/hbase</value>
</property>
<property>
<name>hbase.cluster.distributed</name>
<value>false</value>
</property>
<property>
<name>dfs.replication</name>
<value>1</value>
</property>
</configuration>
进入HBase Shell
进入hbase命令行
./hbase shell
显示hbase中的表
list
创建user表,包含info、data两个列族
create 'user', 'info1', 'data1'
create 'user', {NAME => 'info', VERSIONS => '3'}
向user是表中插入信息,row key是rk0001,列族是info中添加name是列修饰符(标识符),值是zhangsan
put 'user', 'rk0001', 'info:name', 'zhangsan'
向user表中插入信息,row key是rk0001,列族info中添加gender列标示符,值是female
put 'user', 'rk0001', 'info:gender', 'female'
向user表中插入信息,row key是rk0001,列族info中添加age列标示符,值是20
put 'user', 'rk0001', 'info:age', 20
向user表中插入信息,row key是rk0001,列族data中添加pic列标示符,值是picture
put 'user', 'rk0001', 'data:pic', 'picture'
获取user表中row key为rk0001的所有信息
get 'user', 'rk0001'
获取user表中row key是rk0001,info列族的所有信息
get 'user', 'rk0001', 'info'
获取user表中row key是rk0001,info列族的name、age列标示符的信息
get 'user', 'rk0001', 'info:name', 'info:age'
获取user表中row key是rk0001,info、data列族的信息
get 'user', 'rk0001', 'info', 'data'
get 'user', 'rk0001', {COLUMN => ['info', 'data']}
get 'user', 'rk0001', {COLUMN => ['info:name', 'data:pic']}
获取user表中row key是rk0001,列族是info,版本号最新5个的信息
get 'user', 'rk0001', {COLUMN => 'info', VERSIONS => 2}
get 'user', 'rk0001', {COLUMN => 'info:name', VERSIONS => 5}
get 'user', 'rk0001', {COLUMN => 'info:name', VERSIONS => 5, TIMERANGE => [1392368783980, 1392380169184]}
获取user表中row key是rk0001,cell的值是zhangsan的信息
get 'people', 'rk0001', {FILTER => "ValueFilter(=, 'binary:图片')"}
获取user表中row key是rk0001,列标示符中含有a的信息
get 'people', 'rk0001', {FILTER => "(QualifierFilter(=,'substring:a'))"}
put 'user', 'rk0002', 'info:name', 'fanbingbing'
put 'user', 'rk0002', 'info:gender', 'female'
put 'user', 'rk0002', 'info:nationality', '中国'
get 'user', 'rk0002', {FILTER => "ValueFilter(=, 'binary:中国')"}
查询user表中的所有信息
scan 'user'
查询user表中列族为info的信息
scan 'user', {COLUMNS => 'info'}
scan 'user', {COLUMNS => 'info', RAW => true, VERSIONS => 5}
scan 'persion', {COLUMNS => 'info', RAW => true, VERSIONS => 3}
查询user表中列族为info和data的信息
scan 'user', {COLUMNS => ['info', 'data']}
scan 'user', {COLUMNS => ['info:name', 'data:pic']}
查询user表中列族是info、列标示符是name的信息
scan 'user', {COLUMNS => 'info:name'}
查询user表中列族是info、列标示符是name的信息,并且版本最新的5个
scan 'user', {COLUMNS => 'info:name', VERSIONS => 5}
查询user表中列族为info和data且列标示符中含有a字符的信息
scan 'user', {COLUMNS => ['info', 'data'], FILTER => "(QualifierFilter(=,'substring:a'))"}
查询user表中列族为info,rk范围是[rk0001, rk0003)的数据
scan 'people', {COLUMNS => 'info', STARTROW => 'rk0001', ENDROW => 'rk0003'}
查询user表中row key以rk字符开头的
scan 'user',{FILTER=>"PrefixFilter('rk')"}
查询user表中指定范围的数据
scan 'user', {TIMERANGE => [1392368783980, 1392380169184]}
删除user表row key为rk0001,列标示符为info:name的数据
delete 'people', 'rk0001', 'info:name'
删除user表row key为rk0001,列标示符为info:name,timestamp为1392383705316的数据
delete 'user', 'rk0001', 'info:name', 1392383705316
清空user表中的数据
truncate 'people'
修改表结构
首先停用user表(新版本不用)
disable 'user'
添加两个列族f1和f2
alter 'people', NAME => 'f1'
alter 'user', NAME => 'f2'
启用表
enable 'user'
###disable 'user'(新版本不用)
删除一个列族:
alter 'user', NAME => 'f1', METHOD => 'delete' 或 alter 'user', 'delete' => 'f1'
添加列族f1同时删除列族f2
alter 'user', {NAME => 'f1'}, {NAME => 'f2', METHOD => 'delete'}
将user表的f1列族版本号改为5
alter 'people', NAME => 'info', VERSIONS => 5
启用表
enable 'user'
删除表
disable 'user'
drop 'user'
get 'person', 'rk0001', {FILTER => "ValueFilter(=, 'binary:中国')"}
get 'person', 'rk0001', {FILTER => "(QualifierFilter(=,'substring:a'))"}
scan 'person', {COLUMNS => 'info:name'}
scan 'person', {COLUMNS => ['info', 'data'], FILTER => "(QualifierFilter(=,'substring:a'))"}
scan 'person', {COLUMNS => 'info', STARTROW => 'rk0001', ENDROW => 'rk0003'}
scan 'person', {COLUMNS => 'info', STARTROW => '20140201', ENDROW => '20140301'}
scan 'person', {COLUMNS => 'info:name', TIMERANGE => [1395978233636, 1395987769587]}
delete 'person', 'rk0001', 'info:name'
alter 'person', NAME => 'ffff'
alter 'person', NAME => 'info', VERSIONS => 10
get 'user', 'rk0002', {COLUMN => ['info:name', 'data:pic']}

[hadoop@weekend110 bin]$ pwd
/home/hadoop/app/hbase-0.96.2-hadoop2/bin
[hadoop@weekend110 bin]$ ./hbase shell
2016-10-12 10:09:42,925 INFO [main] Configuration.deprecation: hadoop.native.lib is deprecated. Instead, use io.native.lib.available
HBase Shell; enter 'help<RETURN>' for list of supported commands.
Type "exit<RETURN>" to leave the HBase Shell
Version 0.96.2-hadoop2, r1581096, Mon Mar 24 16:03:18 PDT 2014
hbase(main):001:0>
hbase(main):001:0> help
HBase Shell, version 0.96.2-hadoop2, r1581096, Mon Mar 24 16:03:18 PDT 2014
Type 'help "COMMAND"', (e.g. 'help "get"' -- the quotes are necessary) for help on a specific command.
Commands are grouped. Type 'help "COMMAND_GROUP"', (e.g. 'help "general"') for help on a command group.
COMMAND GROUPS: //罗列出了所有的命令
Group name: general //通常命令,这些命令将返回集群级的通用信息。
Commands: status, table_help, version, whoami
Group name: ddl //ddl操作命令,这些命令会创建、更换和删除HBase表
Commands: alter, alter_async, alter_status, create, describe, disable, disable_all, drop, drop_all, enable, enable_all, exists, get_table, is_disabled, is_enabled, list, show_filters
Group name: namespace //namespace命令
Commands: alter_namespace, create_namespace, describe_namespace, drop_namespace, list_namespace, list_namespace_tables
Group name: dml //dml操作命令,这些命令会新增、修改和删除HBase表中的数据
Commands: count, delete, deleteall, get, get_counter, incr, put, scan, truncate, truncate_preserve
Group name: tools //tools命令,这些命令可以维护HBase集群
Commands: assign, balance_switch, balancer, catalogjanitor_enabled, catalogjanitor_run, catalogjanitor_switch, close_region, compact, flush, hlog_roll, major_compact, merge_region, move, split, trace, unassign, zk_dump
Group name: replication //replication命令,这些命令可以增加和删除集群的节点
Commands: add_peer, disable_peer, enable_peer, list_peers, list_replicated_tables, remove_peer
Group name: snapshot //snapshot命令,这些命令用于对HBase集群进行快照以便备份和恢复集群
Commands: clone_snapshot, delete_snapshot, list_snapshots, rename_snapshot, restore_snapshot, snapshot
Group name: security //security命令,这些命令可以控制HBase的安全性
Commands: grant, revoke, user_permission
SHELL USAGE:
Quote all names in HBase Shell such as table and column names. Commas delimit
command parameters. Type <RETURN> after entering a command to run it.
Dictionaries of configuration used in the creation and alteration of tables are
Ruby Hashes. They look like this:
{'key1' => 'value1', 'key2' => 'value2', ...}
and are opened and closed with curley-braces. Key/values are delimited by the
'=>' character combination. Usually keys are predefined constants such as
NAME, VERSIONS, COMPRESSION, etc. Constants do not need to be quoted. Type
'Object.constants' to see a (messy) list of all constants in the environment.
If you are using binary keys or values and need to enter them in the shell, use
double-quote'd hexadecimal representation. For example:
hbase> get 't1', "keyx03x3fxcd"
hbase> get 't1', "key�03�23�11"
hbase> put 't1', "testxefxff", 'f1:', "x01x33x40"
The HBase shell is the (J)Ruby IRB with the above HBase-specific commands added.
For more on the HBase Shell, see http://hbase.apache.org/docs/current/book.html
hbase(main):002:0>
hbase(main):002:0> version
0.96.2-hadoop2, r1581096, Mon Mar 24 16:03:18 PDT 2014
hbase(main):003:0> create
ERROR: wrong number of arguments (0 for 1)
Here is some help for this command:
Creates a table. Pass a table name, and a set of column family
specifications (at least one), and, optionally, table configuration.
Column specification can be a simple string (name), or a dictionary
(dictionaries are described below in main help output), necessarily
including NAME attribute.
Examples: //这里,有例子
Create a table with namespace=ns1 and table qualifier=t1
hbase> create 'ns1:t1', {NAME => 'f1', VERSIONS => 5}
Create a table with namespace=default and table qualifier=t1
hbase> create 't1', {NAME => 'f1'}, {NAME => 'f2'}, {NAME => 'f3'}
hbase> # The above in shorthand would be the following:
hbase> create 't1', 'f1', 'f2', 'f3'
hbase> create 't1', {NAME => 'f1', VERSIONS => 1, TTL => 2592000, BLOCKCACHE => true}
hbase> create 't1', {NAME => 'f1', CONFIGURATION => {'hbase.hstore.blockingStoreFiles' => '10'}}
Table configuration options can be put at the end.
Examples: //这里,有例子
hbase> create 'ns1:t1', 'f1', SPLITS => ['10', '20', '30', '40']
hbase> create 't1', 'f1', SPLITS => ['10', '20', '30', '40']
hbase> create 't1', 'f1', SPLITS_FILE => 'splits.txt', OWNER => 'johndoe'
hbase> create 't1', {NAME => 'f1', VERSIONS => 5}, METADATA => { 'mykey' => 'myvalue' }
hbase> # Optionally pre-split the table into NUMREGIONS, using
hbase> # SPLITALGO ("HexStringSplit", "UniformSplit" or classname)
hbase> create 't1', 'f1', {NUMREGIONS => 15, SPLITALGO => 'HexStringSplit'}
hbase> create 't1', 'f1', {NUMREGIONS => 15, SPLITALGO => 'HexStringSplit', CONFIGURATION => {'hbase.hregion.scan.loadColumnFamiliesOnDemand' => 'true'}}
You can also keep around a reference to the created table:
hbase> t1 = create 't1', 'f1'
Which gives you a reference to the table named 't1', on which you can then
call methods.
hbase(main):004:0>

[hadoop@weekend110 bin]$ jps
2443 NameNode
2970 NodeManager
7515 Jps
2539 DataNode
2729 SecondaryNameNode
2866 ResourceManager
[hadoop@weekend110 bin]$ pwd
/home/hadoop/app/hbase-0.96.2-hadoop2/bin
[hadoop@weekend110 bin]$ ./start-hbase.sh
starting master, logging to /home/hadoop/app/hbase-0.96.2-hadoop2/logs/hbase-hadoop-master-weekend110.out
[hadoop@weekend110 bin]$ jps
2443 NameNode
7623 HMaster
2970 NodeManager
2539 DataNode
2729 SecondaryNameNode
2866 ResourceManager
7686 Jps
[hadoop@weekend110 bin]$ ./hbase shell
2016-10-12 15:53:46,394 INFO [main] Configuration.deprecation: hadoop.native.lib is deprecated. Instead, use io.native.lib.available
HBase Shell; enter 'help<RETURN>' for list of supported commands.
Type "exit<RETURN>" to leave the HBase Shell
Version 0.96.2-hadoop2, r1581096, Mon Mar 24 16:03:18 PDT 2014
hbase(main):001:0> list
TABLE
SLF4J: Class path contains multiple SLF4J bindings.
SLF4J: Found binding in [jar:file:/home/hadoop/app/hbase-0.96.2-hadoop2/lib/slf4j-log4j12-1.6.4.jar!/org/slf4j/impl/StaticLoggerBinder.class]
SLF4J: Found binding in [jar:file:/home/hadoop/app/hadoop-2.4.1/share/hadoop/common/lib/slf4j-log4j12-1.7.5.jar!/org/slf4j/impl/StaticLoggerBinder.class]
SLF4J: See http://www.slf4j.org/codes.html#multiple_bindings for an explanation.
0 row(s) in 2.8190 seconds
=> []
hbase(main):002:0> create 'mygirls', {NAME => 'base_info',VERSIONS => 3},{NAME => 'extra_info'}
0 row(s) in 1.1080 seconds
=> Hbase::Table - mygirls
hbase(main):003:0>
describe

hbase(main):010:0> describe 'mygirls'
DESCRIPTION ENABLED
'mygirls', {NAME => 'base_info', DATA_BLOCK_ENCODING => 'NONE', BLOOMFILTER => 'ROW', true
REPLICATION_SCOPE => '0', VERSIONS => '3', COMPRESSION => 'NONE', MIN_VERSIONS => '0
', TTL => '2147483647', KEEP_DELETED_CELLS => 'false', BLOCKSIZE => '65536', IN_MEMOR
Y => 'false', BLOCKCACHE => 'true'}, {NAME => 'extra_info', DATA_BLOCK_ENCODING => 'N
ONE', BLOOMFILTER => 'ROW', REPLICATION_SCOPE => '0', VERSIONS => '1', COMPRESSION =>
'NONE', MIN_VERSIONS => '0', TTL => '2147483647', KEEP_DELETED_CELLS => 'false', BLO
CKSIZE => '65536', IN_MEMORY => 'false', BLOCKCACHE => 'true'}
1 row(s) in 0.0980 seconds
hbase(main):011:0>
disable 和 drop ,先得disable(下线),再才能drop(删掉)

hbase(main):002:0> disable 'mygirls'
0 row(s) in 1.2030 seconds
hbase(main):003:0> drop 'mygirls'
0 row(s) in 0.4270 seconds
hbase(main):004:0>
put

hbase(main):011:0> put
ERROR: wrong number of arguments (0 for 4)
Here is some help for this command:
Put a cell 'value' at specified table/row/column and optionally
timestamp coordinates. To put a cell value into table 'ns1:t1' or 't1'
at row 'r1' under column 'c1' marked with the time 'ts1', do:
hbase> put 'ns1:t1', 'r1', 'c1', 'value', ts1 //例子
The same commands also can be run on a table reference. Suppose you had a reference
t to table 't1', the corresponding command would be:
hbase> t.put 'r1', 'c1', 'value', ts1 //例子


hbase(main):012:0> put 'mygirls','0001','base_info:name','fengjie'
0 row(s) in 0.3240 seconds
hbase(main):013:0> put 'mygirls','0001','base_info:age','18'
0 row(s) in 0.0170 seconds
hbase(main):014:0> put 'mygirls','0001','base_info:sex','jipinnvren'
0 row(s) in 0.0130 seconds
hbase(main):015:0> put 'mygirls','0001','base_info:boyfriend','huangxiaoming'
0 row(s) in 0.0590 seconds
get
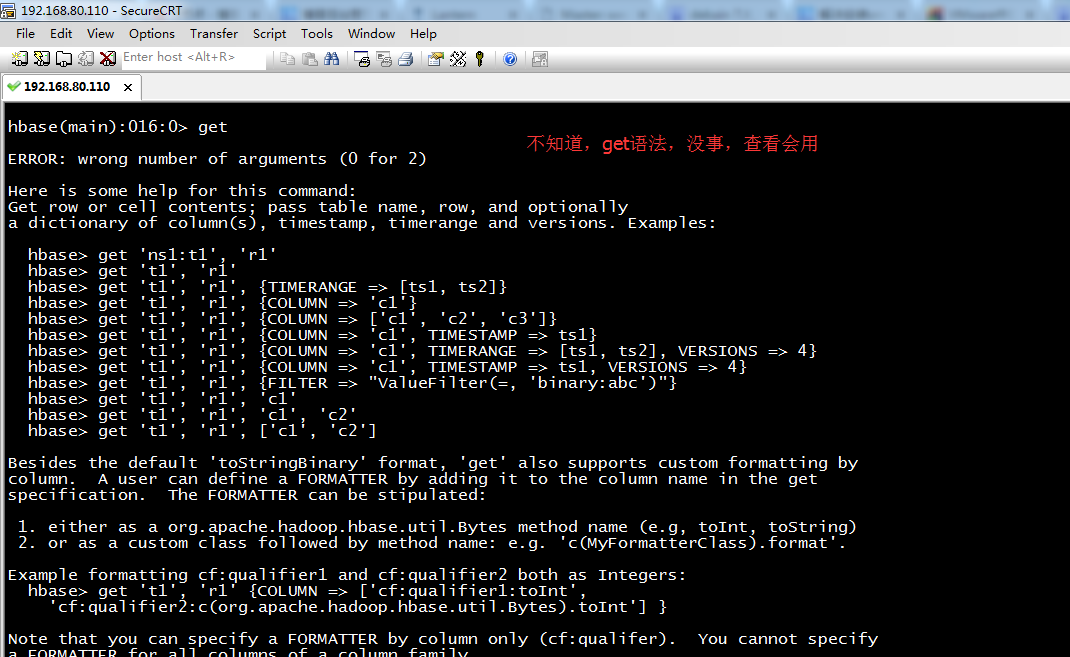
hbase(main):016:0> get
ERROR: wrong number of arguments (0 for 2)
Here is some help for this command:
Get row or cell contents; pass table name, row, and optionally
a dictionary of column(s), timestamp, timerange and versions. Examples: //例子
hbase> get 'ns1:t1', 'r1'
hbase> get 't1', 'r1'
hbase> get 't1', 'r1', {TIMERANGE => [ts1, ts2]}
hbase> get 't1', 'r1', {COLUMN => 'c1'}
hbase> get 't1', 'r1', {COLUMN => ['c1', 'c2', 'c3']}
hbase> get 't1', 'r1', {COLUMN => 'c1', TIMESTAMP => ts1}
hbase> get 't1', 'r1', {COLUMN => 'c1', TIMERANGE => [ts1, ts2], VERSIONS => 4}
hbase> get 't1', 'r1', {COLUMN => 'c1', TIMESTAMP => ts1, VERSIONS => 4}
hbase> get 't1', 'r1', {FILTER => "ValueFilter(=, 'binary:abc')"}
hbase> get 't1', 'r1', 'c1'
hbase> get 't1', 'r1', 'c1', 'c2'
hbase> get 't1', 'r1', ['c1', 'c2']
Besides the default 'toStringBinary' format, 'get' also supports custom formatting by
column. A user can define a FORMATTER by adding it to the column name in the get
specification. The FORMATTER can be stipulated:
1. either as a org.apache.hadoop.hbase.util.Bytes method name (e.g, toInt, toString)
2. or as a custom class followed by method name: e.g. 'c(MyFormatterClass).format'.
Example formatting cf:qualifier1 and cf:qualifier2 both as Integers:
hbase> get 't1', 'r1' {COLUMN => ['cf:qualifier1:toInt',
'cf:qualifier2:c(org.apache.hadoop.hbase.util.Bytes).toInt'] }
Note that you can specify a FORMATTER by column only (cf:qualifer). You cannot specify
a FORMATTER for all columns of a column family.
The same commands also can be run on a reference to a table (obtained via get_table or
create_table). Suppose you had a reference t to table 't1', the corresponding commands
would be:
hbase> t.get 'r1'
hbase> t.get 'r1', {TIMERANGE => [ts1, ts2]}
hbase> t.get 'r1', {COLUMN => 'c1'}
hbase> t.get 'r1', {COLUMN => ['c1', 'c2', 'c3']}
hbase> t.get 'r1', {COLUMN => 'c1', TIMESTAMP => ts1}
hbase> t.get 'r1', {COLUMN => 'c1', TIMERANGE => [ts1, ts2], VERSIONS => 4}
hbase> t.get 'r1', {COLUMN => 'c1', TIMESTAMP => ts1, VERSIONS => 4}
hbase> t.get 'r1', {FILTER => "ValueFilter(=, 'binary:abc')"}
hbase> t.get 'r1', 'c1'
hbase> t.get 'r1', 'c1', 'c2'
hbase> t.get 'r1', ['c1', 'c2']
hbase(main):017:0>


hbase(main):017:0> get 'mygirls','0001'
COLUMN CELL
base_info:age timestamp=1476259587999, value=18
base_info:boyfriend timestamp=1476259597469, value=huangxiaoming
base_info:name timestamp=1476259582217, value=fengjie
base_info:sex timestamp=1476259593138, value=jipinnvren
4 row(s) in 0.0320 seconds

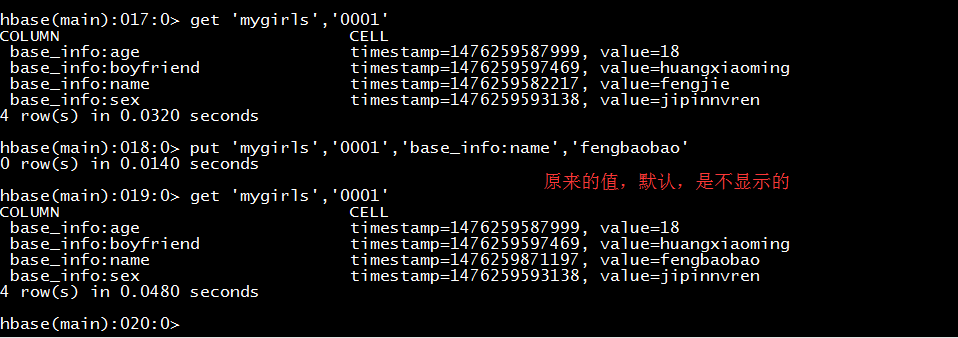
hbase(main):018:0> put 'mygirls','0001','base_info:name','fengbaobao'
0 row(s) in 0.0140 seconds
hbase(main):019:0> get 'mygirls','0001'
COLUMN CELL
base_info:age timestamp=1476259587999, value=18
base_info:boyfriend timestamp=1476259597469, value=huangxiaoming
base_info:name timestamp=1476259871197, value=fengbaobao
base_info:sex timestamp=1476259593138, value=jipinnvren
4 row(s) in 0.0480 seconds


hbase(main):020:0> get 'mygirls','0001',{COLUMN => 'base_info:name',VERSIONS => 10}
COLUMN CELL
base_info:name timestamp=1476259871197, value=fengbaobao
base_info:name timestamp=1476259582217, value=fengjie
2 row(s) in 0.0700 seconds
得到,2个版本。意思是,最多可得到10个版本


hbase(main):021:0> put 'mygirls','0001','base_info:name','fengfeng'
0 row(s) in 0.0240 seconds
hbase(main):022:0> get 'mygirls','0001',{COLUMN => 'base_info:name',VERSIONS => 10}
COLUMN CELL
base_info:name timestamp=1476260199839, value=fengfeng
base_info:name timestamp=1476259871197, value=fengbaobao
base_info:name timestamp=1476259582217, value=fengjie
3 row(s) in 0.0550 seconds


hbase(main):023:0> put 'mygirls','0001','base_info:name','qinaidefeng'
0 row(s) in 0.0160 seconds
hbase(main):024:0> get 'mygirls','0001',{COLUMN => 'base_info:name',VERSIONS => 10}
COLUMN CELL
base_info:name timestamp=1476260274142, value=qinaidefeng
base_info:name timestamp=1476260199839, value=fengfeng
base_info:name timestamp=1476259871197, value=fengbaobao
3 row(s) in 0.0400 seconds
只存,最近的3个版本。
scan
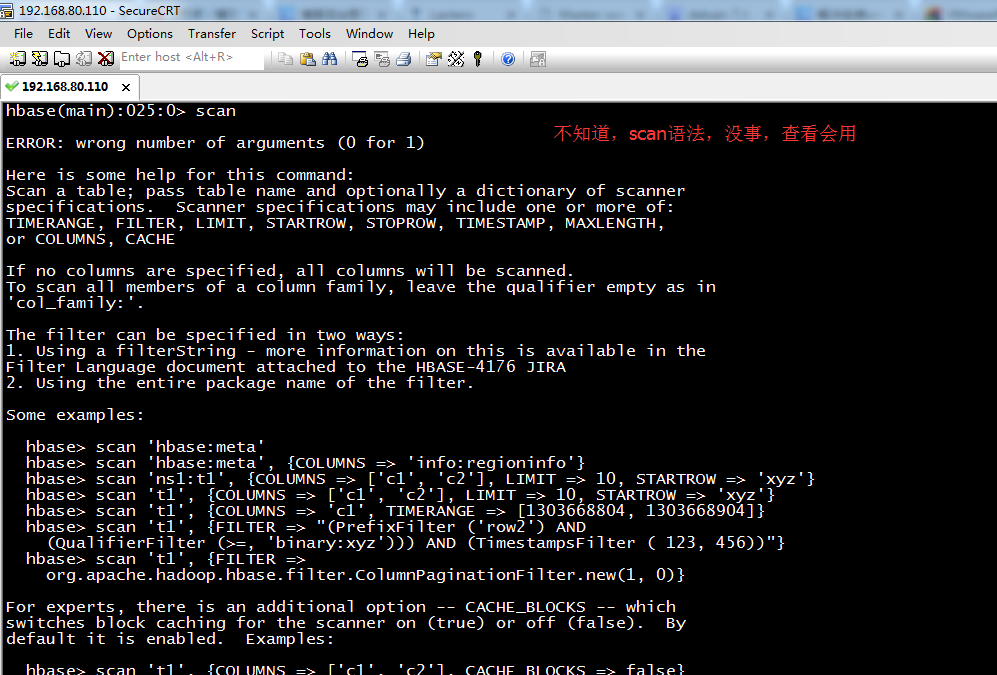
hbase(main):025:0> scan
ERROR: wrong number of arguments (0 for 1)
Here is some help for this command:
Scan a table; pass table name and optionally a dictionary of scanner
specifications. Scanner specifications may include one or more of:
TIMERANGE, FILTER, LIMIT, STARTROW, STOPROW, TIMESTAMP, MAXLENGTH,
or COLUMNS, CACHE
If no columns are specified, all columns will be scanned.
To scan all members of a column family, leave the qualifier empty as in
'col_family:'.
The filter can be specified in two ways:
1. Using a filterString - more information on this is available in the
Filter Language document attached to the HBASE-4176 JIRA
2. Using the entire package name of the filter.
Some examples: //例子
hbase> scan 'hbase:meta'
hbase> scan 'hbase:meta', {COLUMNS => 'info:regioninfo'}
hbase> scan 'ns1:t1', {COLUMNS => ['c1', 'c2'], LIMIT => 10, STARTROW => 'xyz'}
hbase> scan 't1', {COLUMNS => ['c1', 'c2'], LIMIT => 10, STARTROW => 'xyz'}
hbase> scan 't1', {COLUMNS => 'c1', TIMERANGE => [1303668804, 1303668904]}
hbase> scan 't1', {FILTER => "(PrefixFilter ('row2') AND
(QualifierFilter (>=, 'binary:xyz'))) AND (TimestampsFilter ( 123, 456))"}
hbase> scan 't1', {FILTER =>
org.apache.hadoop.hbase.filter.ColumnPaginationFilter.new(1, 0)}
For experts, there is an additional option -- CACHE_BLOCKS -- which
switches block caching for the scanner on (true) or off (false). By
default it is enabled. Examples:
hbase> scan 't1', {COLUMNS => ['c1', 'c2'], CACHE_BLOCKS => false}
Also for experts, there is an advanced option -- RAW -- which instructs the
scanner to return all cells (including delete markers and uncollected deleted
cells). This option cannot be combined with requesting specific COLUMNS.
Disabled by default. Example:
hbase> scan 't1', {RAW => true, VERSIONS => 10}
Besides the default 'toStringBinary' format, 'scan' supports custom formatting
by column. A user can define a FORMATTER by adding it to the column name in
the scan specification. The FORMATTER can be stipulated:
1. either as a org.apache.hadoop.hbase.util.Bytes method name (e.g, toInt, toString)
2. or as a custom class followed by method name: e.g. 'c(MyFormatterClass).format'.
Example formatting cf:qualifier1 and cf:qualifier2 both as Integers:
hbase> scan 't1', {COLUMNS => ['cf:qualifier1:toInt',
'cf:qualifier2:c(org.apache.hadoop.hbase.util.Bytes).toInt'] }
Note that you can specify a FORMATTER by column only (cf:qualifer). You cannot
specify a FORMATTER for all columns of a column family.
Scan can also be used directly from a table, by first getting a reference to a
table, like such:
hbase> t = get_table 't'
hbase> t.scan
Note in the above situation, you can still provide all the filtering, columns,
options, etc as described above.
hbase(main):026:0>


hbase(main):026:0> scan 'mygirls'
ROW COLUMN+CELL
0001 column=base_info:age, timestamp=1476259587999, value=18
0001 column=base_info:boyfriend, timestamp=1476259597469, value=huangxiaoming
0001 column=base_info:name, timestamp=1476260274142, value=qinaidefeng
0001 column=base_info:sex, timestamp=1476259593138, value=jipinnvren
1 row(s) in 0.1040 seconds


hbase(main):027:0> scan 'mygirls',{RAW => true,VERSIONS => 10}
ROW COLUMN+CELL
0001 column=base_info:age, timestamp=1476259587999, value=18
0001 column=base_info:boyfriend, timestamp=1476259597469, value=huangxiaoming
0001 column=base_info:name, timestamp=1476260274142, value=qinaidefeng
0001 column=base_info:name, timestamp=1476260199839, value=fengfeng
0001 column=base_info:name, timestamp=1476259871197, value=fengbaobao
0001 column=base_info:name, timestamp=1476259582217, value=fengjie
0001 column=base_info:sex, timestamp=1476259593138, value=jipinnvren
1 row(s) in 0.0660 seconds
hbase(main):028:0> get 'mygirls','0001',{COLUMN => 'base_info:name',VERSIONS => 10,RAW => true}
COLUMN CELL
base_info:name timestamp=1476260274142, value=qinaidefeng
base_info:name timestamp=1476260199839, value=fengfeng
base_info:name timestamp=1476259871197, value=fengbaobao
3 row(s) in 0.0170 seconds
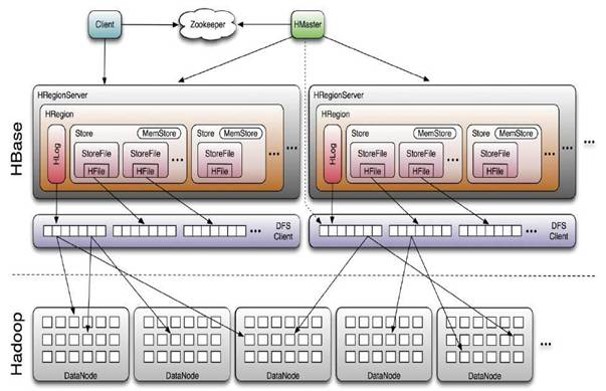
为什么,scan能把老版本都显示出来?
答:原因是,你最新的操作,并没有真正刷到Hadoop文件里。
最新的操作,是在HLog里。
要等到,把这个HLog刷到MeroStore里或HFile里,才能把那些过期的数据给清除掉。
那多久才会刷呢?有个默认机制。 还有,立即把HBase停掉。
其实啊,HBase Shell操作,在平常工作中,都不会这么操作。因为,不建议,很不好用,不方便。!!!
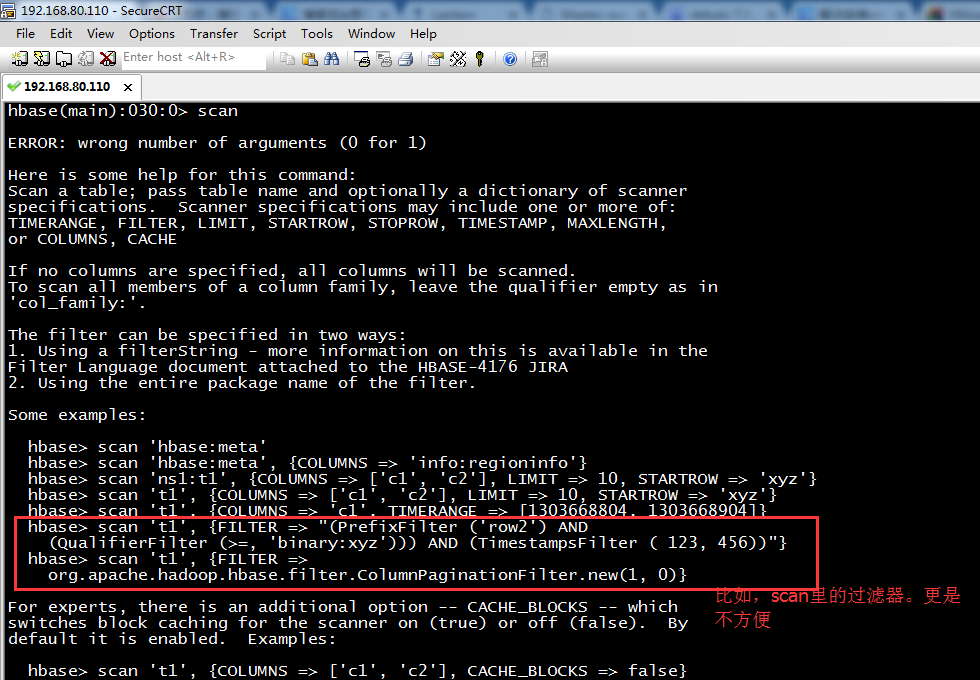
hbase> scan 't1', {FILTER => "(PrefixFilter ('row2') AND
(QualifierFilter (>=, 'binary:xyz'))) AND (TimestampsFilter ( 123, 456))"}
hbase> scan 't1', {FILTER =>
org.apache.hadoop.hbase.filter.ColumnPaginationFilter.new(1, 0)}
更多,自行去玩玩。这里,不多赘述。
进入hbase命令行
./hbase shell
显示hbase中的表
list
创建user表,包含info、data两个列族
create 'user', 'info1', 'data1'
create 'user', {NAME => 'info', VERSIONS => '3'}
向user表中插入信息,row key为rk0001,列族info中添加name列标示符,值为zhangsan
put 'user', 'rk0001', 'info:name', 'zhangsan'
向user表中插入信息,row key为rk0001,列族info中添加gender列标示符,值为female
put 'user', 'rk0001', 'info:gender', 'female'
向user表中插入信息,row key为rk0001,列族info中添加age列标示符,值为20
put 'user', 'rk0001', 'info:age', 20
向user表中插入信息,row key为rk0001,列族data中添加pic列标示符,值为picture
put 'user', 'rk0001', 'data:pic', 'picture'
获取user表中row key为rk0001的所有信息
get 'user', 'rk0001'
获取user表中row key为rk0001,info列族的所有信息
get 'user', 'rk0001', 'info'
获取user表中row key为rk0001,info列族的name、age列标示符的信息
get 'user', 'rk0001', 'info:name', 'info:age'
获取user表中row key为rk0001,info、data列族的信息
get 'user', 'rk0001', 'info', 'data'
get 'user', 'rk0001', {COLUMN => ['info', 'data']}
get 'user', 'rk0001', {COLUMN => ['info:name', 'data:pic']}
获取user表中row key为rk0001,列族为info,版本号最新5个的信息
get 'user', 'rk0001', {COLUMN => 'info', VERSIONS => 2}
get 'user', 'rk0001', {COLUMN => 'info:name', VERSIONS => 5}
get 'user', 'rk0001', {COLUMN => 'info:name', VERSIONS => 5, TIMERANGE => [1392368783980, 1392380169184]}
获取user表中row key为rk0001,cell的值为zhangsan的信息
get 'people', 'rk0001', {FILTER => "ValueFilter(=, 'binary:图片')"}
获取user表中row key为rk0001,列标示符中含有a的信息
get 'people', 'rk0001', {FILTER => "(QualifierFilter(=,'substring:a'))"}
put 'user', 'rk0002', 'info:name', 'fanbingbing'
put 'user', 'rk0002', 'info:gender', 'female'
put 'user', 'rk0002', 'info:nationality', '中国'
get 'user', 'rk0002', {FILTER => "ValueFilter(=, 'binary:中国')"}
查询user表中的所有信息
scan 'user'
查询user表中列族为info的信息
scan 'user', {COLUMNS => 'info'}
scan 'user', {COLUMNS => 'info', RAW => true, VERSIONS => 5}
scan 'persion', {COLUMNS => 'info', RAW => true, VERSIONS => 3}
查询user表中列族为info和data的信息
scan 'user', {COLUMNS => ['info', 'data']}
scan 'user', {COLUMNS => ['info:name', 'data:pic']}
查询user表中列族为info、列标示符为name的信息
scan 'user', {COLUMNS => 'info:name'}
查询user表中列族为info、列标示符为name的信息,并且版本最新的5个
scan 'user', {COLUMNS => 'info:name', VERSIONS => 5}
查询user表中列族为info和data且列标示符中含有a字符的信息
scan 'user', {COLUMNS => ['info', 'data'], FILTER => "(QualifierFilter(=,'substring:a'))"}
查询user表中列族为info,rk范围是[rk0001, rk0003)的数据
scan 'people', {COLUMNS => 'info', STARTROW => 'rk0001', ENDROW => 'rk0003'}
查询user表中row key以rk字符开头的
scan 'user',{FILTER=>"PrefixFilter('rk')"}
查询user表中指定范围的数据
scan 'user', {TIMERANGE => [1392368783980, 1392380169184]}
删除数据
删除user表row key为rk0001,列标示符为info:name的数据
delete 'people', 'rk0001', 'info:name'
删除user表row key为rk0001,列标示符为info:name,timestamp为1392383705316的数据
delete 'user', 'rk0001', 'info:name', 1392383705316
清空user表中的数据
truncate 'people'
修改表结构
首先停用user表(新版本不用)
disable 'user'
添加两个列族f1和f2
alter 'people', NAME => 'f1'
alter 'user', NAME => 'f2'
启用表
enable 'user'
###disable 'user'(新版本不用)
删除一个列族:
alter 'user', NAME => 'f1', METHOD => 'delete' 或 alter 'user', 'delete' => 'f1'
添加列族f1同时删除列族f2
alter 'user', {NAME => 'f1'}, {NAME => 'f2', METHOD => 'delete'}
将user表的f1列族版本号改为5
alter 'people', NAME => 'info', VERSIONS => 5
启用表
enable 'user'
删除表
disable 'user'
drop 'user'
get 'person', 'rk0001', {FILTER => "ValueFilter(=, 'binary:中国')"}
get 'person', 'rk0001', {FILTER => "(QualifierFilter(=,'substring:a'))"}
scan 'person', {COLUMNS => 'info:name'}
scan 'person', {COLUMNS => ['info', 'data'], FILTER => "(QualifierFilter(=,'substring:a'))"}
scan 'person', {COLUMNS => 'info', STARTROW => 'rk0001', ENDROW => 'rk0003'}
scan 'person', {COLUMNS => 'info', STARTROW => '20140201', ENDROW => '20140301'}
scan 'person', {COLUMNS => 'info:name', TIMERANGE => [1395978233636, 1395987769587]}
delete 'person', 'rk0001', 'info:name'
alter 'person', NAME => 'ffff'
alter 'person', NAME => 'info', VERSIONS => 10
get 'user', 'rk0002', {COLUMN => ['info:name', 'data:pic']}
hbase的java api
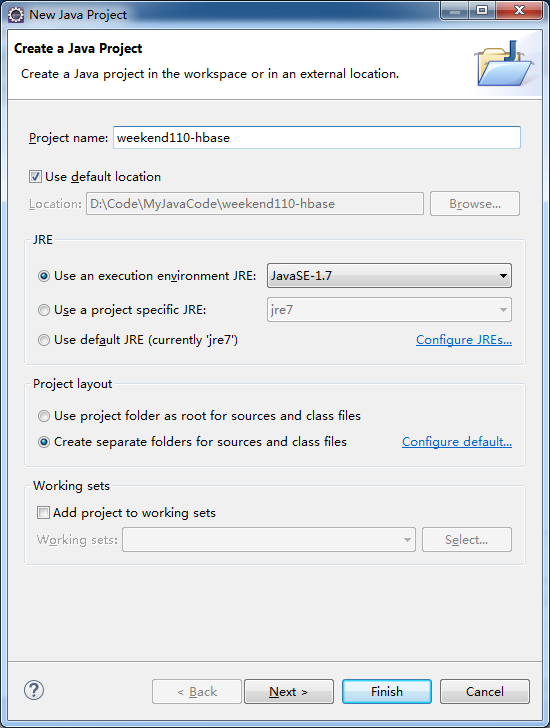
1、建立hbase工程
推荐http://hbase.apache.org/
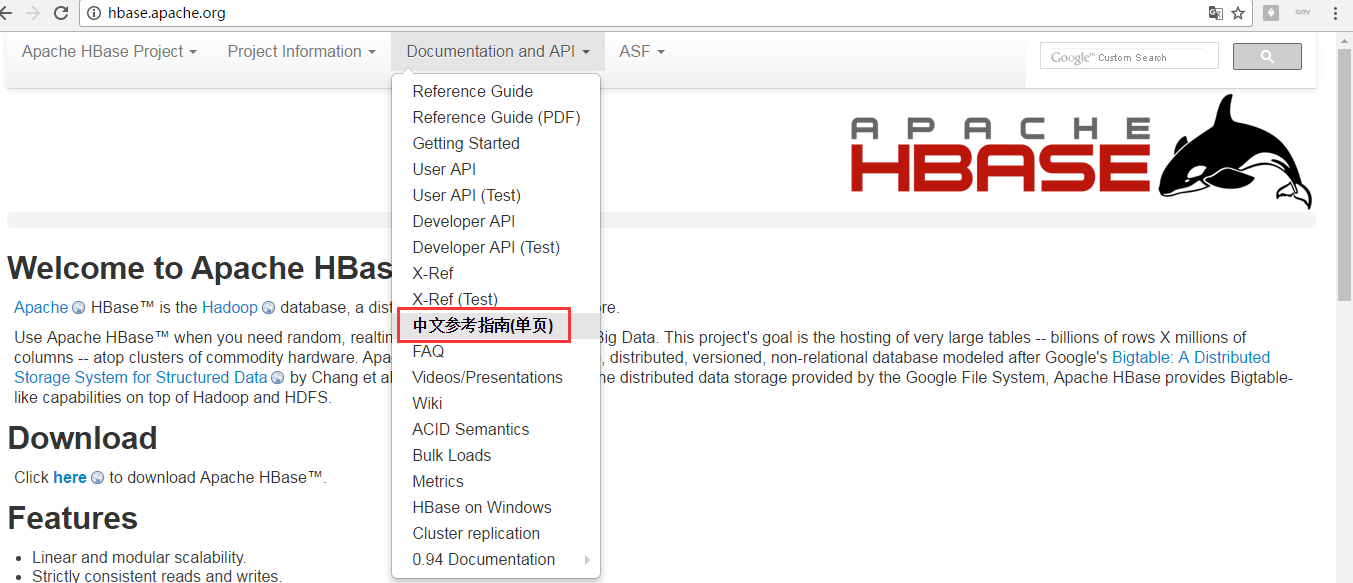
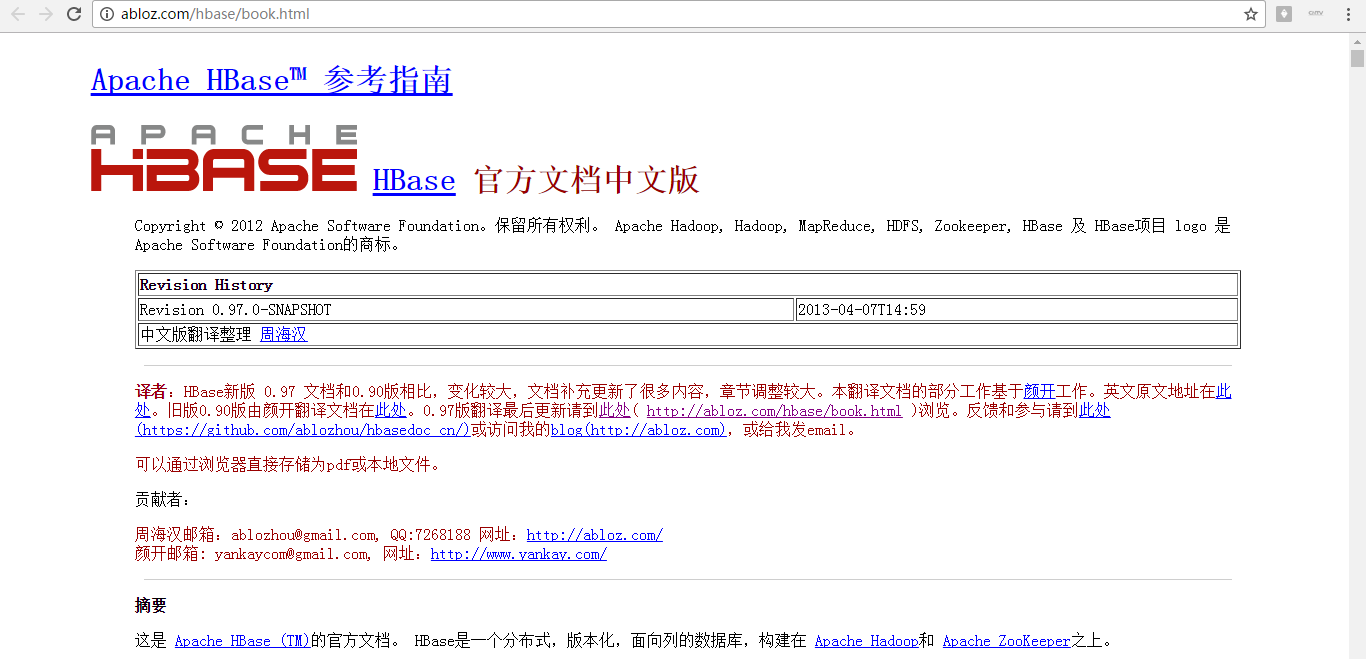
.关于HBase的更多技术细节,强烈必多看
http://abloz.com/hbase/book.html
2、 weekend110-hbase -> Build Path -> Configure Build Path
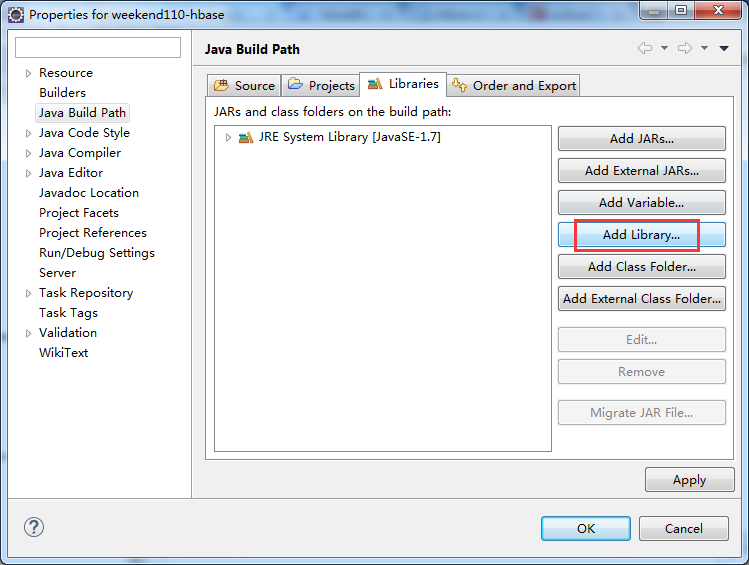
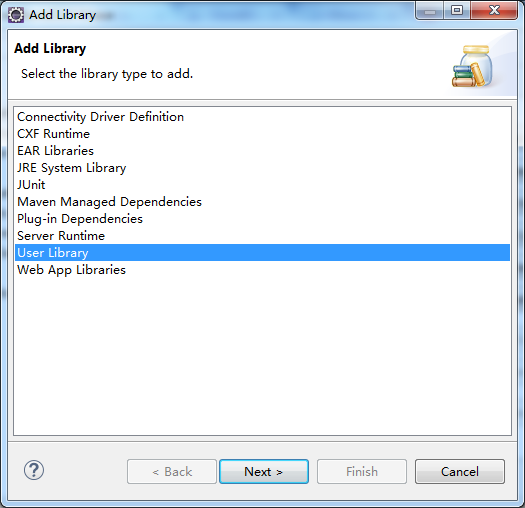
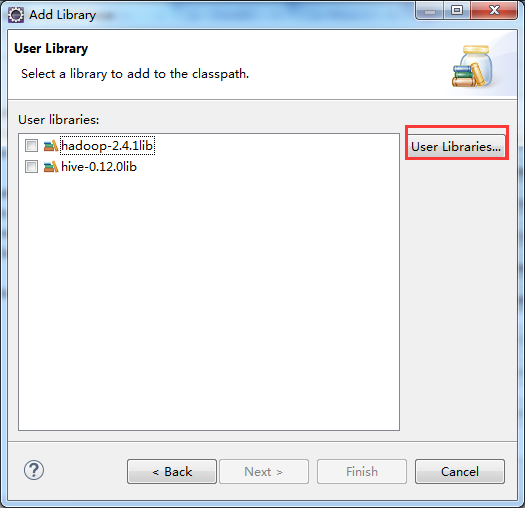
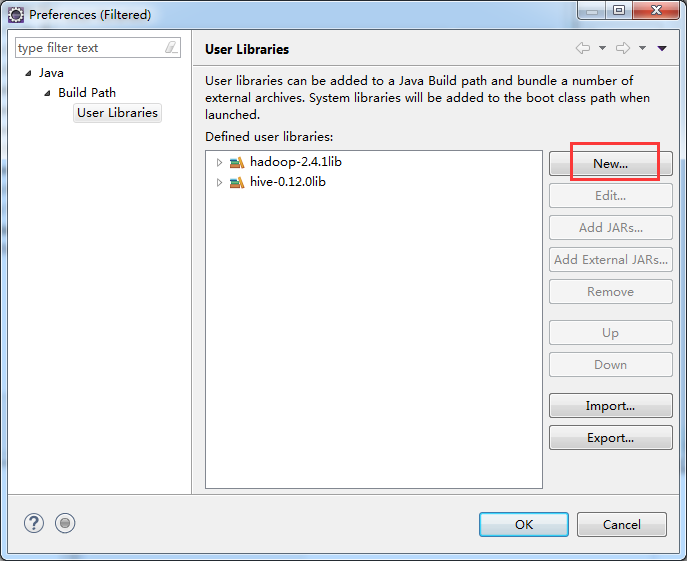


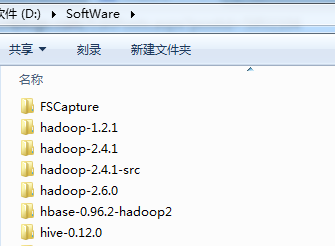
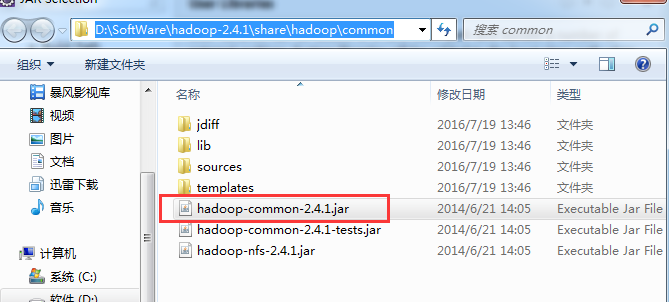
我们是hadoop-2.4.1.jar,但是,hbase-0.96.2-hadoop2-bin.tar.gz自带的是,hadoop-2.2.0.jar。
这里,我参考了《Hadoop 实战》,陆嘉恒老师编著的。P249页,
注意:安装Hadoop的时候,要注意HBase的版本。也就是说,需要注意Hadoop和HBase之间的版本关系,如果不匹配,很可能会影响HBase系统的稳定性。在HBase的lin目录下可以看到对应的Hadoop的JAR文件。默认情况下,HBase的lib文件夹下对应的Hadoop版本相对稳定。如果用户想要使用其他的Hadoop版本,那么需要将Hadoop系统安装目录hadoop-*.*.*-core.jar文件和hadoop-*.*.*-test.jar文件复制到HBase的lib文件夹下,以替换其他版本的Hadoop文件。
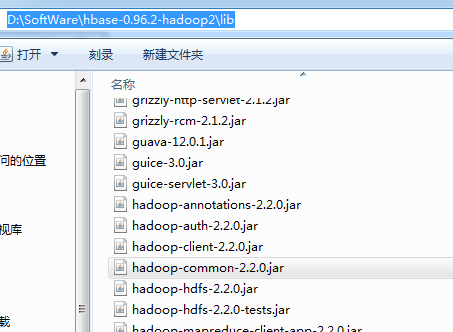
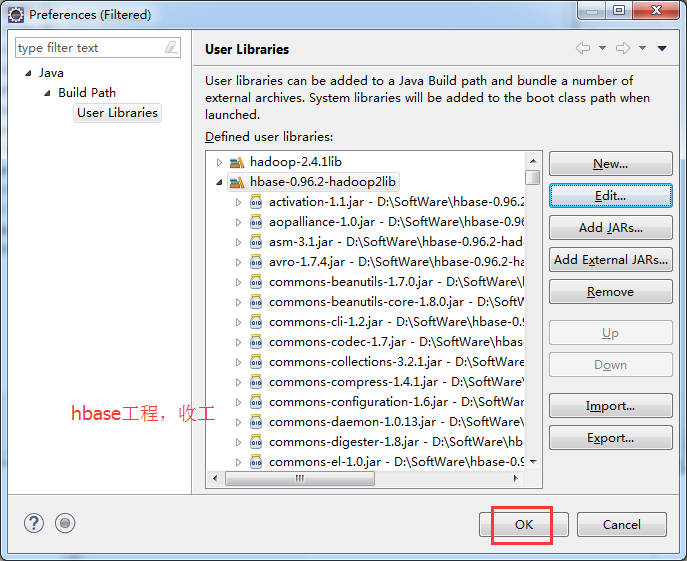
这里,我们为了方便,直接把D:SoftWarehbase-0.96.2-hadoop2lib的所有jar包,都弄进来。
也参考了网上一些博客资料说,不需这么多。此外,程序可能包含一些间接引用,以后再逐步逐个,下载,添加就是。复制粘贴到 hbase-0.96.2-hadoop2lib 里。
去 http://mvnrepository.com/ 。
参考我的博客
Eclipse下新建Maven项目、自动打依赖jar包
参考 : http://blog.csdn.net/hetianguang/article/details/51371713
http://www.cnblogs.com/NicholasLee/archive/2012/09/13/2683432.html

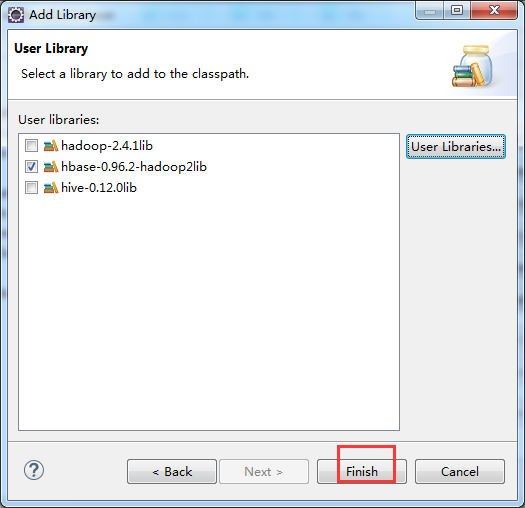
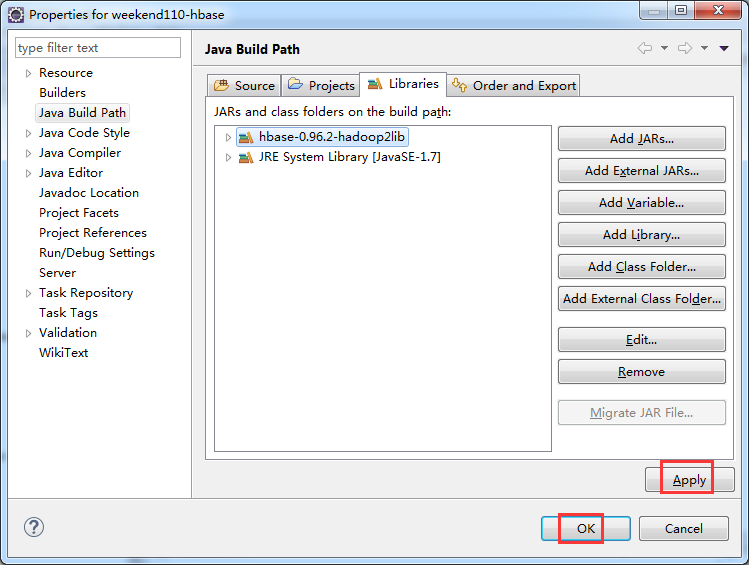
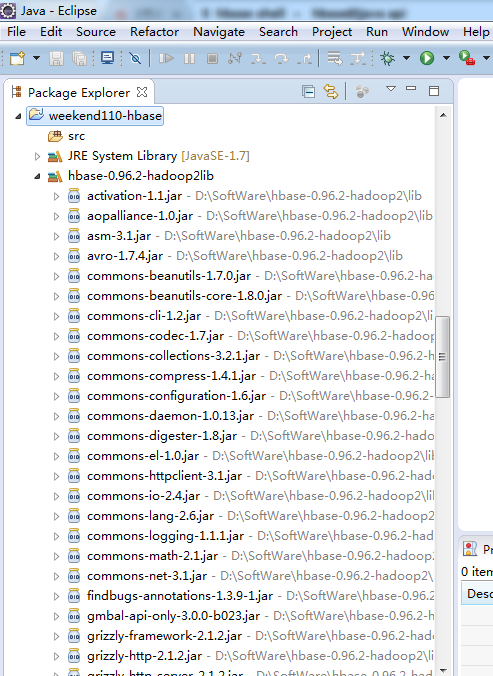
3、新建包cn.itcast.bigdata.hbase


4、新建类 HbaseDao.java
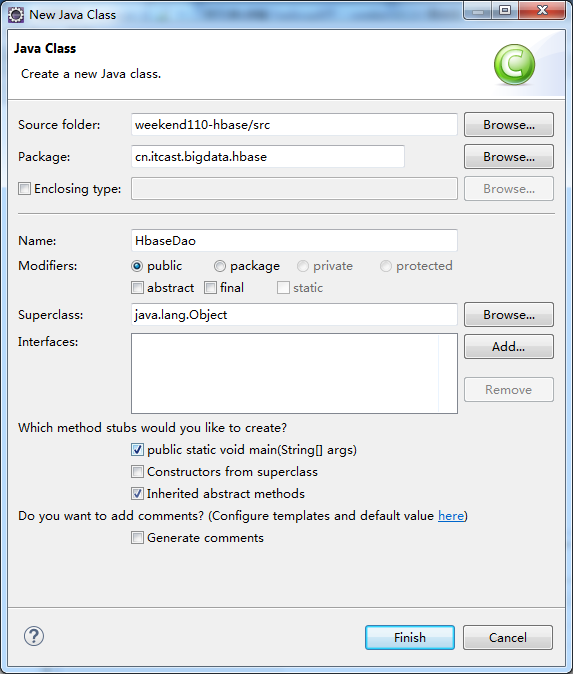
这里,我就以分布式集群的配置,附上代码。工作中,就是这么干的!
package cn.itcast.bigdata.hbase;
import java.io.IOException;
import java.util.ArrayList;
import org.apache.hadoop.conf.Configuration;
import org.apache.hadoop.hbase.HBaseConfiguration;
import org.apache.hadoop.hbase.HColumnDescriptor;
import org.apache.hadoop.hbase.HTableDescriptor;
import org.apache.hadoop.hbase.TableName;
import org.apache.hadoop.hbase.client.HBaseAdmin;
import org.apache.hadoop.hbase.client.HTable;
import org.apache.hadoop.hbase.client.Put;
import org.apache.hadoop.hbase.util.Bytes;
import org.junit.Test;
public class HbaseDao {
@Test
public void insertTest() throws Exception{
Configuration conf = HBaseConfiguration.create();
conf.set("hbase.zookeeper.quorum", "weekend05:2181,weekend06:2181,weekend07:2181");
HTable nvshen = new HTable(conf, "nvshen");
Put name = new Put(Bytes.toBytes("rk0001"));
name.add(Bytes.toBytes("base_info"), Bytes.toBytes("name"), Bytes.toBytes("angelababy"));
Put age = new Put(Bytes.toBytes("rk0001"));
age.add(Bytes.toBytes("base_info"), Bytes.toBytes("age"), Bytes.toBytes(18));
ArrayList<Put> puts = new ArrayList<>();
puts.add(name);
puts.add(age);
nvshen.put(puts);
}
public static void main(String[] args) throws Exception {
Configuration conf = HBaseConfiguration.create();
conf.set("hbase.zookeeper.quorum", "weekend05:2181,weekend06:2181,weekend07:2181");
HBaseAdmin admin = new HBaseAdmin(conf);
TableName name = TableName.valueOf("nvshen");
HTableDescriptor desc = new HTableDescriptor(name);
HColumnDescriptor base_info = new HColumnDescriptor("base_info");
HColumnDescriptor extra_info = new HColumnDescriptor("extra_info");
base_info.setMaxVersions(5);
desc.addFamily(base_info);
desc.addFamily(extra_info);
admin.createTable(desc);
}
}
或者 HbaseDemo.java
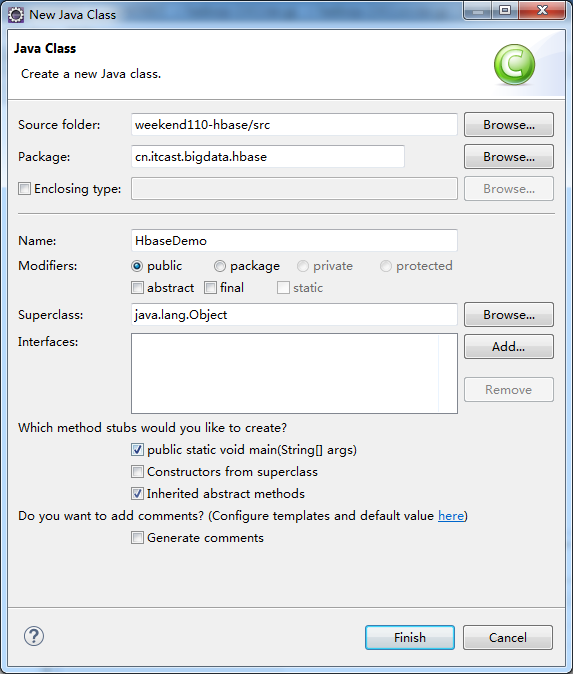
package cn.itcast.bigdata.hbase;
import java.io.IOException;
import java.util.ArrayList;
import org.apache.hadoop.conf.Configuration;
import org.apache.hadoop.hbase.HBaseConfiguration;
import org.apache.hadoop.hbase.HColumnDescriptor;
import org.apache.hadoop.hbase.HTableDescriptor;
import org.apache.hadoop.hbase.TableName;
import org.apache.hadoop.hbase.client.HBaseAdmin;
import org.apache.hadoop.hbase.client.HTable;
import org.apache.hadoop.hbase.client.Put;
import org.apache.hadoop.hbase.util.Bytes;
import org.junit.Test;
public class HbaseDao {
@Test
public void insertTest() throws Exception{
Configuration conf = HBaseConfiguration.create();
conf.set("hbase.zookeeper.quorum", "weekend05:2181,weekend06:2181,weekend07:2181");
HTable nvshen = new HTable(conf, "nvshen");
Put name = new Put(Bytes.toBytes("rk0001"));
name.add(Bytes.toBytes("base_info"), Bytes.toBytes("name"), Bytes.toBytes("angelababy"));
Put age = new Put(Bytes.toBytes("rk0001"));
age.add(Bytes.toBytes("base_info"), Bytes.toBytes("age"), Bytes.toBytes(18));
ArrayList<Put> puts = new ArrayList<>();
puts.add(name);
puts.add(age);
nvshen.put(puts);
}
public static void main(String[] args) throws Exception {
Configuration conf = HBaseConfiguration.create();
conf.set("hbase.zookeeper.quorum", "weekend05:2181,weekend06:2181,weekend07:2181");
HBaseAdmin admin = new HBaseAdmin(conf);
TableName name = TableName.valueOf("nvshen");
HTableDescriptor desc = new HTableDescriptor(name);
HColumnDescriptor base_info = new HColumnDescriptor("base_info");
HColumnDescriptor extra_info = new HColumnDescriptor("extra_info");
base_info.setMaxVersions(5);
desc.addFamily(base_info);
desc.addFamily(extra_info);
admin.createTable(desc);
}
}
藏经阁技术资料分享群二维码
