Overview
Oracle E-Business Suite Integrated SOA Gateway allows you to use PL/SQL application programming interfaces (APIs) to insert or update data in Oracle E-Business Suite. APIs are stored procedures that let you update or retrieve data from Oracle E-Business Suite.
After a PL/SQL API interface definition is exposed as a SOAP Web service represented in WSDL, the deployed service can be orchestrated into a meaningful BPEL process within a SOA Composite application with service endpoints. At run time, the SOA Composite in the WebLogic managed server where the soa-infra application is running can be exposed to customers and invoked through any of the Web service clients or orchestration tools including Oracle JDeveloper, Apache Axis, .NET Web Service Client, Oracle BPEL Process Manager, and Oracle Enterprise Service Bus (ESB).
In addition to SOAP services, PL/SQL APIs can be exposed as REST services. To better understand how to use each Web service in inserting or updating application data, detailed design-time and run-time tasks are discussed in this chapter. For the example described in the following sections, Oracle JDeveloper 11g (11.1.1.6.0) is used as a design-time tool to create a SOA composite application with BPEL process and Oracle SOA Suite 11g (11.1.1.6.0) is used for the process deployment.
Note: While using Oracle JDeveloper with other Oracle Fusion Middleware components (such as Oracle SOA Suite), to enable SOA technologies, you need to manually download Oracle SOA Suite Composite Editor, a JDeveloper's extension for SOA technologies. For more information on installing additional Oracle Fusion Middleware design time components, see the Oracle Fusion Middleware Installation Guide for Oracle JDeveloper.
This chapter includes the following topics:
Using PL/SQL SOAP Services
SOA Composite Application with BPEL Process Scenario
Take PL/SQL Supplier Ship and Debit Request API OZF_SD_REQUEST_PUB as an example to explain the creation of a SOA Composite application with BPEL process.
When the creation of a ship and debit request is received, the creation information including input ship and debit payload will be read and passed to create a ship and debit request.
-
Invoking a Synchronous SOAP Web Service
A synchronous service is used to process the request if all needed information is supplied immediately. The request number will be returned to the requestor synchronously.
When the SOA Composite application with BPEL process has been successfully executed after deployment, a ship and debit request is created in the Oracle Order Management. The request number should be the same as the payload input value.
See: Invoking a Synchronous SOAP Web Service from a SOA Composite Application with BPEL Process.
-
Invoking an Asynchronous SOAP Web Service
If a response message does not return to the requestor right away or if it takes longer time to process the request, an asynchronous Web service can be used instead. Once the request is completed, the response information will be received.
A SOA Composite application with BPEL process will be created. The BPEL process whose input will be the response of an asynchronous operation. This BPEL process writes the response received to an output file on the server where the SOA Composite is deployed.
See: Invoking an Asynchronous SOAP Web Service from a SOA Composite Application with BPEL Process.
Prerequisites to Create a SOA Composite Application with BPEL Process Using a PL/SQL Web Service
Before performing the design-time tasks for PL/SQL Web services, you need to ensure the following tasks are in place:
Note: Before generating the Web service for a selected interface, a security grant can be created for a specific user (such as "TRADEMGR") or user group if necessary to ensure the user has the access privilege to the interface.
-
An integration administrator or integration developer needs to generate a Web service first. The administrator will deploy the generated service to an Oracle SOA Suite WebLogic managed server.
-
An integration developer needs to locate and record the deployed WSDL URL for the PL/SQL interface exposed as a Web service.
-
SOAHeader variables need to be populated for Web service authorization.
Please note that certain PL/SQL APIs exposed from Oracle E-Business Suite Integrated SOA Gateway take record types as input. Such APIs expect default values to be populated for parameters within these record types for successful execution.
The default values are FND_API.G_MISS_CHAR for characters, FND_API.G_MISS_DATE for dates, and FND_API.G_MISS_NUM for numbers. Oracle E-Business Suite Integrated SOA Gateway can default these values when the parameters within the record type are passed as nil values, for example, as shown below:
<PRICE_LIST_REC>
<ATTRIBUTE1 xsi:nil="true"/>
<ATTRIBUTE2 xsi:nil="true"/>
<ATTRIBUTE3 xsi:nil="true"/>
...
</PRICE_LIST_REC>
Deploying a PL/SQL Web Service Composite
An integration administrator or integration developer must first create a Web service for a selected interface definition, and then the administrator can deploy the service from Oracle Integration Repository to an Oracle SOA Suite WebLogic managed server.
For example, the following steps must be performed first before the integration developer creates a BPEL process by using the deployed WSDL:
-
To generate a Web service, the integration administrator or the integration developer locates the interface definition first (such as a PL/SQL interface OZF_SD_REQUEST_PUB) and selects desired interaction pattern information (either synchronous or asynchronous or both patterns) from the Interaction Pattern table. This can be selected at the interface level or at the method level before clicking Generate in the interface details page.
Once the service has been successfully generated, the SOAP Service Status field changed from 'Not Generated' to 'Generated' in the SOAP Web Service tab. For detailed instructions on how to generate a Web service, see Generating SOAP Web Services, Oracle E-Business Suite Integrated SOA Gateway Implementation Guide.
-
To deploy a generated Web service, the administrator selects one authentication type before clicking Deploy. The deployed service in Oracle SOA Suite is an active service and is ready to accept new SOAP requests.
Once the service has been successfully deployed, the selected authentication type will be displayed along with 'Deployed' with 'Active' state in the SOAP Service Status field. For more information on securing Web services with authentication type, see Managing Web Service Security, Oracle E-Business Suite Integrated SOA Gateway Implementation Guide.
For detailed instructions on how to deploy a Web service, see Deploying and Undeploying SOAP Web Services, Oracle E-Business Suite Integrated SOA Gateway Implementation Guide.
Searching and Recording a WSDL URL
Apart from the required tasks mentioned above, the integration developer needs to locate and record the deployed Web service WSDL URL for the interface that needs to be orchestrated into a meaningful BPEL process in Oracle JDeveloper.
This can be done by clicking the View WSDL link in the interface details page. Copy the WSDL URL from the new pop-up window. This URL will be used later in creating a partner link service in a BPEL process.
Viewing and Recording a Deployed WSDL URL

For information on how to search for an interface and view the interface details, see Searching and Viewing Integration Interfaces.
Setting Variables in SOAHeader for a SOAP Request
Certain variables required to set applications context must be populated for SOAHeader elements to pass values during service execution. These SOAHeader elements for PL/SQL interface type are Responsibility, RespApplication, SecurityGroup, NLSLanguage, and Org_Id.
Note: The username and password information is defined by the Web service security policy (such as oracle/wss_username_token_service_policy). Detailed instructions on how to pass the security headers along with the SOAP request, see Configuring Web Service Policies.
The expected values for these elements are described in the following table:
| Element Name | Expected Value |
|---|---|
| Responsibility | responsibility_key (such as "OZF_USER") |
| RespApplication | Application Short Name (such as "OZF") |
| SecurityGroup | Security Group Key (such as "STANDARD") |
| NLSLanguage | NLS Language (such as "AMERICAN") |
| Org_Id | Org Id (such as "204") |
Note: NLS Language and Org_Id are optional values to be passed.
-
If the NLS Language element is specified, SOAP requests can be consumed in the language passed. All corresponding SOAP responses and error messages can also be returned in the same language. If no language is identified, then the default language of the user will be used.
-
If a service execution is dependent on any particular organization, then you must pass the Org_Id element of that SOAP request.
The context information can be specified by configuring an Assign activity before the Invoke activity in the BPEL process.
Detailed information on how to set SOAHeader for the SOAP request, see Assigning SOAHeader Parameters.
Invoking a Synchronous Web Service from a SOA Composite Application with BPEL Process
Based on the single invoice creation scenario, a synchronous Web service is used to process the request when all needed information is supplied immediately. The request number will be returned to the requestor synchronously.
The following design-time tasks are discussed in this chapter:
-
Create a SOA Composite Application with Synchronous BPEL Process
Use this step to create a new SOA Composite application with BPEL project called ShipDebitRequest.bpel using a Synchronous BPEL Process template. This automatically creates two dummy activities - Receive and Reply - to receive input from a third party application and to reply output of the BPEL process to the request application.
-
Use this step to create a ship and debit request in Oracle Order Management by using the Supplier Ship and Debit Request API OZF_SD_REQUEST_PUB exposed as Web service.
-
Add a Partner Link for File Adapter
Use this step to synchronously read invoice header details passed from the first Assign activity.
-
Use this step to configure two Invoke activities in order to:
-
Point to the File Adapter to synchronously read invoice header details that is passed from the first Assign activity.
-
Point to the OZF_SD_REQUEST_PUB partner link to initiate the request creation with payload and transaction details received from the Assign activities.
-
-
Use this step to configure Assign activities in order to pass request header details, payload information and request number to appropriate Invoke activities to facilitate the request creation. At the end, pass the request number to the request application through the dummy Reply activity.
For general information and how to create SOA composite applications using BPEL process service component, see the Oracle Fusion Middleware Developer's Guide for Oracle SOA Suite for details.
Creating a SOA Composite Application with BPEL Process
Use this step to create a new SOA Composite application that will contain various BPEL process activities.
To create a new SOA Composite application with BPEL project:
-
Open Oracle JDeveloper.
-
Click New Application in the Application Navigator.
The "Create SOA Application - Name your application" page is displayed.
The Create SOA Application - Name your application Page

-
Enter an appropriate name for the application in the Application Name field and select SOA Application from the Application Template list.
Click Next. The "Create SOA Application - Name your project" page is displayed.
The Create SOA Application - Name your project Page

-
Enter an appropriate name for the project in the Project Name field, for example, ShipDebitRequest.
-
In the Project Technologies tab, select 'Web Services' and ensure that SOA is selected from the Available technology list to the Selected technology list.
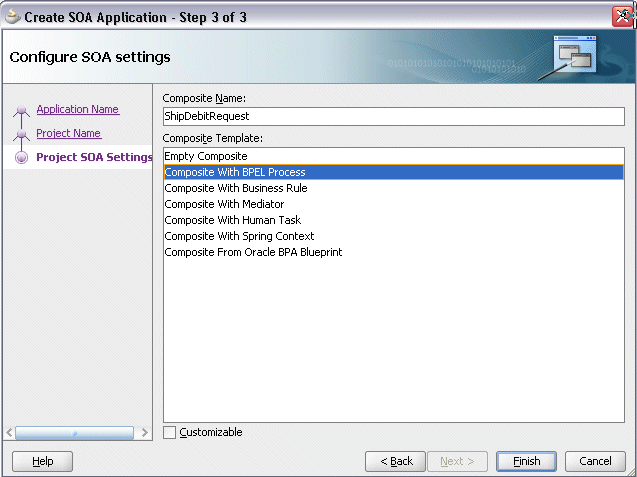
Click Next. The "Create SOA Application - Configure SOA settings" page is displayed.
The Create SOA Application - Configure SOA settings Page
-
Select Composite With BPEL Process from the Composite Template list, and then click Finish. You have created a new application, and a SOA project. This automatically creates a SOA composite.
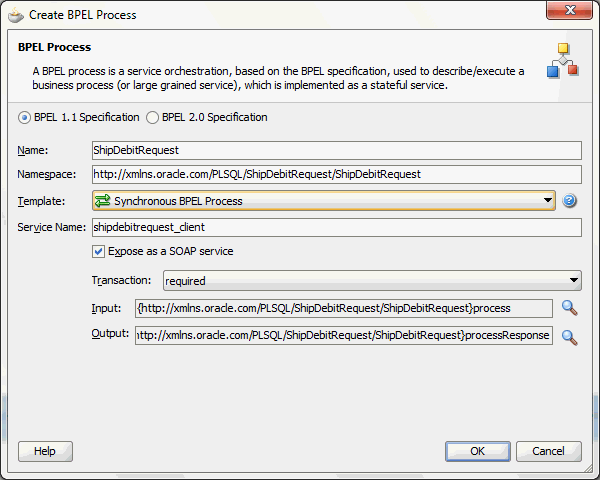
The Create BPEL Process page is displayed.
The Create BPEL Process Page
-
Leave the default BPEL 1.1 Specification selection unchanged. This creates a BPEL project that supports the BPEL 1.1 specification.
Enter an appropriate name for the BPEL process in the Name field, for example, ShipDebitRequest.
Select Synchronous BPEL Process in the Template field.
Select 'required' from the Transaction drop-down list. Click OK.
A synchronous BPEL process is created with the Receive and Reply activities. The required source files including bpel and wsdl, using the name you specified (for example, ShipDebitRequest.bpel and ShipDebitRequest.wsdl) and composite.xml are also generated.
Note: Service Provider does not support service creation for PL/SQL stored procedures or packages which have '$' character in parameter type names. The presence of $ in the name would cause the XSD generation to fail.
-
Navigate to SOA Content > Business Rules and click the composite.xml to view the composite diagram.
Double click on the ShipDebitRequest component to open the BPEL process.
Creating a Partner Link for the Web Service
Use this step to create a Partner Link called OZF_SD_REQUEST_PUB.
To create a partner link for OZF_SD_REQUEST_PUB Web service:
-
In Oracle JDeveloper, place your mouse in the Partner Links area and right click to select Create Partner Link... from the pull-down menu. Alternatively, you can drag and drop Partner Link from the BPEL Constructs list into the right Partner Link swim lane of the process diagram.
The Create Partner Link window appears.
-
Copy the WSDL URL corresponding to the OZF_SD_REQUEST_PUB service that you recorded earlier from the Integration Repository, and paste it in the WSDL File field. Press the [Tab] key.
-
A Partner Link Type message dialog box appears asking whether you want the system to create a new WSDL file that will by default create partner link types for you.
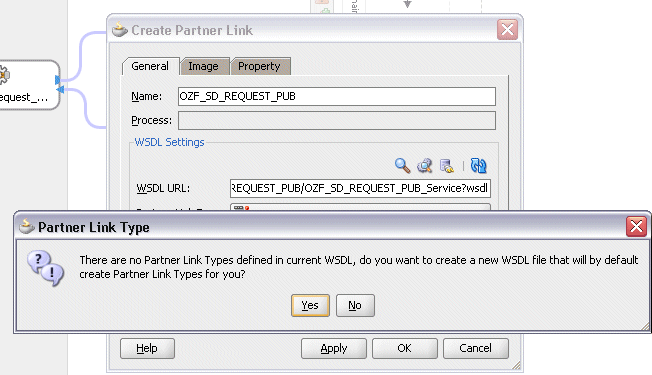
Click Yes to have the Partner Name value populated automatically. Enter the partner link name as OZF_SD_REQUEST_PUB.
Select the Partner Link Type and Partner Role fields from the drop-down lists.
Create Partner Link

Click Apply.
The partner link is created with the required WSDL settings, and is represented in the BPEL project by a new icon in the border area of the process diagram.
-
Click OK to complete the partner link configuration.
Partner Link OZF_SD_REQUEST_PUB is added to the Partner Links section in the BPEL process diagram.
Double click the OZF_SD_REQUEST_PUBWrapper.wsdl and click the Source tab to view the source WSDL description for the partner link you just created.
Adding a Partner Link for File Adapter
Use this step to configure a BPEL process by reading current content of a file.
To add a Partner Link for File Adapter to Read Payload:
-
In Oracle JDeveloper, drag and drop the File Adapter service from the BPEL Services list into the right Partner Link swim lane of the process diagram. The Adapter Configuration wizard welcome page appears.
-
Click Next. The Service Name dialog box appears.
-
Enter a name for the file adapter service such as ReadPayload.
-
Click Next. The Adapter Interface dialog box appears.
Specifying the Operation

-
Select the Define from operation and schema (specified later) radio button and click Next. The Operation dialog box appears.
Specifying the Operation
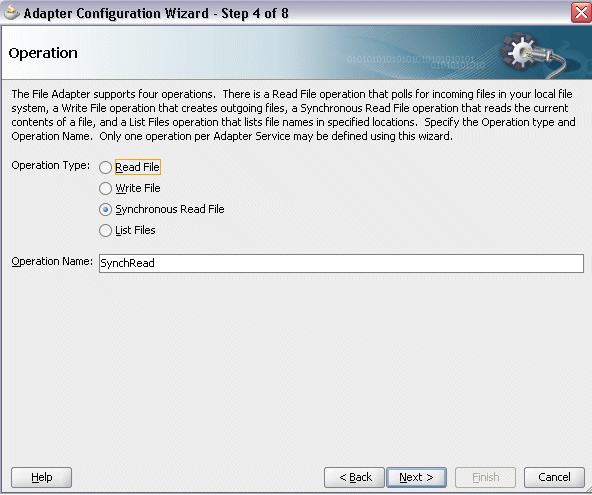
-
Specify the operation type, for example Synchronous Read File. This automatically populates the Operation Name field.
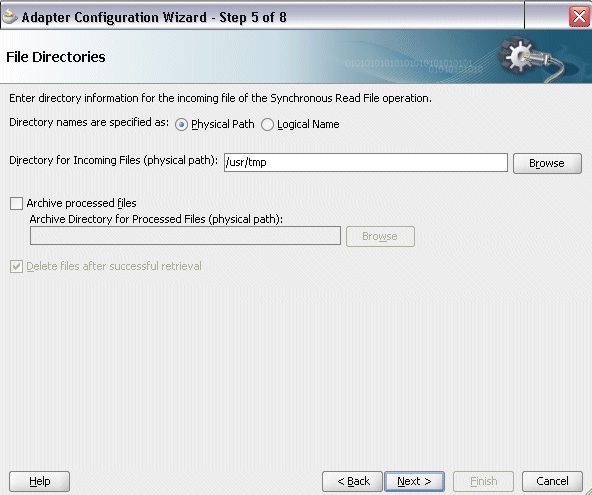
Click Next to access the File Directories dialog box.
Specifying the Input File Directory
-
Select the Physical Path radio button and enter the input payload file directory information. For example, enter /usr/tmp/ as the directory name.
Note: You must ensure the input payload file InputCreateSDRequest.xml is available in the directory ‘/usr/tmp/’ folder of Oracle SOA Suite server.
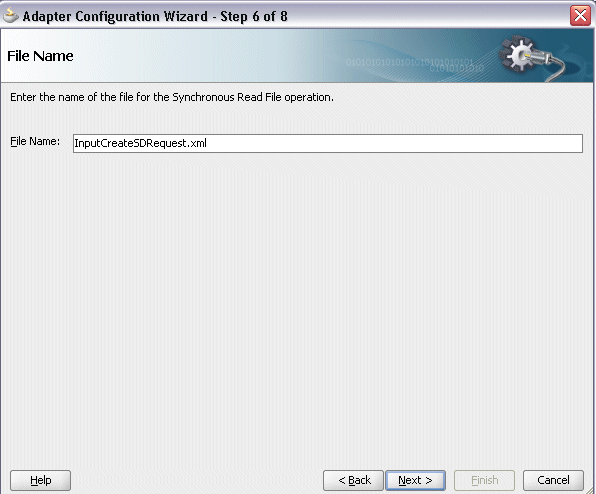
Click Next to open the File Name dialog box.
-
Enter the name of the file for the synchronous read file operation. For example, enter InputCreateSDRequest.xml.
Specifying the Input File Name
Click Next. The Messages dialog box appears.
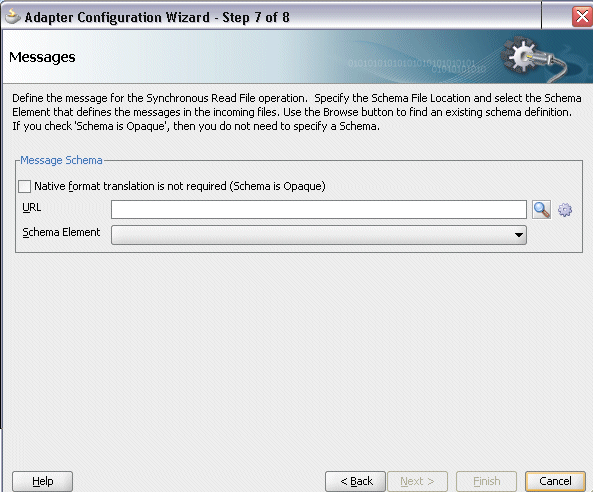
Specifying Message Schema
-
Select Browse for schema file in front of the URL field.
The Type Chooser window is displayed.
Click the Import Schema Files button on the top right corner of the Type Chooser window.
Enter the schema location for the service. Such as http://<soa_suite_hostname>:<port>/soa-infra/services/default/<jndi_name>_PLSQL_OZF_SD_REQUEST_PUB/OZF_SD_REQUEST_PUB_Service?XSD=xsd/APPS_ISG_CREATE_SD_REQUEST_OZF_SD_REQUEST_PUB-24CREATE_SD_.xsd.
Schema location for your service can be found from the service WSDL URL (for example, http://<soa_suite_hostname>:<port>/soa-infra/services/default/<jndi_name>_PLSQL_OZF_SD_REQUEST_PUB/OZF_SD_REQUEST_PUB_Service/?wsdl).
Select the Copy to Project check box and click OK.
Importing Schema File
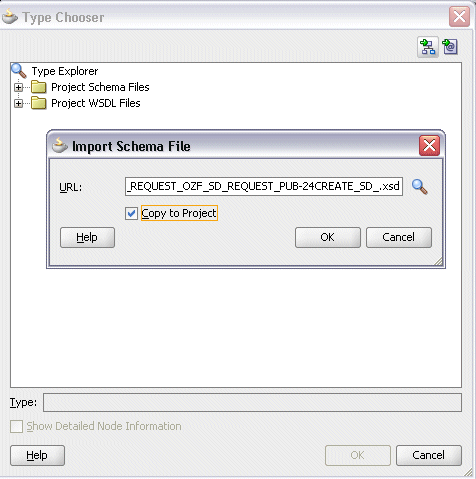
Select the Maintain original directory structure for imported files Copy Options check box and click OK.

The Imported Schema folder is automatically added to the Type Chooser window.
Identifying Message Schema
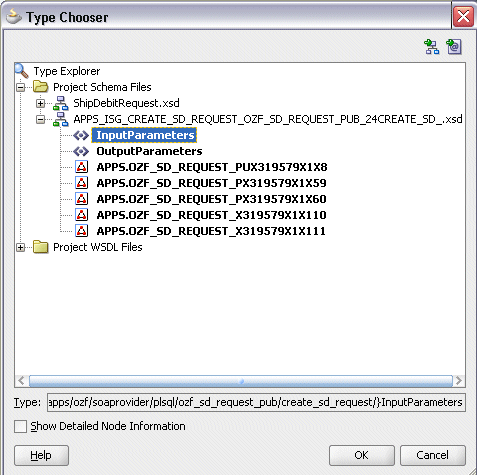
Select InputParameters Message in the APPS_ISG_CREATE_SD_REQUEST_OZF_SD_REQUEST_PUB-24CREATE_SD_.xsd. Click OK.
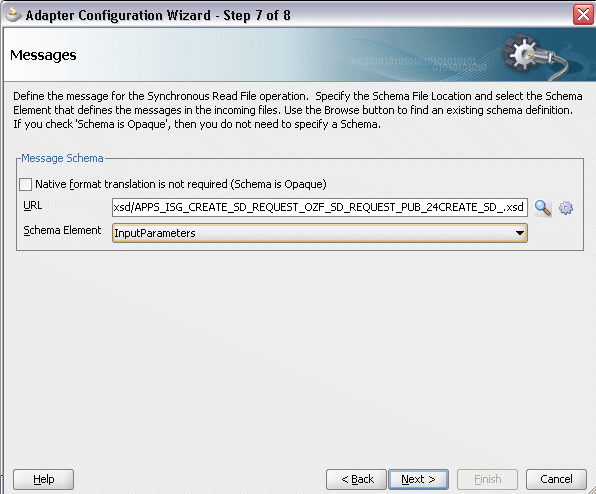
The selected .xsd is displayed as URL, and the InputParameters is selected as Schema Element.
Viewing Selected Message Schema and Element
-
Click Next and then Finish. The wizard generates the WSDL file corresponding to the partner link. The main Create Partner Link dialog box appears, specifying the new WSDL file ReadPayload.wsdl.
Completing the Partner Link Configuration
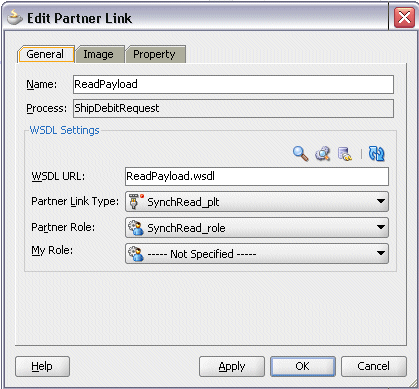
Click Apply and then OK to complete the configuration and create the partner link with the required WSDL settings for the File Adapter service.
The ReadPayload Partner Link appears in the BPEL process diagram.
-
Under applications window, navigate to file ReadPayload_file.jca. Set value of property "DeleteFile" to "false".

Adding Invoke Activities
This step is to configure two Invoke activities:
-
Read request creation details that is passed from the first Assign activity using ReadPayload partner link for File Adapter.
-
Send the payload and request details received from the Assign activities to create a ship and debit request by using the OZF_SD_REQUEST_PUB partner link.
To add an Invoke activity for ReadPayload Partner Link:
-
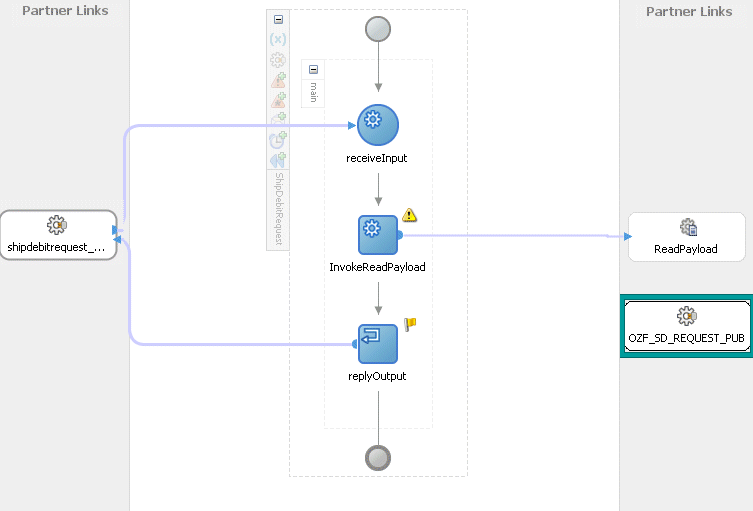
In Oracle JDeveloper, expand the BPEL Constructs from the Component Palette. Drag and drop the Invoke activity into the center swim lane of the process diagram, between the receiveInput and replyOutput activities.
-
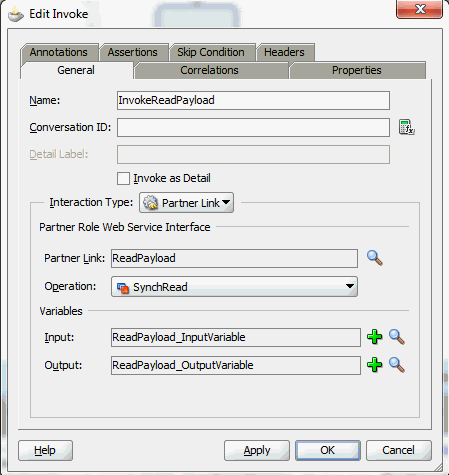
Link the Invoke activity to the ReadPayload service. The Edit Invoke dialog box appears.
-
Enter a name for the Invoke activity, and then click the Create icon next to the Input Variable field to create a new variable. The Create Variable dialog box appears.
Enter 'ReadPayload_InputVariable' as the input variable name. You can also accept the default name.
Creating a Variable
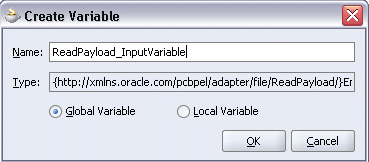
Select Global Variable and click OK.
-
Click the Create icon next to the Output Variable field to create a new variable. The Create Variable dialog box appears.
Enter 'ReadPayload_OutputVariable' as the output variable name. You can also accept the default name.
Select Global Variable, and then enter a name for the variable. Click OK.
Editing the Invoke Activity
-
Click Apply and then OK in the Edit Invoke dialog box to finish configuring the Invoke activity.
The Invoke activity appears in the process diagram.
Adding an Invoke Activity
To add an Invoke activity for OZF_SD_REQUEST_PUB Partner Link:
-
In Oracle JDeveloper, expand the BPEL Constructs from the Component Palette. Drag and drop the Invoke activity into the center swim lane of the process diagram, after the first Invoke activity and the reployOutputactivity.
-
Link the Invoke activity to the OZF_SD_REQUEST_PUB service. The Edit Invoke dialog box appears.
-
Enter a name for the Invoke activity such as 'Invoke_EBS_SDR_Service'.
In the Operation field, select CREATE_SD_REQUEST from the drop-down list.
-
Create global Input and Output variables as CREATE_SD_REQUEST_InputVariable and CREATE_SD_REQUEST_OutputVariable.
Click OK in Edit Invoke.
Click Apply and then OK in the Edit Invoke dialog box to finish configuring the Invoke activity.
The Invoke activity appears in the process diagram.
Adding Assign Activities
This step is to configure four Assign activities:
-
To set the SOAHeader details for ship and debit SOAP request.
Note: You need to populate certain variables in the BPEL process for SOAHeader elements to pass values that may be required to set applications context during service execution. These SOAHeader elements areResponsibility, RespApplication, SecurityGroup, NLSLanguage, and Org_Id.
-
To set input payload for SOAP request.
-
To set input for SOAP request.
-
To set the SOAP response to output.
To add the first Assign activity to set SOAHeader details:
Assigning SOAHeader Parameters:
-
In Oracle JDeveloper, expand the BPEL Constructs from the Component Palette. Drag and drop the Assign activity into the center swim lane of the process diagram between the two Invoke activities you just created earlier.
-
Double-click the Assign activity to access the Edit Assign dialog box.
-
Click the General tab to enter the name for the Assign activity, such as 'SetSOAHeader'.
-
Select the Copy Rules tab to expand the target trees:
-
Click the Expression icon to invoke the Expression Builder dialog.
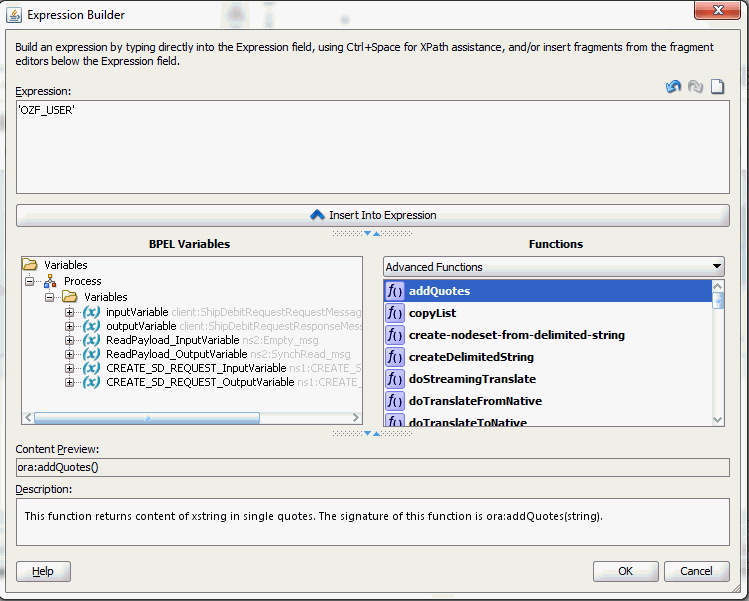
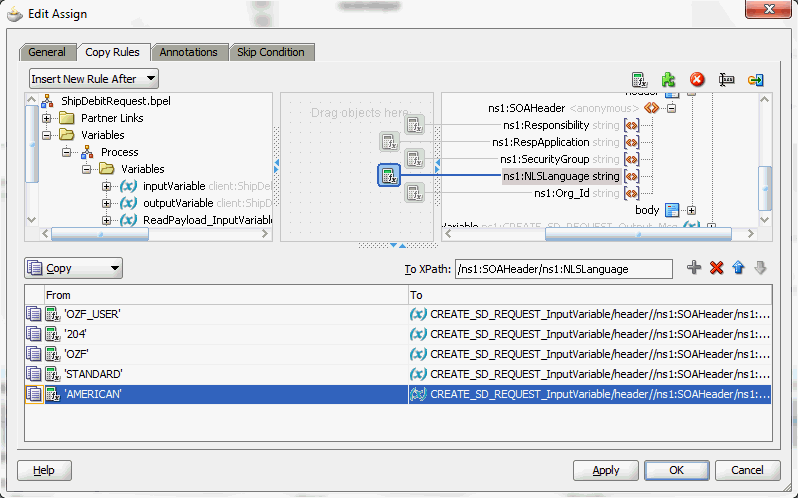
Enter 'OZF_USER' in the Expression box. Click OK. The Expression icon with the expression value ('OZF_USER') appears in the center of the Edit Assign dialog, between the From and To navigation tree nodes.
-
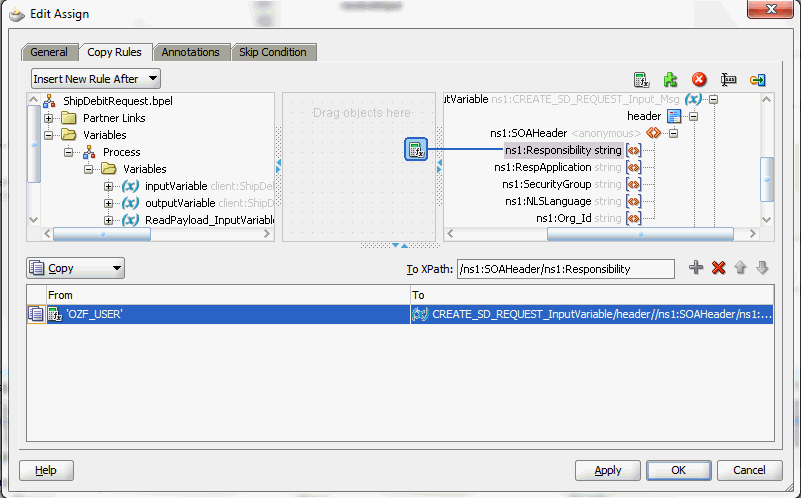
In the To navigation tree, navigate to Variables > Process > Variables > CREATE_SD_REQUEST_InputVariable > header > ns1:SOAHeader and select ns1:Responsibility. The To XPath value is displayed.
-
Drag the Expression icon to connect to the target node (ns1:Responsibility) that you just identified. This creates a line that connects the source and target nodes. The copy rule is displayed in the From and To sections at the bottom of the Edit Assign dialog box.
Assigning Parameters
-
-
Enter second pair of parameters by clicking the Expression icon to invoke the Expression Builder dialog.
-
Enter 'OZF' in the Expression box. Click OK. The Expression icon with the expression value ('OZF') appears in the center of the Edit Assign dialog, between the From and To navigation tree nodes.
-
In the To navigation tree, navigate to Variables > Process > Variables > CREATE_SD_REQUEST_InputVariable > header > ns1:SOAHeader and select ns1:RespApplication. The To XPath field should contain your selected entry.
-
Drag the Expression icon to connect to the target node (ns1:RespApplication) that you just identified. This creates a line that connects the source and target nodes. The copy rule is displayed in the From and To sections at the bottom of the Edit Assign dialog box.
-
-
Enter the third pair of parameters by clicking the Expression icon to invoke the Expression Builder dialog.
-
Enter 'STANDARD' in the Expression box. Click OK. The Expression icon with the expression value ('STANDARD') appears in the center of the Edit Assign dialog, between the From and To navigation tree nodes.
-
In the To navigation tree, navigate to Variables > Process > Variables > CREATE_SD_REQUEST_InputVariable > header > ns1:SOAHeader and select ns1:SecurityGroup. The XPath field should contain your selected entry.
-
Drag the Expression icon to connect to the target node (ns1:SecurityGroup) that you just identified. This creates a line that connects the source and target nodes. The copy rule is displayed in the From and To sections at the bottom of the Edit Assign dialog box.
-
-
Enter the fourth pair of parameters by clicking the Expression icon to invoke the Expression Builder dialog.
-
Enter 'AMERICAN' in the Expression box. Click OK. The Expression icon with the expression value ('AMERICAN') appears in the center of the Edit Assign dialog, between the From and To navigation tree nodes.
-
In the To navigation tree, navigate to Variables > Process > Variables > CREATE_SD_REQUEST_InputVariable > header > ns1:SOAHeader and select ns1:NLSLanguage. The XPath field should contain your selected entry.
-
Drag the Expression icon to connect to the target node (ns1:NLSLanguage) that you just identified. This creates a line that connects the source and target nodes. The copy rule is displayed in the From and To sections at the bottom of the Edit Assign dialog box.
-
-
Enter the fifth pair of parameters by clicking the Expression icon to invoke the Expression Builder dialog.
-
Enter '204' in the Expression box. Click OK. The Expression icon with the expression value ('204') appears in the center of the Edit Assign dialog, between the From and To navigation tree nodes.
-
In the To navigation tree, select type Variable. Navigate to Variables > Process > Variables > CREATE_SD_REQUEST_InputVariable > header > ns1:SOAHeader and select ns1:Org_Id. The XPath field should contain your selected entry.
-
Drag the Expression icon to connect to the target node (ns1:Org_Id) that you just identified. This creates a line that connects the source and target nodes. The copy rule is displayed in the From and To sections at the bottom of the Edit Assign dialog box.
-
-
The Edit Assign dialog box appears.
Assign Parameters
-
Click Apply and then OK to complete the configuration of the Assign activity.
To enter the second Assign activity to pass payload information to the Invoke_EBS_SDR_Service Invoke activity:
-
Add the second Assign activity by dragging and dropping the Assign activity from the BPEL Constructs in the Component Palette into the center swim lane of the process diagram, between the 'SetSOAHeader' Assignactivity and the 'Invoke_EBS_SDR_Service' Invoke activity.
-
Repeat Step 2 to Step 3 described in creating the first Assign activity to add the second Assign activity called 'SetPayload'.
-
Select the Copy Rules tab and expand the source and target trees:
-
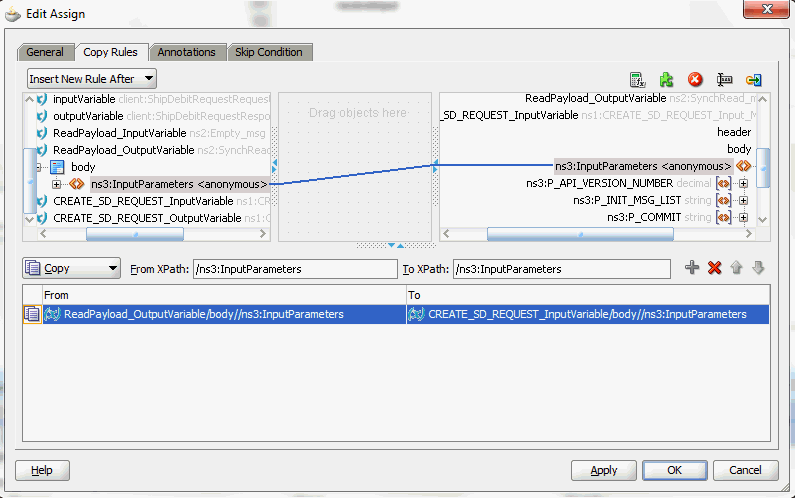
In the From navigation tree, navigate to Variable > Process > Variables > InputVariable > ReadPayload_OutVariable > body and select ns3:InputParameters. The From XPath field is also displayed.
-
In the To navigation tree, navigate to Variable > Process > Variables > CREATE_SD_REQUEST_InputVariable > body and select ns3:InputParameters. The To XPath field is also displayed.
Drag the source node (InputParameters) to connect to the target node (InputParameters) that you just identified. This creates a line that connects the source and target nodes. The copy rule is displayed in the From and To sections at the bottom of the Edit Assign dialog box.
Assigning Parameters
-
-
Click Apply and then OK to complete the configuration of the second Assign activity.
Defining Schema for BPEL Process Input Request
Before setting the input request for the SOAP request, you need to define necessary schema for BPEL process request.
-
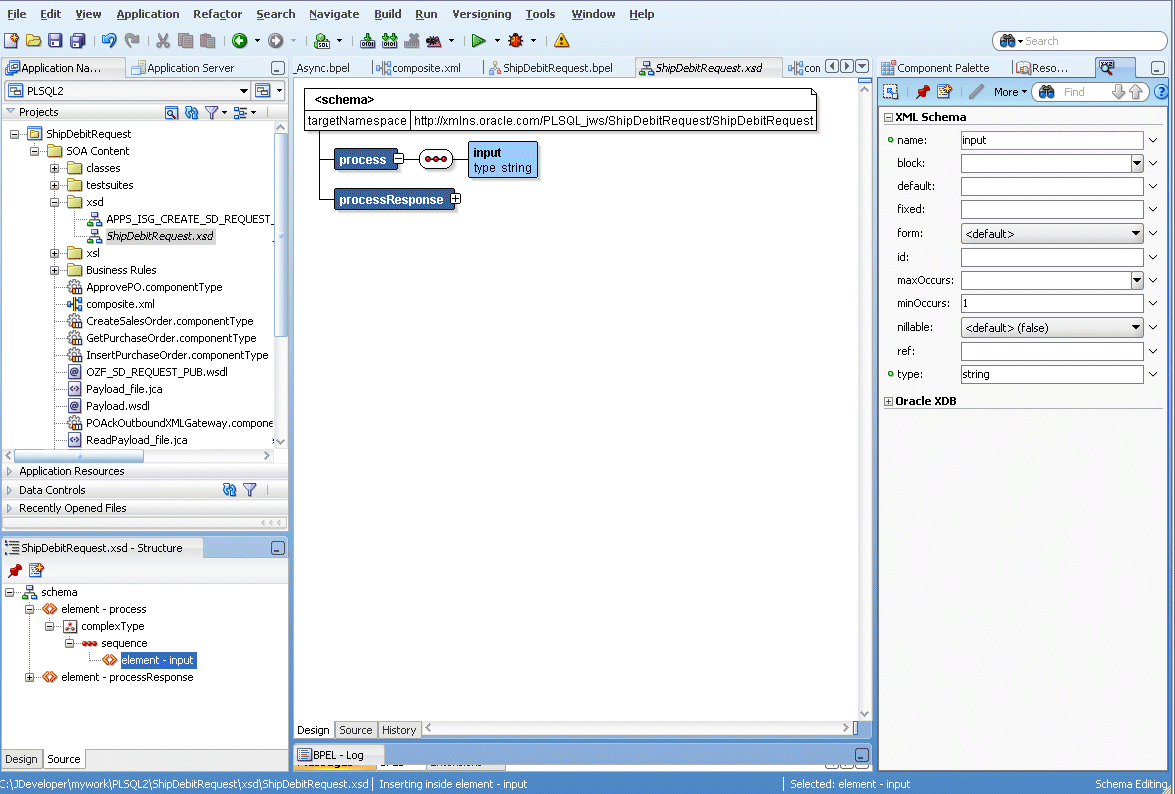
From the Applications Navigator window, expand the ShipDebitRequest > SOA Content > xsd folder to open the ShipDebitRequest.xsd file.
-
In the Design mode, expand 'process' to view elements within process request.
Defining Schema for BPEL Process Request
-
Click on element 'input' and change the property name from 'input' to ‘request_number' in the XML Schema window.
-
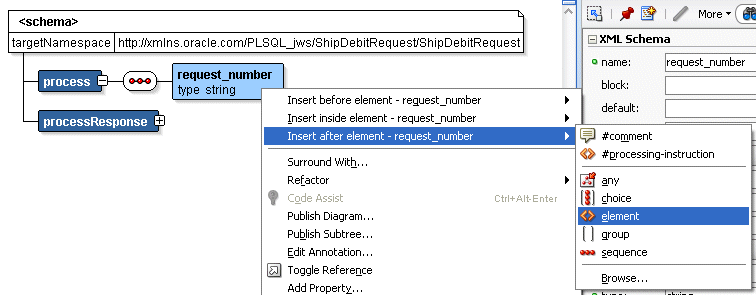
Select and right-click on the 'request_number’ element to open the pop-up menu.
Select the Insert after element – request_number > element option. New element 'element1' is displayed in the schema design window underneath the 'request_number' element.
From the element properties section, change the name from 'element1' to 'description’ and enter type as ‘string’.
Adding Schema Elements
-
Similarly, insert another element called ‘req_max_qty’ after element ‘description’.
Enter default value as ‘200’ and type as ‘decimal’.
Right-click on mouse and select the Rebuild option.
Rebuilding Schema Elements
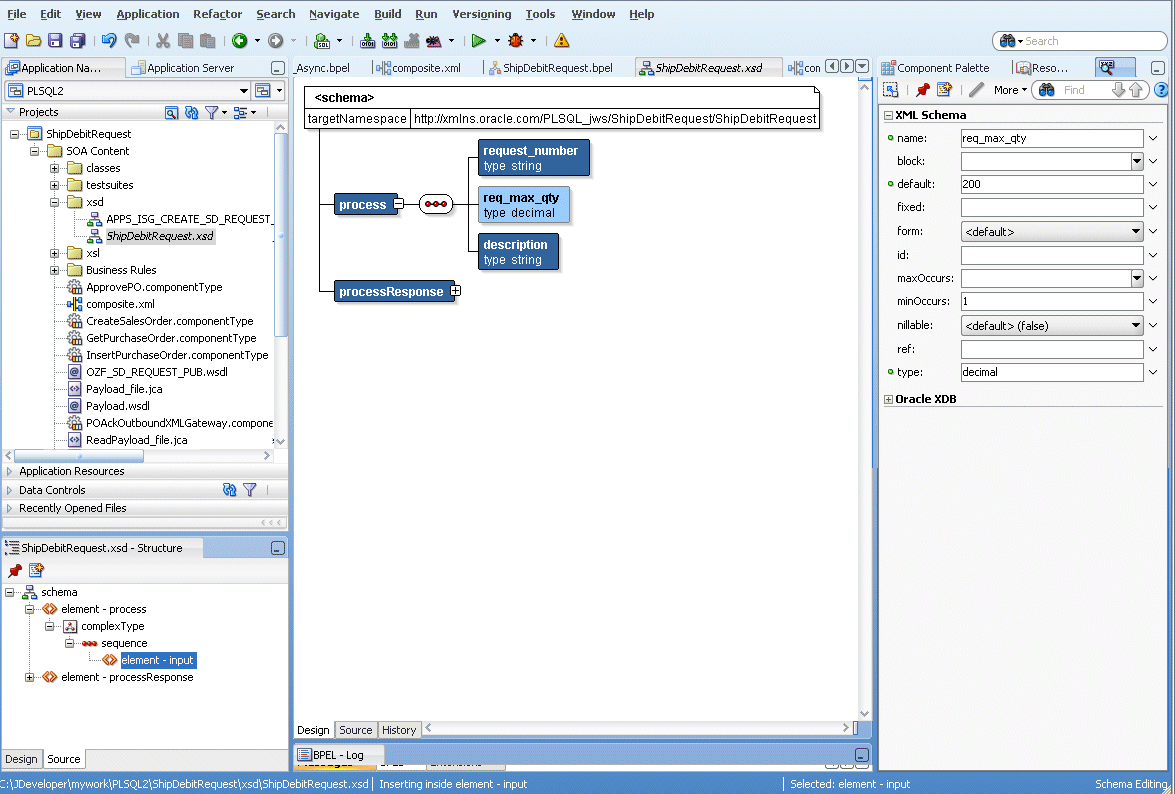
Look for compilation messages in Log to ensure the successful compilation.
To set the third Assign activity to pass the input request to the Invoke_EBS_SDR_Service Invoke activity:
-
Add the third Assign activity by dragging and dropping the Assign activity from the BPEL Constructs in the Component Palette into the center swim lane of the process diagram, between the second Assign activity 'SetPayload' and the Invoke_EBS_SDR_Service Invoke activity.
-
Repeat Step 2 to Step 3 described in creating the first Assign activity to add the third Assign activity called 'SetInput'.
-
Select the Copy Rules tab and expand the source and target trees:
-
In the From navigation tree, navigate to Variable > Process > Variables > inputVariable > Payload > client:ShipDebitRequestProcessRequst and select client:request_number. The From XPath field is also displayed.
-
In the To navigation tree, navigate to Variable > Process > Variables > Create_SD_REQUEST_InputVariable > Body > ns4:InputParameters >ns4:P_SDR_HDR_REC and select ns4:REQUEST_NUMBER. The To XPath field is also displayed.
Drag the source node (client:request_number) to connect to the target node (ns4:REQUEST_NUMBER) that you just identified. This creates a line that connects the source and target nodes. The copy rule is displayed in the From and To sections at the bottom of the Edit Assign dialog box.
-
-
Enter the second pair of parameters with the following values:
-
In the From navigation tree, navigate to Variable > Process > Variables > inputVariable > Payload > client:ShipDebitRequestProcessRequst and select client:description. The XPath field should contain your selected entry.
-
In the To navigation tree, navigate to Variable > Process > Variables > Create_SD_REQUEST_InputVariable > Body > ns4:InputParameters >ns4:P_SDR_HDR_REC and selectns4:REQUEST_DESCRIPTION. The XPath field should contain your selected entry.
Drag the source node (client:description) to connect to the target node (ns4:REQUEST_DESCRIPTION) that you just identified. This creates a line that connects the source and target nodes. The copy rule is displayed in the From and To sections at the bottom of the Edit Assign dialog box.
-
-
Enter the third pair of parameters with the following values:
-
In the From navigation tree, navigate to Variable > Process > Variables > inputVariable > Payload > client:ShipDebitRequestProcessRequst and select client:req_max_qty. The XPath field should contain your selected entry.
-
In the To navigation tree, navigate to Variable > Process > Variables > Create_SD_REQUEST_InputVariable > Body > ns4:InputParameters >ns4:P_SDR_LINES_TBL > ns4:P_SDR_LINES_TBL_ITEMand select ns4:MAX_QTY. The XPath field should contain your selected entry.
Drag the source node (client:req_max_qty) to connect to the target node (ns4:MAX_QTY) that you just identified. This creates a line that connects the source and target nodes. The copy rule is displayed in the From and To sections at the bottom of the Edit Assign dialog box.

-
-
Click Apply and then OK to complete the configuration of the Assign activity.
To add the fourth Assign activity to set SOAP response to output:
-
Add the fourth Assign activity by dragging and dropping the Assign activity from the BPEL Constructs in the Component Palette into the center swim lane of the process diagram, between the Invoke_EBS_SDR_ServiceInvoke and the replyOutput activities.
-
Repeat Step 2 to Step 3 described in creating the first Assign activity to add the fourth Assign activity called 'SetResponse'.
-
Select the Copy Rules tab and expand the source and target trees:
-
In the From navigation tree, navigate to Variable > Process > Variables > CREATE_SD_REQUEST_OutputVariable> body > ns3:OutputParameters and select ns3:X_RETURN_STATUS.
-
In the To navigation tree, navigate to Variable > Process > Variables > outputVariable> payload and select client:processResponse.
Drag the source node (ns3:X_RETURN_STATUS) to connect to the target node (client:processResponse) that you just identified. This creates a line that connects the source and target nodes. The copy rule is displayed in the From and To sections at the bottom of the Edit Assign dialog box.

-
-
Click Apply and then OK to complete the configuration of the Assign activity.
Configuring Web Service Policies
Use the following steps to add a security policy at design time:
-
Navigate to SOA Content > Business Rules > composite.xml. Right click on the OZF_SD_REQUEST_PUB service and select "Configure WS Policies" from the drop-down list.
-
The Configure SOA WS Policies dialog appears.
In the Security section, click the Add icon (+). The Select Server Security Policies dialog appears.
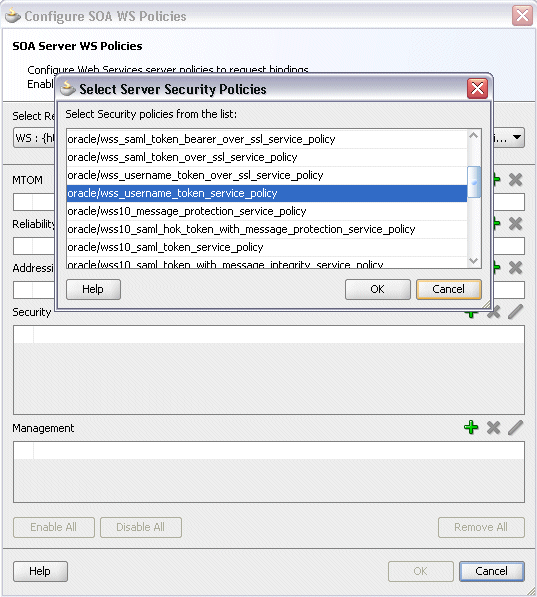
Select 'oracle/wss_username_token_service_policy' and click OK.
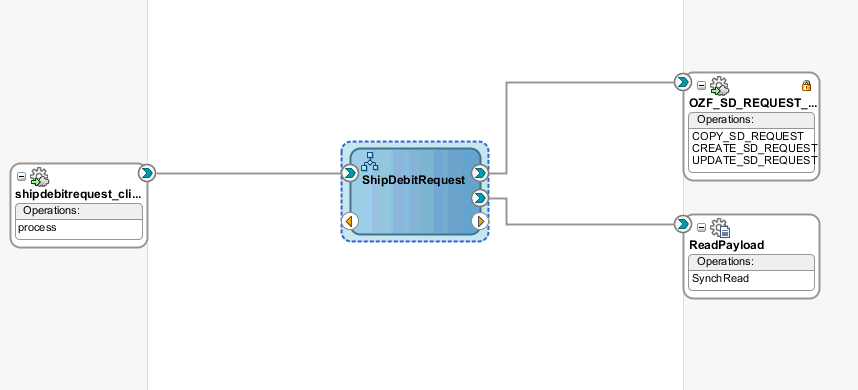
The attached security policy is shown in the Security section.
A lock icon appears in the OZF_SD_REQUEST_PUB service of the composite.xml indicating that a security policy has been successfully attached.
-
From the navigation menu, select View > Property Inspector to display the Property Inspector window for OZF_SD_REQUEST_PUB service component.
In the Properties section, click the Add icon (+) for binding properties. The Create Property dialog appears.
Enter 'oracle.webservices.auth.username' in the Name field and enter 'operations' as the value.
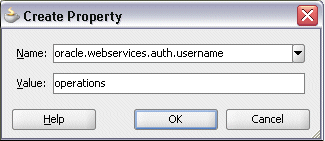
Click OK.
-
Use the same approach by clicking the Add icon (+) again in the Properties section for binding properties. Enter 'oracle.webservices.auth.password' in the Name field. Enter the associated password for user 'operations' in the Value field.
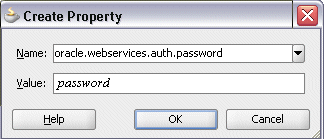
Click OK.
Both selected property names and values appear in the Properties section.
Click the Source tab of the composite.xml and notice that the oracle.webservices.auth.username and oracle.webservices.auth.password property names and the associated values are added to the OZF_SD_REQUEST_PUB reference.

Deploying and Testing the SOA Composite with Synchronous BPEL Process
To invoke the synchronous Supplier Ship and Debit Request service (OZF_SD_REQUEST_PUB) from the BPEL client contained in the SOA composite, the SOA composite needs to be deployed to the Oracle WebLogic managed server. This can be achieved using Oracle JDeveloper. Once the composite is deployed, it can be tested from the Oracle Enterprise Manager Fusion Middleware Control Console.
Prerequisites
Before deploying the SOA composite with BPEL process using Oracle JDeveloper, you must have established the connectivity between the design-time environment and the run-time server. For information on how to configure the necessary server connection, see Configuring Server Connection.
Note: If a local instance of the WebLogic Server is used, start the WebLogic Server by selecting Run > Start Server Instance from Oracle JDeveloper. Once the WebLogic Admin Server "DefaultServer" instance is successfully started, the <Server started in Running mode> and DefaultServer started message in the Running:DefaultServer and Messages logs should appear.
For the payload information on the creation of a supplier ship and debit request, see Sample Payload for Creating Supplier Ship and Debit Request.
Perform the following run-time tasks:
Deploying the SOA Composite with BPEL Process
You must deploy the SOA composite with BPEL process (ShipDebitRequest.bpel) that you created earlier before you can run it.
To deploy the SOA composite application:
-
In the Applications Navigator of JDeveloper, select the ShipDebitRequest project.
-
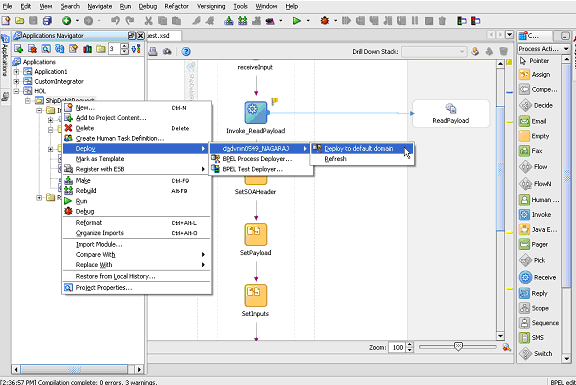
Right-click the project and select Deploy > [project name] > [serverConnection] from the menu.
For example, you can select Deploy > ShipDebitRequest > SOAServer to deploy the process if you have the connection set up appropriately.
Deploying the SOA Composite with BPEL Process
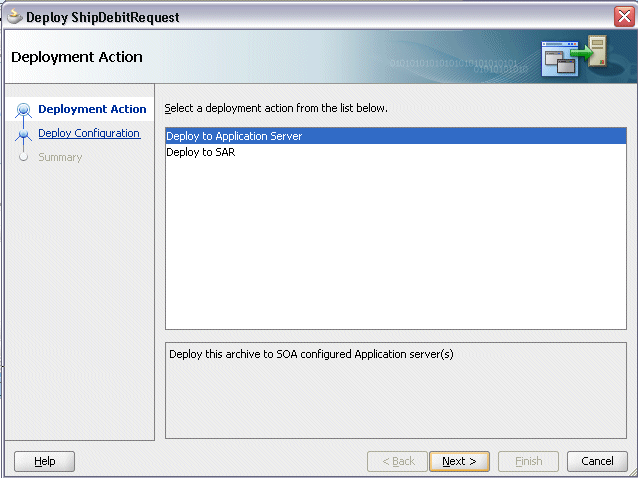
Note: If this is the first time to set up server connection, then the Deployment Action window appears. Select 'Deploy to Application Server' and click Next.
In the Deploy Configuration window, ensure the following information is selected before clicking Next to add a new application server:
-
New Revision ID: 1.0
-
Mark composite revision as default: Select this check box.
-
Overwrite any existing composites with the same revision ID: Select this check box.
The steps to create a new Oracle WebLogic Server connection from JDeveloper are covered in Configuring Server Connection.
-
-
In the Select Server page, select 'soa-server1' that you have established the server connection earlier. Click Next.
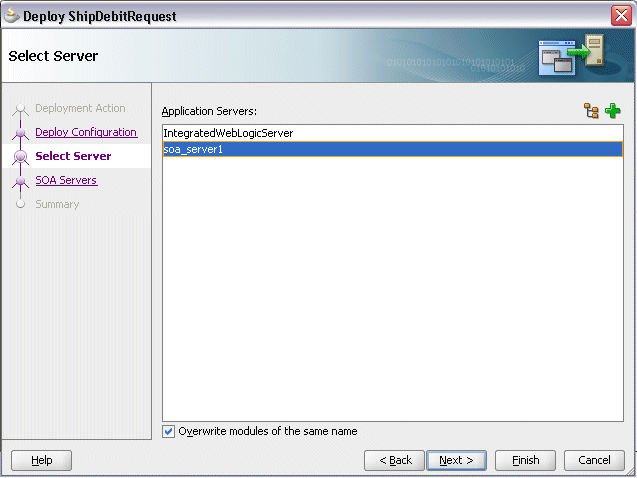
-
In the SOA Servers page, accept the default target SOA Server ('soa-server1') selection.
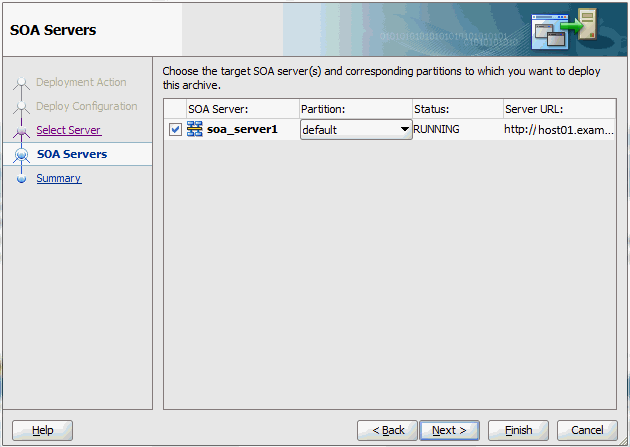
Click Next and Finish.
-
If you are deploying the composite for the first time from your Oracle JDeveloper session, the Authorization Request window appears. Enter username and password information specified during Oracle SOA Suite installation. Click OK.
-
Deployment processing starts. Monitor deployment process and check for successful compilation in the SOA - Log window.
Verify that the deployment is successful in the Deployment - Log window.

Testing the SOA Composite Application
Once the BPEL process contained in the SOA composite application has been successfully deployed, you can manage and monitor the process from Oracle Enterprise Manager Fusion Middleware Control Console. You can also test the process and the integration interface by manually initiating the process.
You can log on to Oracle E-Business Suite to manually initiate the purchase order approval and acknowledgement processes and to confirm that the relevant event is raised and the updated purchased order information is also written in the XML file.
To test the SOA composite application:
-
Navigate to Oracle Enterprise Manager Fusion Middleware Control Console (http://<servername>:<port>/em). The login page appears.

For more information about Oracle SOA Suite, see the Oracle Fusion Middleware Administrator's Guide for Oracle SOA Suite.
-
Enter the username and password information specified during installation. Click Login to log in to a farm. The composite (ShipDebitRequest) you deployed is displayed in the Applications Navigation tree.
You may need to select an appropriate target instance farm if there are multiple target Oracle Enterprise Manager Fusion Middleware Control Console farms.
-
From the Farm navigation pane, expand the SOA >soa-infra node in the tree to navigate through the SOA Infrastructure home page and menu to access your deployed SOA composite applications running on soa-infra managed server.
Click the ShipDebitRequest [1.0] link.

-
Click the Policies tab and notice that the 'oracle/wss_username_token_service_policy' policy you attached to the OZF_SD_REQUEST_PUB service binding earlier at the design time is now displayed here.

-
In the ShipDebitRequest [1.0] home page, click Test.
-
The Test Web Service page for initiating an instance appears.
Note: If the WS-Security credentials are not entered at design time, you can enter the credentials at run time by selecting the WSS Username Token option in the Security section at the top of the Request tab. Enter 'operations' in the Username field and the associated password for user 'operations' in the Password field.

You can specify the following fields as XML payload data to use in the Input Arguments section:
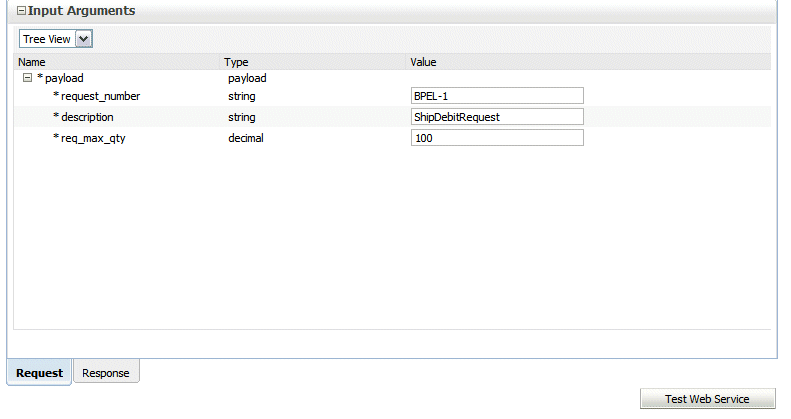
-
request_number: Enter an unique number in this field, such as BPEL-1.
Note: The Request Number entered here should be unique each time that you initiate. The Supplier Ship and Debit Request Number should be unique across users in Supplier Ship and Debit of Oracle Trade Management.
-
description: Enter appropriate description information.
-
req_max_qty: Enter 100 as the value.
Click Test Web Service to initiate the process.
The test results appear in the Response tab upon completion.
-
-
Verifying SOAP Response in the Console
In the Response tab page, click the Launch Message Flow Trace link to view the result of synchronous composite application. The Flow Trace page is displayed.
In the Trace section, verify that ShipDebitRequest, and OZF_SD_REQUEST_PUB components have a Completed state indicating that the application executed successfully.
You can check the Faults section to see if any error occurred during the test.
-
Click your BPEL service component instance link (such as ShipDebitRequest) to display the Instances page where you can view execution details for the BPEL activities in the Audit Trail tab.
Click the Flow tab to check the BPEL process flow diagram. Click an activity of the process diagram to view the activity details and flow of the payload through the process.
-
Verifying Created Supplier Ship and Debit Request in Oracle Trade Management
Log in to Oracle E-Business Suite as a user who has the Oracle Trade Management User responsibility. Select the Supplier Ship and Debit link from the navigation menu to open the Ship and Debit Overview window.
-
Notice that the Request Number BPEL-1 entered earlier is displayed in the list. Click the request number BPEL-1 link to open the Ship and Debit Request Details page for the created request. Verify the details.
Invoking an Asynchronous Web Service from a SOA Composite Application with BPEL Process
SOA Composite Application with BPEL Process Scenario
This example explains the creation of a BPEL process to invoke a method TESTUSERNAME of asynchronous service FND_USER_PKG deployed on Oracle SOA Suite.
When the service has been successfully executed after deployment, the TESTUSERNAME method returns a positive number asynchronously if the username passed as an input argument exists in Oracle E-Business Suite. If the username does not exist, then number 0 is returned instead.
Searching and Recording a WSDL URL
Apart from the required tasks mentioned above, an integration developer needs to ensure that the service has been generated with the support of asynchronous operation pattern. This is achieved by selecting the Asynchronous interaction pattern check box in the Interaction Pattern table for the TESTUSERNAME operation of FND_USER_PKG service in integration Repository, and followed by clicking the Generate button to generate the service with asynchronous operation. Once the service has been successfully generated, it needs to be deployed first before you copy the deployed WSDL URL to create a BPEL client at design time.
Viewing and Recording a Deployed Asynchronous WSDL URL

Client Side Setup Tasks
Oracle E-Business Suite Integrated SOA Gateway asynchronous services have two port types. Each port type performs a one-way operation.
-
One port type initiates the asynchronous process.
Example of this kind of port type can be 'TESTUSERNAME_ASYNCH'.
-
The other one calls back the client with the asynchronous response.
Example of this kind of port type can be 'TESTUSERNAME_ASYNCH_RESPONSE'.
Oracle E-Business Suite Integrated SOA Gateway uses Web Services Addressing (WS-Addressing) to provide transport-neutral mechanisms to address and correlate Web services and messages. WS-Addressing is a public specification and is the default correlation method supported by Oracle E-Business Suite Integrated SOA Gateway. It uses simple object access protocol (SOAP) headers for asynchronous message correlation. Messages are independent of the transport or application used. For more WS-Addressing information, see http://www.w3.org/Submission/ws-addressing/ for details.
To ensure the asynchronous operation works properly, a Web Service Client needs to specify:
-
Endpoint location (in wsa:ReplyTo header): The Reply-To address specifies the location at which a client that also implements Callback port-type is listening for a callback message.
-
Conversation ID (in wsa:MessageID header): The MessageID uniquely identifies a message for the Web Service Client. The same MessageID is returned by Oracle E-Business Suite Integrated SOA Gateway in wsa:RelatesTo header in the callback message.
Establishing an Asynchronous Service Process Flow
To better understand how the asynchronous service will work, the following design-time tasks are included in this chapter:
-
Create a SOA Composite Application
Use this step to create a new SOA Composite application using an Asynchronous BPEL template. This automatically creates two dummy activities - Receive and Reply - to receive input from a third party application and to reply output of the BPEL process to the request application.
-
Use this step to create a partner link using the PL/SQL API FND_USER_PKG exposed as Web service.
-
Use this step to configure an Invoke activity to invoke the service.
-
Use this step to configure a Receive activity to receive the response message from the asynchronous operation and pass it on to the second Assign activity.
-
Use this step to configure two Assign activities in order to pass username from the client as an input value to the Invoke activity, as well as to pass the response message from the Receive activity. The response details will be written as an output file on the server where the BPEL process is deployed.
For general information and how to create SOA composite applications using BPEL process service component, see the Oracle Fusion Middleware Developer's Guide for Oracle SOA Suite for details.
Creating a SOA Composite Application with BPEL Process
Use this step to create a new SOA Composite Application that will contain various BPEL process activities.
To create a new SOA Composite Application with BPEL project:
-
Open Oracle JDeveloper.
-
Click New Application in the Application Navigator.
The "Create SOA Application - Name your application" page is displayed.
-
Enter an appropriate name for the application in the Application Name field and select SOA Application from the Application Template list.
Click Next. The "Create SOA Application - Name your project" page is displayed.
-
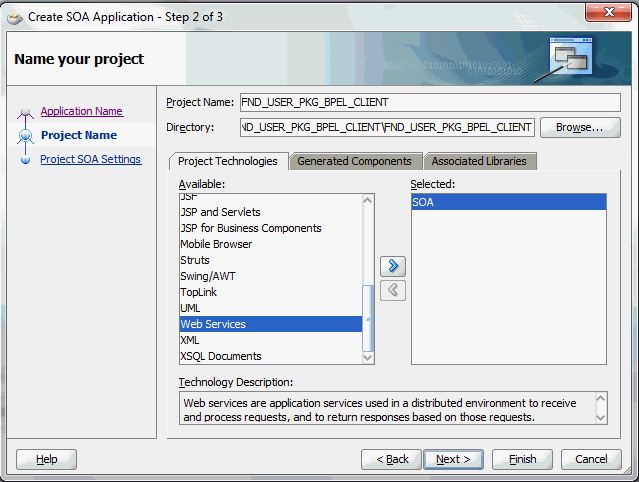
Enter an appropriate name for the project in the Project Name field. For example, FND_USER_PKG_BPEL_CLIENT.
The Create SOA Application - Name your project Page
-
In the Project Technologies tab, select 'Web Services' and ensure that SOA is selected from the Available technology list to the Selected technology list.
Click Next. The "Create SOA Application - Configure SOA settings" page is displayed.
-
Select Composite With BPEL Process from the Composite Template list, and then click Finish.

You have created a new application, and a SOA project. This automatically creates a SOA composite.
The Create BPEL Process page is displayed.
The Create BPEL Process Page

-
Leave the default BPEL 1.1 Specification selection unchanged. This creates a BPEL project that supports the BPEL 1.1 specification.
Enter an appropriate name for the BPEL process in the Name field. For example, TESTUSERNAME_ASYNC_BPELProcess.
Select Synchronous BPEL Process in the Template field.
Select requiresNew from the Transaction drop-down list. Click OK.
A synchronous BPEL process is created with the Receive and Reply activities. The required source files including bpel and wsdl, using the name you specified (for example, TESTUSERNAME_ASYNC_BPELProcess.bpel and TESTUSERNAME_ASYNC_BPELProcess.wsdl) and composite.xml are also generated.

-
Navigate to SOA Content > Business Rules and click the composite.xml to view the composite diagram.

Double click on the TESTUSERNAME_ASYNC_BPELProcess component to open the synchronous BPEL process.
Adding a Partner Link
Use this step to configure a BPEL process by writing the response received from the asynchronous operation to a file.
To add a Partner Link:
-
In Oracle JDeveloper, place your mouse in the Partner Links area and right click to select Create Partner Link... from the pull-down menu. Alternatively, you can drag and drop Partner Link from the BPEL Constructs list into the right Partner Link swim lane of the process diagram.
The Create Partner Link window appears.
-
Copy the WSDL URL corresponding to the FND_USER_PKG service that you recorded earlier from the Integration Repository, and paste it in the WSDL File field. Press the [Tab] key.
-
Enter the partner link name as FND_USER_PKG.
Select the following values in the WSDL Settings region:
-
Partner Link Type: FND_USER_PKG
-
Partner Role: FND_USER_PKGProvider
-
My Role: FND_USER_PKGRequester
Create Partner Link
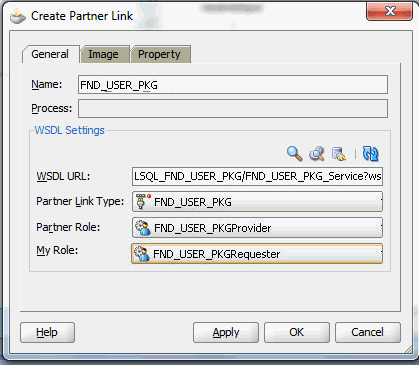
Click Apply.
The partner link is created with the required WSDL settings, and is represented in the BPEL project by a new icon in the border area of the process diagram.
-
-
Click OK to complete the partner link configuration.
Partner Link FND_USER_PKG is added to the Partner Links section in the BPEL process diagram.
Save your changes by selecting File > Save All.
Adding an Invoke Activity
Use this step to configure an Invoke activity for File Adapter to write the response to an output file.
To add an Invoke activity for WriteFile Partner Link:
-
In Oracle JDeveloper, expand the BPEL Constructs from the Component Palette. Drag and drop the Invoke activity into the center swim lane of the process diagram after the receiveInput activity.
-
Link the Invoke activity to the FND_USER_PKG service. The Edit Invoke dialog box appears.
-
Enter a name for the Invoke activity, and then click the Create icon next to the Input Variable field to create a new variable. The Create Variable dialog box appears.
Enter 'TESTUSERNAME_ASYNCH_Invoke_TESTUSERNAME_ASYNCH_InputVariable' as the input variable name. You can also accept the default name.
Select Global Variable and click OK.
Please note that we have selected asynchronous function.
Editing the Invoke Activity

-
Click Apply and then OK in the Edit Invoke dialog box to finish configuring the Invoke activity.
The Invoke activity appears in the process diagram.
Adding a Receive Activity
Use this step to configure a Receive activity to receive the response message from the asynchronous operation and pass it on to the second Assign activity.
-
In Oracle JDeveloper, expand the BPEL Constructs from the Component Palette. Drag and drop the Receive activity into the center swim lane of the process diagram after the Invoke activity.
-
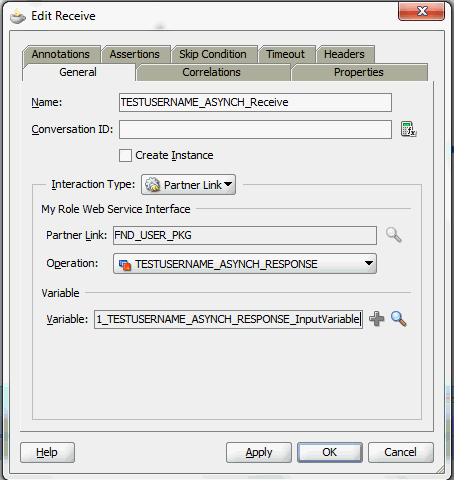
Link the Receive activity to the FND_USER_PKG partner link. The Receive activity will receive the response message from the partner link. The Edit Receive dialog box appears.
-
Enter a name for the Receive activity. Select TESTUSERNAME_ASYNCH_RESPONSE from the Operation drop-down list.
-
Click the Create icon next to the Variable field to create a new variable. The Create Variable dialog box appears.
Select Global Variable, and then enter a name for the variable. You can accept the default name (such as TESTUSERNAME_ASYNCH_Receive_TESTUSERNAME_ASYNCH_RESPONSE_InputVariable). Click OK to return to the Edit Receive dialog box.
-
Click Apply and OK to finish configuring the Receive activity.
The Receive activity appears in the BPEL process diagram.

Adding Assign Activities
This step is to configure two Assign activities to pass username from the client as an input value to the Invoke activity, as well as to pass the response message from the Receive activity. The response details will be written as an output file on the server where the BPEL process is deployed.
To enter the first Assign activity to pass username from the client as an input value to the Invoke activity:
-
Add the Assign activity by dragging and dropping the Assign activity from the BPEL Constructs in the Component Palette, between the receiveInput activity and the Invoke activity.
-
Double-click the Assign activity to access the Edit Assign dialog box.
Enter Input_to_Service as the name of the first Assign activity.
-
Select the Copy Rules tab and expand the source and target trees:
-
In the From navigation tree, navigate to Variables > Process > Variables > InputVariable > payload > client:process > client:input. The From XPath field is also displayed.
-
In the To navigation tree, navigate to Variables > Process > Variables > TESTUSERNAME_ASYNCH_Invoke_TESTUSERNAME_ASYNCH_InputVariable > body > ns2:InputParameter and select ns2: X_USER_NAME. The To XPath field is also displayed.
-
-
Drag the source node (client:input) to point to the target node (ns2: X_USER_NAME) that you just identified in the previous step. This creates a line that connects the source and target nodes. The copy rule is displayed in the From and To sections at the bottom of the Edit Assign dialog box.
Assigning Parameters

-
Click Apply and then OK to complete the configuration of the first Assign activity.
To enter the second Assign activity to pass the response message from the Receive activity:
-
Add the second Assign activity by dragging and dropping the Assign activity from the BPEL Constructs in the Component Palette, between the Receive activity and the replyOut activity.
-
Double-click the Assign activity to access the Edit Assign dialog box.
Enter Service_Response as the name of the second Assign activity.
-
Select the Copy Rules tab and expand the source and target trees:
-
In the From navigation tree, navigate to Variables > Process > Variables > TESTUSERNAME_ASYNCH_Receive_TESTUSERNAME_ASYNCH_InputVariable > body > ns2:OutputParameters and selectns2:TESTUSERNAME. The From XPath field is also displayed.
-
In the To navigation tree, select type Variable and then navigate to Variables > Process > Variables > OutputVariable > payload > client: proessResponse and select client:result. The To XPath field is also displayed.
-
-
Drag the source node (ns2:TESTUSERNAME) to point to the target node (client:result) that you just identified in the previous step. This creates a line that connects the source and target nodes. The copy rule is displayed in the From and To sections at the bottom of the Edit Assign dialog box.
Assigning Parameters

-
Click Apply and then OK to complete the configuration of the second Assign activity.
The Assign activities appear in the BPEL process diagram.
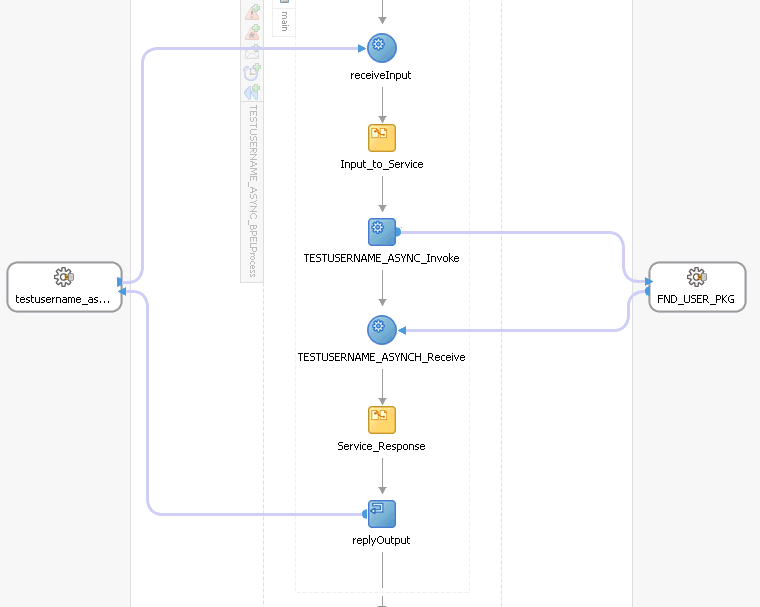
Configuring Web Service Policies
Use the following steps to add a security policy at design time:
-
Navigate to SOA Content > composite.xml. Right click on the FND_USER_PKG service and select "Configure WS Policies > For Request" from the drop-down list.

-
The Configure SOA WS Policies dialog appears.
In the Security section, click the Add icon (+). The Select Server Security Policies dialog appears.
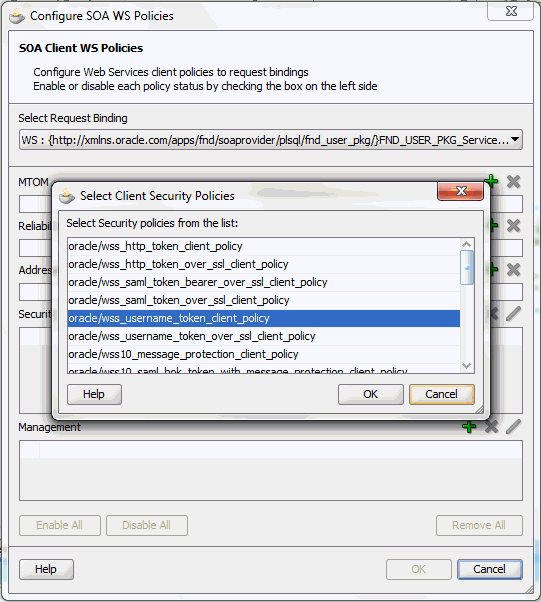
Select 'oracle/wss_username_token_service_policy' and click OK.
The attached security policy is shown in the Security section.
A lock icon appears in the FND_USER_PKG service of the composite.xml indicating that a security policy has been successfully attached.

-
Select the FND_USER_PKG service, and add the reference binding by selecting View > Property Inspector from the navigation menu. This displays the Property Inspector window for the FND_USER_PKG service component.
Note: This can also be done by directly adding the following reference binding in the Source tab of the composite.xml file for the FND_USER_PKG service:
<property name="oracle.webservices.auth.username" type="xs:string"
          many="false" override="may">operations</property>
<property name="oracle.webservices.auth.password" type="xs:string"
          many="false" override="may">password</property>
Replace password with the actual password for the username 'operations'.
In the Properties section, click the Add icon (+) for binding properties. The Create Property dialog appears.
Enter 'oracle.webservices.auth.username' in the Name field and enter 'operations' as the value.

Click OK.
-
Use the same approach by clicking the Add icon (+) again in the Properties section for binding properties. Enter 'oracle.webservices.auth.password' in the Name field. Enter the associated password for user 'operations' in the Value field.

Click OK.
Both selected property names and values appear in the Properties section.
Click the Source tab of the composite.xml and notice that the oracle.webservices.auth.username and oracle.webservices.auth.password property names and the associated values are added to the FND_USER_PKG reference.

Deploying and Testing the SOA Composite with Asynchronous BPEL Process
To invoke the asynchronous TESTUSERNAME method from the BPEL client contained in the SOA composite, the SOA composite needs to be deployed on the Oracle WebLogic managed server. This can be achieved using Oracle JDeveloper. Once the composite is deployed, it can be tested from the Oracle Enterprise Manager Fusion Middleware Control Console.
Prerequisites
Before deploying the SOA composite with BPEL process using Oracle JDeveloper, you must have established the connectivity between the design-time environment and the run-time server. For information on how to configure the necessary server connection, see Configuring Server Connection.
Note: If a local instance of the WebLogic Server is used, start the WebLogic Server by selecting Run > Start Server Instance from Oracle JDeveloper. Once the WebLogic Admin Server "DefaultServer" instance is successfully started, the <Server started in Running mode> and DefaultServer started message in the Running:DefaultServer and Messages logs should appear.
Perform the following run-time tasks:
Deploying the SOA Composite with BPEL Process
You must deploy the SOA composite with BPEL process that you created earlier before you can run it.
To deploy the SOA composite application:
-
In the Applications Navigator of JDeveloper, select the FND_USER_PKG_BPEL_CLIENT project.
-
Right-click the project and select Deploy > [project name] > [serverConnection] from the menu.
For example, you can select Deploy > FND_USER_PKG_BPEL_CLIENT > SOAServer to deploy the process if you have the connection set up appropriately.

Note: If this is the first time to set up server connection, then the Deployment Action window appears. Select 'Deploy to Application Server' and click Next.

In the Deploy Configuration window, ensure the following information is selected before clicking Next to add a new application server:
-
New Revision ID: 1.0
-
Mark composite revision as default: Select this check box.
-
Overwrite any existing composites with the same revision ID: Select this check box.
The steps to create a new Oracle WebLogic Server connection from JDeveloper are covered in Configuring Server Connection.
-
-
In the Select Server page, select 'soa-server1' that you have established the server connection earlier. Click Next.

-
In the SOA Servers page, accept the default target SOA Server ('soa-server1') selection.

Click Next and Finish.
-
If you are deploying the composite for the first time from your Oracle JDeveloper session, the Authorization Request window appears. Enter username and password information specified during Oracle SOA Suite installation. Click OK.
-
Deployment processing starts. Monitor deployment process and check for successful compilation in the SOA - Log window.

Verify that the deployment is successful in the Deployment - Log window.

Testing the SOA Composite Application
Once the BPEL process contained in the SOA composite application has been successfully deployed, you can manage and monitor the process from Oracle Enterprise Manager Fusion Middleware Control Console.
For more information about Oracle SOA Suite, see the Oracle Fusion Middleware Administrator's Guide for Oracle SOA Suite.
To test asynchronous operation in the Console:
-
Log in to Oracle Enterprise Manager Fusion Middleware Control Console (http://<hostname>:<port>/em) with username and password information specified during the installation.
-
From the Farm navigation pane, expand the SOA >soa-infra node in the tree to navigate through the SOA Infrastructure home page and menu to access your deployed SOA composite applications running on soa-infra managed server.
Click the FND_USER_PKG_BPEL_CLIENT [1.0] link.
-
In the FND_USER_PKG_BPEL_CLIENT [1.0] home page, click Test.
-
The Test Web Service page for initiating an instance appears. Enter username 'operations' as XML payload input data in the Input Arguments section.
Click Test Web Service to initiate the process.

-
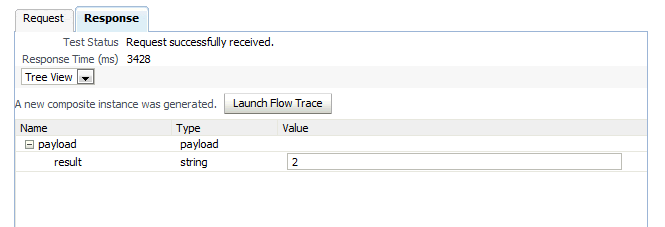
The service invocation is successful and the response is shown in the Response tab.
Please note that the TESTUSERNAME operation returns a positive number asynchronously if the input username passed as an argument exists in Oracle E-Business Suite. If the username does not exist, then number 0 is returned instead.
-
Click Launch Flow Trace in the Response tab to open the Flow Trace page.

-
In the Trace section, verify the deployed 'TESTUSERNAME_ASYNCH_BPELProcess' BPEL Component contained in the 'testusername_async_bpelprocess_client_ep' service along with the FND_USER_PKG and FND_USER_PKG_Service services have a 'Completed' state indicating that the invocation executed successfully.
You can also check the Faults section to see if any error occurred during the test.
-
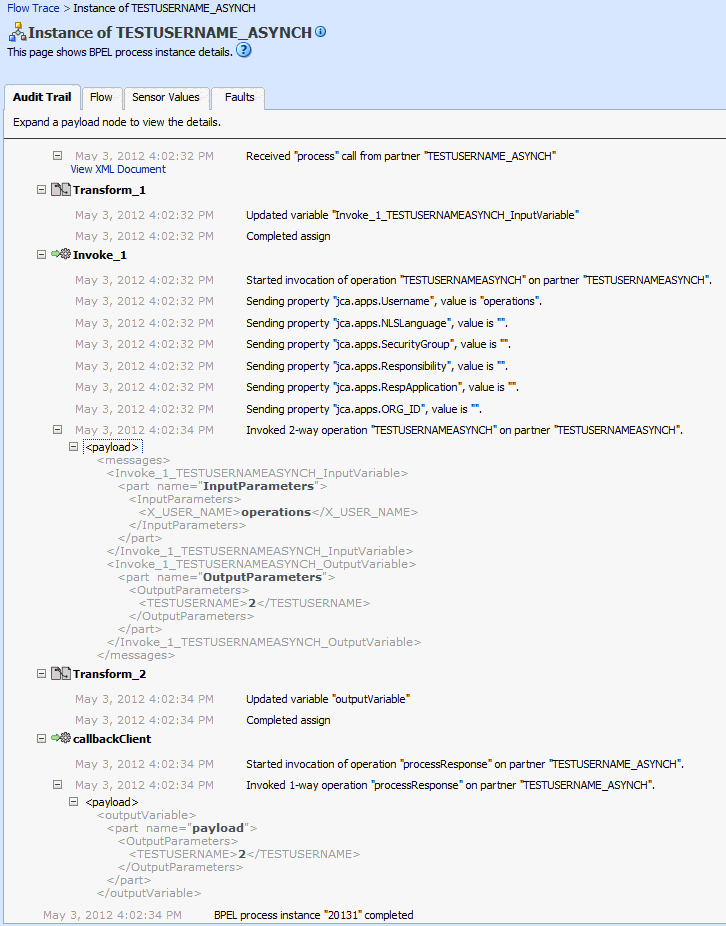
Click the TESTUSERNAME_AYSNCH link in the Flow Trace page to display the instance details in the Audit Trail tab.
Using PL/SQL REST Services
REST services provided through Oracle E-Business Suite Integrated SOA Gateway can be used to create or update resources in Oracle E-Business Suite.
Since all REST services are secured by HTTP Basic Authentication or Token Based Authentication, to better understand how these security methods work in conjunction with REST service invocation, the following REST service invocation examples are described in this section:
-
Invoking a REST Service Using HTTP Basic Authentication and XML Payload With REST Header
-
Invoking a REST Service Using Token Based Authentication and JSON Payload
Invoking a REST Service Using HTTP Basic Authentication and XML Payload With REST Header
REST Service Invocation Scenario
Consider a PL/SQL API 'Profile Management APIs' (FND_PROFILE) as an example to explain the REST service invocation.
When a request is received to get the current value of a specific user profile option, a Java client is used to invoke the Get Profile REST service operation contained in the API. In this example, the request provides username and password information in the HTTP header, the user credentials are authenticated and authorized. After validation, the Get Profile REST service operation can be invoked for the authenticated user.
After the successful service invocation, the client will receive a REST response message with the profile value for the request. If the profile does not exist, null will return.
Prerequisites to Use a PL/SQL REST Service
Before invoking the PL/SQL REST service, ensure the following tasks are in place:
Setting Variables in RESTHeader for an HTTP Request
Applications context values can be passed in the 'RESTHeader' element before invoking a REST service that requires these values.
These context elements for PL/SQL interface type are Responsibility, RespApplication, SecurityGroup, NLSLanguage, and Org_Id.
The expected values for these elements are described in the following table:
| Element Name | Expected Value |
|---|---|
| Responsibility | responsibility_key (such as "SYSTEM_ADMINISTRATOR") |
| RespApplication | Application Short Name (such as "SYSADMIN") |
| SecurityGroup | Security Group Key (such as "STANDARD") |
| NLSLanguage | NLS Language (such as "AMERICAN") |
| Org_Id | Org Id (such as "202") |
Note: NLS Language and Org_Id are optional values to be passed.
-
If the NLS Language element is specified, REST requests can be consumed in the language passed. All corresponding REST responses and error messages can also be returned in the same language. If no language is identified, then the default language of the user will be used.
-
If a service execution is dependent on any particular organization, then you must pass the Org_Id element of that REST request.
Invoking a REST Service Using Java
Based on the REST service invocation scenario, the following tasks are included in this section:
Deploying a PL/SQL REST Web Service
Use the following steps to deploy the 'Profile Management APIs' (FND_PROFILE):
-
Log in to Oracle E-Business Suite as a user who has the Integration Administrator role. Select the Integrated SOA Gateway responsibility and then choose the Integration Repository link from the navigation menu.
-
In the Integration Repository tab, click Search to access the main Search page.
-
Enter 'FND_PROFILE' in the Internal Name field. Click Go to execute the search.
Click the 'Profile Management APIs' interface name link to open the interface details page.
-
In the REST Web Service tab, enter the following information:

-
Service Alias: FndProfileSvc
The alias will be displayed as the service endpoint in the WADL and schema for the selected method or operation which is 'Get Profile' in this example.
-
In the Service Operations region, select the 'Get Profile' service operation.
The selected method will be exposed as a REST service operation.
-
-
Click Deploy to deploy the service to an Oracle E-Business Suite WebLogic environment.
Once the REST service has been successfully deployed, 'Deployed' appears in the REST Service Status field along with the View WADL link. Click the View WADL link to view the deployed service WADL description.
For more information on deploying REST services, see Deploying REST Web Services, Oracle E-Business Suite Integrated SOA Gateway Implementation Guide.
Recording Resource Information from Deployed WADL
To obtain service resource information from the deployed WADL for the FND_PROFILE service, an integration developer clicks the View WADL link in the REST Web Service tab.

The following WADL description appears:
<xml version="1.0" encoding="UTF-8" standalone="no" ?>
<application xmlns:tns="http://xmlns.oracle.com/apps/fnd/soaprovider/plsql/rest/fnd_profile/" xmlns="http://wadl.dev.java.net/2009/02" xmlns:tns1="http://xmlns.oracle.com/apps/fnd/rest/fndprofilesvc/get/" name="FND_PROFILE"
targetNamespace="http://xmlns.oracle.com/apps/fnd/soaprovider/plsql/rest/fnd_profile/">
<grammars>
  		<include xmlns="http://www.w3.org/2001/XMLSchema" href="https://<hostname>:<port>/webservices/rest/FndProfileSvc/?XSD=GET_SYNCH_TYPEDEF.xsd" />
</grammars>
	<resources base="http://<hostname>:<port>/webservices/rest/FndProfileSvc/">
		<resource path="/get/">
			<method id="GET" name="POST">
				<request>
					<representation mediaType="application/xml" type="tns1:InputParameters" />
					<representation mediaType="application/json" type="tns1:InputParameters" />
				</request>
				<response>
					<representation mediaType="application/xml" type="tns1:OutputParameters" />
					<representation mediaType="application/json" type="tns1:OutputParameters" />
				</response>
			</method>
		</resource>
	</resources>
</application>
Copy or record the following information which will be used later when defining a Java client:
-
<resources base>="http://<hostname>:<port>/webservices/rest/FndProfileSvc/">
This information http://<hostname>:<port>/webservices/rest/FndProfileSvc will be used later in Java client program as the base URL.
-
<resource path>="/get/">
This information /get/ will be used later to form the later part of the service URL.
Creating a Project with a Java Class
This section describes how to create a project with a Java class that will be used to invoke the FND_PROFILE REST service.
To create a project and a Java class:
-
Open Oracle JDeveloper.
-
From the main menu, choose File > New.
In the New Gallery window, expand the General category and select 'Applications'. In the Items list, select Custom Application.
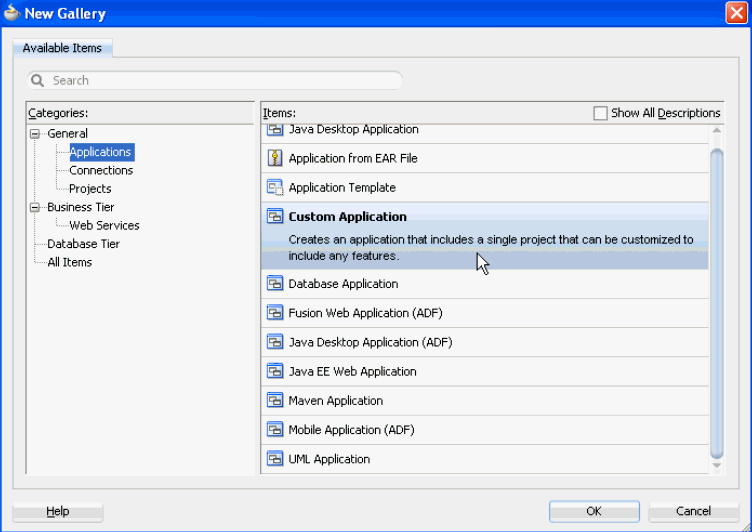
Click OK. The "Create Custom Application - Name your application" page is displayed.
-
Enter an appropriate name for the application in the Application Name field. Click Next.
-
The "Create Custom Application - Name your project" page is displayed. Enter an appropriate name for the project in the Project Name field, for example 'ISGRESTClient'.

In the Project Features tab, select 'Java' from the Available list. Move the selected feature from the "Available" window to the "Selected" window using the right arrow button.
Click Next.
-
Click Finish in the Configure Java Settings dialog box.
The newly created project should be visible in the Projects workspace.
-
Select and right-click on the project name you just created in the Application Navigator and choose New from the drop-down selection menu.
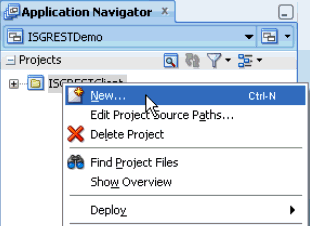
-
In the New Gallery window, expand the General category and select 'Java'. In the Items list, select Class. Click OK.

-
In the Create Java Class dialog, change the default class name to 'RestInvocationBasicAuthWithHeader'. Accept all other defaults and click OK.
-
The new class opens automatically in the source editor, displaying the skeleton class definition.
Replace the skeleton class definition with the following Java code:
package sample;

import java.io.BufferedReader;
import java.io.IOException;
import java.io.InputStream;
import java.io.InputStreamReader;
import java.io.OutputStreamWriter;
import java.net.HttpURLConnection;
import java.net.URL;
import com.sun.jersey.core.util.Base64;

public class RestInvocationBasicAuthWithHeader {
	// xml payload with REST header for invoking the service
	private static final String xmlRequest4 = "<ns:GET_Input xmlns:ns="http://xmlns.oracle.com/apps/fnd/soaprovider/plsql/rest/fnd_profile/get/""
			+ "     xmlns:ns1="http://xmlns.oracle.com/apps/fnd/soaprovider/plsql/rest/fnd_profile/header">"
			+ "    <ns1:RESTHeader>"
			+ "			<ns1:Responsibility>SYSTEM_ADMINISTRATOR</ns1:Responsibility>"
			+ "			<ns1:RespApplication>SYSADMIN</ns1:RespApplication>"
			+ "			<ns1:SecurityGroup>STANDARD</ns1:SecurityGroup>"
			+ "			<ns1:NLSLanguage>AMERICAN</ns1:NLSLanguage>"
			+ "			<ns1:Org_Id>202</ns1:Org_Id>"
			+ "    </ns1:RESTHeader>"
			+ "    <ns:InputParameters>"
			+ "    <ns:NAME>APPS_SERVLET_AGENT</ns:NAME>"
			+ "    </ns:InputParameters> + </ns:GET_Input>";

	/**
	 * This method invokes a REST service using basic Authentication and xml payload with REST headers.
	 */
	public static void postXml_BasicAuth(String svcUrlStr, String username,String passwd) throws IOException {

		URL url = new URL(svcUrlStr);
		// Obtaining connection to invoke the service
		HttpURLConnection conn = (HttpURLConnection) url.openConnection();
		// Setting Http header values
		conn.setRequestMethod("POST");
		conn.setRequestProperty("Content-Type", "application/xml");
		String auth = username + ":" + passwd;
		byte[] bytes = Base64.encode(auth);
		String authStr = new String(bytes);
		conn.setRequestProperty("Authorization", "Basic " + authStr);
		conn.setRequestProperty("Accept", "application/xml");
		conn.setRequestProperty("Content-Language", "en-US");
		conn.setUseCaches(false);
		conn.setDoInput(true);
		conn.setDoOutput(true);
		// Send request
		OutputStreamWriter wr = new OutputStreamWriter(conn.getOutputStream());
		wr.write(xmlRequest4.toCharArray());
		wr.flush();
		wr.close();
		conn.connect();
		System.out.println("Response code - " + conn.getResponseCode());
		// Get Response
		String response = null;
		try {
			response = readHttpResponse(conn);
		} finally {
			if (conn != null)
				conn.disconnect();
		}
		// Show response
		System.out.println("Response is :
" + response);
	}

	/**
	 * This method reads response from server and returns it in a string representation.
	 */
	private static String readHttpResponse(HttpURLConnection conn) {

		InputStream is = null;
		BufferedReader rd = null;
		StringBuffer response = new StringBuffer();
		try {

			if (conn.getResponseCode() >= 400) {
				is = conn.getErrorStream();
			} else {
				is = conn.getInputStream();
			}
			rd = new BufferedReader(new InputStreamReader(is));
			String line;
			while ((line = rd.readLine()) != null) {
				response.append(line);
				response.append('
');
			}
		} catch (IOException ioe) {
			response.append(ioe.getMessage());
		} finally {
			if (is != null) {
				try {
					is.close();
				} catch (Exception e) {
				}
			}
			if (rd != null) {
				try {
					rd.close();
				} catch (Exception e) {
				}
			}
		}
		return (response.toString());
	}

	public static void main(String a[]) {
		String baseUrl = "http://<server hostname>:<port>/webservices/rest";
		String svcUrlStr1 = baseUrl + "/FndProfileSvc/get/";
		// invoke Rest service using basic authentication method
		try {
			postXml_BasicAuth(svcUrlStr1, "SYSADMIN", "sysadmin");
		} catch (IOException e) {
			e.printStackTrace();
		}
	}
}
Please note that resource information recorded earlier from the deployed WADL is now placed in the baseUrl and svcUrlStr1 elements.
Note: Use https (instead of http) in the baseUrl if your Oracle E-Business Suite instance is running on the SSL-enabled environment. Additionally, you need to import the SSL certificate into your client JVM's keystore.
-
Replace <server hostname>:<port> with the actual values in the code.
-
Save your work by selecting File > Save All.
Invoking a REST Service Using a Java Class
After creating a project with a Java class RestInvocationBasicAuthWithHeader.java, you need to compile and execute the process to invoke the REST service.
Use the following steps to compile and run the Java class:
-
In the Application Navigator, right-click on the RestInvocationWithLogin.java Java class you just created at the design time. Select Make from the menu.
-
Right-click on the RestInvocationBasicAuthWithHeader.java Java class. Select Run from the menu.
Monitor this process and check for successful compilation in the Log window. Verify that the execution is successful in the Log window.
Viewing Output Message
When the REST service is successfully invoked, the following output appears in the Log window:
Response code - 200
Response is :
<?xml version="1.0" encoding="UTF-8" standalone="no"?>
<OutputParameters xmlns:xsi="http://www.w3.org/2001/XMLSchema-instance" xmlns="http://xmlns.oracle.com/apps/fnd/rest/FndProfileSvc/get/">
<VAL>http://<server hostname>:<port>/OA_HTML</VAL>
</OutputParameters>
The value of the profile option 'APPS_SERVLET_AGENT' is obtained by the service and displayed in the <VAL></VAL> tag.
Notice that service alias information FndProfileSvc entered earlier during service deployment appears as part of the service endpoint.
Invoking a REST Service Using Token Based Authentication and JSON Payload
REST Service Invocation Scenario
A PL/SQL API User (FND_USER_PKG) is used in this example to explain the REST service invocation.
When a consequent HTTP request is received from the same user to request for testing user names in Oracle E-Business Suite, the Test User Name (TESTUSERNAME) REST service operation contained in the API is invoked to test the users against the FND_USER table.
Since password is not provided in this request, token based security method is used to authenticate the user credentials. The security Login service is launched to create an Oracle E-Business Suite user session and returns the session ID as cookie in place of password for user authentication. After validation, the Test User Name (TESTUSERNAME) REST service operation can be invoked.
In this example, user name information to be tested is passed in a JSON-based payload for REST service invocation. When the service has been successfully executed, the TESTUSERNAME operation returns a positive number if the user name passed in the payload exists in Oracle E-Business Suite. If the user name does not exist, then number 0 is returned instead.
Prerequisites to Use a PL/SQL REST Service
Before performing the design-time tasks, ensure the following tasks are in place:
Obtaining Needed Libraries
To successfully invoke the REST service with payload in JSON format, you need to obtain the following libraries available at <$COMMON_TOP>/java/lib directory:
-
jersey-bundle_1.0.0.0_1-1-5-1.jar
-
jackson-core-asl_1.0.0.0_1-1-1.jar
-
jackson-mapper-asl_1.0.0.0_1-1-1.jar
These library files will be added to the project later at the design-time during the project creation.
Setting Variables in RESTHeader for an HTTP Request
In REST services, applications context values can be passed in the 'RESTHeader' element before invoking a REST service.
These RESTHeader elements for PL/SQL interface type are Responsibility, RespApplication, SecurityGroup, NLSLanguage, and Org_Id.
For more information about the RESTHeader elements for PL/SQL interface type, see Invoking a REST Service Using HTTP Basic Authentication and XML Payload With REST Header.
Invoking a REST Service Using Java
Based on the REST service invocation scenario, the following tasks are included in this section:
Deploying a PL/SQL REST Web Service
Use the following steps to deploy the User API (FND_USER_PKG):
-
Log in to Oracle E-Business Suite as a user who has the Integration Administrator role. Select the Integrated SOA Gateway responsibility and then choose the Integration Repository link from the navigation menu.
-
In the Integration Repository tab, click Search to access the main Search page.
-
Enter 'FND_USER_PKG' in the Internal Name field. Click Go to execute the search.
Click the 'User' interface name link to open the interface details page.
-
In the REST Web Service tab, enter the following information:

-
Service Alias: fndMessageSvc
The alias will be displayed as the service endpoint in the WADL and schema for the selected method or service operation which is TESTUSERNAME in this example.
-
In the Service Operations region, select 'Test User Name' (TESTUSERNAME).
The selected method will be exposed as a REST service operation.
-
-
Click Deploy to deploy the service to an Oracle E-Business Suite WebLogic environment.
Once the REST service has been successfully deployed, 'Deployed' appears in the REST Service Status field along with the View WADL link allowing you to view the WADL description.
For more information on deploying REST services, see Deploying REST Web Services, Oracle E-Business Suite Integrated SOA Gateway Implementation Guide.
Recording the Deployed WADL URL
To obtain service resource information from the deployed WADL for the FND_USER_PKG service, an integration developer clicks the View WADL link in the REST Web Service tab.

The following WADL description appears:
<xml version="1.0" encoding="UTF-8" standalone="no" ?>
<application xmlns:tns="http://xmlns.oracle.com/apps/fnd/soaprovider/plsql/rest/fnd_user_pkg/" xmlns="http://wadl.dev.java.net/2009/02" xmlns:tns1="http://xmlns.oracle.com/apps/fnd/rest/fndMessageSvc/testusername/" name="FND_USER_PKG"
targetNamespace="http://xmlns.oracle.com/apps/fnd/soaprovider/plsql/rest/fnd_user_pkg/">
<grammars>
  		<include xmlns="http://www.w3.org/2001/XMLSchema" href="https://<hostname>:<port>/webservices/rest/fndMessageSvc/?XSD=TESTUSERNAME_SYNCH_TYPEDEF.xsd" />
</grammars>
	<resources base="http://<hostname>:<port>/webservices/rest/fndMessageSvc/">
		<resource path="/testusername/">
			<method id="GET" name="POST">
				<request>
					<representation mediaType="application/xml" type="tns1:InputParameters" />
					<representation mediaType="application/json" type="tns1:InputParameters" />
				</request>
				<response>
					<representation mediaType="application/xml" type="tns1:OutputParameters" />
					<representation mediaType="application/json" type="tns1:OutputParameters" />
				</response>
			</method>
		</resource>
	</resources>
</application>
Copy or record the following information which will be used later when defining a Java client:
-
<resources base>="http://<hostname>:<port>/webservices/rest/fndMessageSvc/">
This information http://<hostname>:<port>/webservices/rest/fndMessageSvc will be used later in Java client program as the base URL.
-
<resource path>="/testusername/">
This information will be used later to form the later part of the service URL.
Creating a Project with a Java Class
This section describes how to create a project with a Java class (RestInvocationWithLogin.java) and JSON payload that will be used to invoke the FND_USER_PKG REST service.
To create a project with a Java class:
-
In Oracle JDeveloper, choose File > New from the main menu.
In the New Gallery window, expand the General category and select 'Applications'. In the Items list, select Custom Application.
Click OK. The "Create Custom Application - Name your application" page is displayed.
-
Enter an appropriate name for the application in the Application Name field. Click Next.
-
The "Create Custom Application - Name your project" page is displayed. Enter an appropriate name for the project in the Project Name field, for example 'ISGRESTClient3'.
In the Project Features tab, select 'Java' from the Available list. Move the selected feature from the "Available" window to the "Selected" window using the right arrow button.
Click Next
-
Click Finish in the Configure Java Settings dialog box.
-
In the Application Navigator and right-click on the project you just created, and choose New from the drop-down menu.
-
In the New Gallery window, expand the General category and select 'Java'. In the Items list, select Class. Click OK.
-
In the Create Java Class dialog, change the default class name to 'RestInvocationWithLogin'. Accept all other defaults and click OK.
-
The new class opens automatically in the source editor, displaying the skeleton class definition.
Replace the skeleton class definition with the following Java code:
package sample;

import java.io.BufferedReader;
import java.io.ByteArrayInputStream;
import java.io.IOException;
import java.io.InputStream;
import java.io.InputStreamReader;
import java.io.OutputStreamWriter;
import java.net.HttpURLConnection;
import java.net.URL;
import org.codehaus.jackson.JsonNode;
import org.codehaus.jackson.JsonParseException;
import org.codehaus.jackson.JsonParser;
import org.codehaus.jackson.map.ObjectMapper;
import com.sun.jersey.core.util.Base64;

public class RestInvocationWithLogin {

	private static final String jsonRequest1 = "{"TESTUSERNAME_Input":{ "
		+ "   "@xmlns":"http://xmlns.oracle.com/apps/fnd/rest/fndMessageSvc/testusername/","
		+ "   "RESTHeader":{ "
		+ "     "@xmlns":"http://xmlns.oracle.com/apps/fnd/rest/fndMessageSvc/header","
		+ "     "Responsibility":"SYSTEM_ADMINISTRATOR","
		+ "     "RespApplication":"SYSADMIN","
		+ "     "SecurityGroup":"STANDARD","
		+ "     "NLSLanguage":"AMERICAN","
		+ "     "Org_Id":"202" "
		+ "   }, " + "   "InputParameters":{ "
		+ "     "X_USER_NAME":"operations" " + "   }" + "}}";


	/**
	 * This Method invokes the a rest service using the accessTokenName and accessToken values returned by AOL login service
	 */
	public static void postJSON_AolToken(String svcUrlStr, String tokenName,String tokenValue) throws IOException {

		URL url = new URL(svcUrlStr);
		//Obtaining connection to invoke the service
		HttpURLConnection conn = (HttpURLConnection) url.openConnection();
		//Setting Http header values
		conn.setRequestMethod("POST");
		conn.setRequestProperty("Content-Type", "application/json");
		//Adding the accessTokenName and accessToken as Cookies
		conn.addRequestProperty("Cookie", tokenName + "=" + tokenValue);
		conn.setRequestProperty("Accept", "application/json");
		conn.setRequestProperty("Content-Language", "en-US");
		conn.setUseCaches(false);
		conn.setDoInput(true);
		conn.setDoOutput(true);
		//Send request
		OutputStreamWriter wr = new OutputStreamWriter(conn.getOutputStream());
		wr.write(jsonRequest1.toCharArray());
		wr.flush();
		wr.close();
		conn.connect();
		System.out.println("Response code - " + conn.getResponseCode());
		//Get Response
		String response = null;
		try {
			response = readHttpResponse(conn);
		} finally {
			if (conn != null)
				conn.disconnect();
		}
		//Show Response
		System.out.println("Response is :
" + response);
	}

	/**
	 * This method invokes the AOL login service.It authenticates login credentials and  returns accessTokenName and accessToken values after successful validation of login credentials.
	 */
	private static String[] getAolToken(String baseUrl, String username,String passwd) throws Exception {

		String rfUrl = baseUrl + "/login";
		URL url = new URL(rfUrl);
		//Obtaining connection to invoke login service.
		HttpURLConnection conn = (HttpURLConnection) url.openConnection();
		String auth = username + ":" + passwd;
		byte[] bytes = Base64.encode(auth);
		String authStr = new String(bytes);
		//Setting Http request method
		conn.setRequestMethod("GET");
		//Setting the Http header values
		conn.setRequestProperty("Authorization", "Basic " + authStr);
		conn.setRequestProperty("Content-type", "application/json");
		conn.setRequestProperty("Accept", "application/json");
		conn.setUseCaches(false);
		conn.setDoInput(true);
		conn.setDoOutput(true);
		conn.connect();
		String response = null;
		//Get Response
		try {
			response = readHttpResponse(conn);
		} finally {
			if (conn != null)
				conn.disconnect();
		}
		//Parsing Response to obtain
		JsonParser jp = null;
		JsonNode root = null;
		ObjectMapper mapper = new ObjectMapper();
		try {
			jp = mapper.getJsonFactory().createJsonParser(new ByteArrayInputStream(response.getBytes()));
			jp.disableFeature(org.codehaus.jackson.JsonParser.Feature.AUTO_CLOSE_SOURCE);
			root = jp.readValueAsTree();
		} catch (JsonParseException jpe) {
			jpe.printStackTrace();
		} catch (IOException ioe) {
			ioe.printStackTrace();
		}
		JsonNode dataNode = root.get("data");
		JsonNode accessTokenNode = dataNode.get("accessToken");
		String accessToken = accessTokenNode.getTextValue();
		JsonNode accessTokenNameNode = dataNode.get("accessTokenName");
		String accessTokenName = accessTokenNameNode.getTextValue();
		return (new String[] { accessTokenName, accessToken });
	}

	/**
	 * This method reads response sent by the server and returns it in a string representation.
	 */
	private static String readHttpResponse(HttpURLConnection conn) {
		InputStream is = null;
		BufferedReader rd = null;
		StringBuffer response = new StringBuffer();
		try {
			if (conn.getResponseCode() >= 400) {
				is = conn.getErrorStream();
			} else {
				is = conn.getInputStream();
			}
			rd = new BufferedReader(new InputStreamReader(is));
			String line;
			while ((line = rd.readLine()) != null) {
				response.append(line);
				response.append('
');
			}
		} catch (IOException ioe) {
			response.append(ioe.getMessage());
		} finally {
			if (is != null) {
				try {
					is.close();
				} catch (Exception e) {
				}
			}
			if (rd != null) {
				try {
					rd.close();
				} catch (Exception e) {
				}
			}
		}
		return (response.toString());
	}

	public static void main(String[] args) throws Exception {
		String baseUrl = "http://<server hostname>:<port>/webservices/rest";
		String svcUrlStr1 = baseUrl + "/fndMessageSvc/testusername/";
		//Get Access Token by invoking AOL Login Service
		String[] token = getAolToken(baseUrl, "SYSADMIN", "sysadmin");
		System.out.println("AOL Token : Name - " + token[0] + ", Value - "+ token[1]);
		//Invoke REST service using the Access Token
		postJSON_AolToken(svcUrlStr1, token[0], token[1]);
	}
}
Please note that resource information recorded earlier from the deployed WADL is now placed in the baseUrl and svcUrlStr1 elements.
Note: Use https (instead of http) in the baseUrl if your Oracle E-Business Suite instance is running on the SSL-enabled environment. Additionally, you need to import the SSL certificate into your client JVM's keystore.
-
Replace <server hostname>:<port> with the actual values in the code.
-
Add required libraries to process JSON payload:
Use the following steps to add the required library files to the project properties.
-
Select and right-click on the project name you just created earlier to open a selection menu.
-
Select Project Properties from the menu.
The Default Properties dialog box opens.
-
Select Libraries and Classpath, and click Add Library. The Add Library dialog box opens.
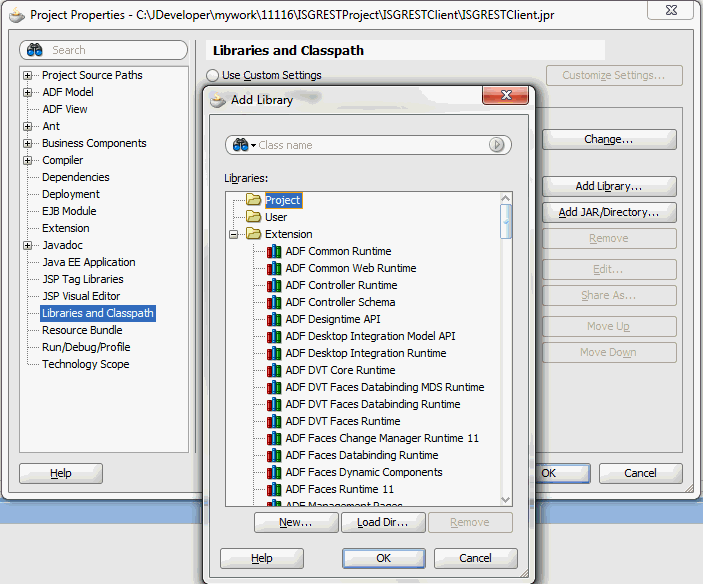
-
In the Add Library dialog box, select the Project folder and then click New.
The Create Library dialog box opens.
-
In the Library Name field, enter 'jackson-core-asl_1.0.0.0_1-1-1.jar'.
Click Add Entry. The Select Path Entry dialog box appears.
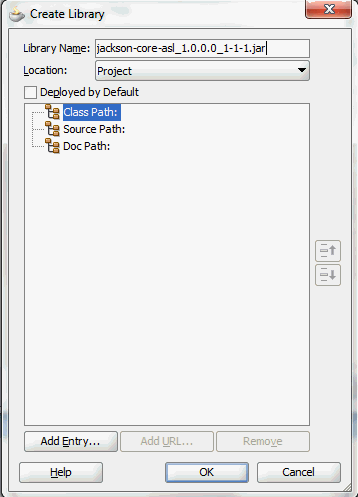
-
In the Select Path Entry dialog box, locate and select the 'jackson-core-asl_1.0.0.0_1-1-1.jar' file that you have downloaded. This adds it to the Classpath.
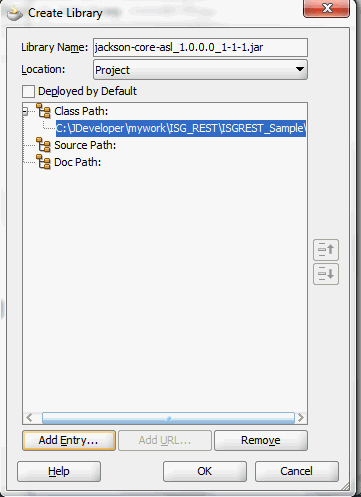
Click OK. The 'ackson-core-asl_1.0.0.0_1-1-1.jar' is now added to the Project folder.
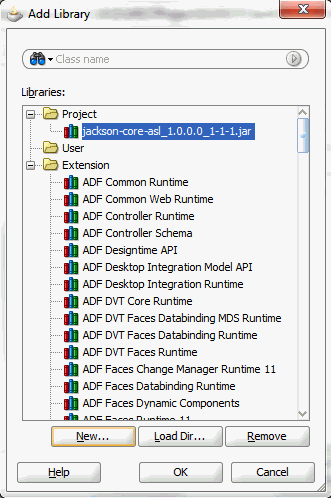
-
Repeat steps 4, 5, and 6 to add the following two jar files to the Project folder:
-
jersey-bundle_1.0.0.0_1-1-5-1.jar
-
jackson-mapper-asl_1.0.0.0_1-1-1.jar
These three jar files should now appear in the Project folder. Click OK.
-
-
The Project Properties dialog box appears. Click OK. This project is now set up with the required libraries.

-
-
Save your work by selecting File > Save All.
Invoking REST Service Using a Java Client
After creating a project with a Java class RestInvocationWithLogin.java, you need to compile and execute the process to invoke the FND_USER_PKG REST service.
Use the following steps to compile and run the Java class:
-
In the Application Navigator, right-click on the RestInvocationWithLogin.java Java class you just created at the design time. Select Make from the menu.
-
Right-click on the RestInvocationWithLogin.java Java class and select Run from the menu.
Monitor this process and check for successful compilation in the Log window. Verify that the execution is successful in the Log window.
Viewing Output Message
When the FND_USER_PKG REST service is successfully invoked, the following output appears:
-
The response from the Login service should be like:
AOL Token : Name - isgdemo, Value - 5xjE6DVfi7NlEGnS70xX1fvrdt
-
The response from the service invocation should be like:
Response code - 200
Response is :
{
  "OutputParameters" : {
    "@xmlns:xsi" : "http://www.w3.org/2001/XMLSchema-instance",
    "@xmlns" : "http://xmlns.oracle.com/apps/fnd/rest/fndMessageSvc/testusername/",
    "TESTUSERNAME" : "2"
  }
}
In this example, a positive number '2' is returned indicating that the user name passed in the payload does exist in Oracle E-Business Suite.
Notice that service alias information fndMessageSvc entered earlier during service deployment appears as part of the service endpoint.
-
The response from the Logout service should be like:
Response is :
{
  "data" : {
    "accessToken" : "-1",
    "accessTokenName" : "isgdemo",
    "ebsVersion" : null
  }
}