我们知道ajax不能跨域访问,但是有时我们确实需要跨域访问获取数据,所以JSONP就此诞生了,其本质使用的是Script标签,除JSONP以外还有另外实现跨域方式
一、手动实现JSONP跨域
1、首先创建一个Web项目,在这里我使用一般处理程序
 1     public class Demo : IHttpHandler
 2     {
 3         public void ProcessRequest(HttpContext context)
 4         {
 5             //接收参数
 6             string callBack = context.Request["callBack"];
 7             string uName = context.Request["uName"];
 8             string data = "({"name":"" + uName + "","age":"23"})";
 9             string josnStr = callBack + data;
10             context.Response.Write(josnStr);
11         }
12
13         public bool IsReusable
14         {
15             get
16             {
17                 return false;
18             }
19         }
20     }
2、创建一个新Web项目并新建html文件
 1 <!DOCTYPE html>
 2 <html xmlns="http://www.w3.org/1999/xhtml">
 3 <head>
 4     <meta http-equiv="Content-Type" content="text/html; charset=utf-8" />
 5     <title>手动实现JSONP实现跨域请求Demo</title>
 6     <!--引用jquery-->
 7     <script src="/jquery-1.7.1.js"></script>
 8     <script type="text/javascript">
 9         var urlPrefix = "http://localhost:2571";
10         //js跨域请求中的回调函数
11         function fun(data) {
12             for (var i in data) {
13                 alert(data[i]);
14             }
15         }
16         //js跨域请求
17         function jsRequest() {
18             var script = document.createElement("script");
19             script.setAttribute("id", "script1");
20             script.setAttribute("type", "text/javascript");
21             script.setAttribute("src", urlPrefix + "/demo.ashx?uName=zzq&callBack=fun");
22             //添加到body之后
23             document.documentElement.appendChild(script);
24             //使用完后移除
25             $("#script1").remove();
26         }
27
28         //jq跨域请求
29         function jqRequest() {
30             $.ajax(
31             {
32                 url: urlPrefix + "/demo.ashx",
33                 type: "get",
34                 data: { uName: "zzq" },
35                 dataType: "jsonp",       //指定Jq发送jsonp请求
36                 jsonpCallback: "fun",  //指定回调函数,没有此项可以直接在success中写回调
37                 jsonp: 'callBack'       //默认callback
38                 //success: function (data) {
39                 //    for (var i in data) {
40                 //        alert(data[i]);
41                 //    }
42                 //}
43             });
44         }
45     </script>
46 </head>
47 <body>
48     <!--Js跨域请求和Jquery跨域请求都不支持post方式,jquery跨域其实就是JS跨域的封装-->
49     <input type="button" value="使用原生JS跨域请求" onclick="jsRequest()" />
50     <input type="button" value="使用Jquery跨域请求" onclick="jqRequest()" />
51 </body>
52 </html>
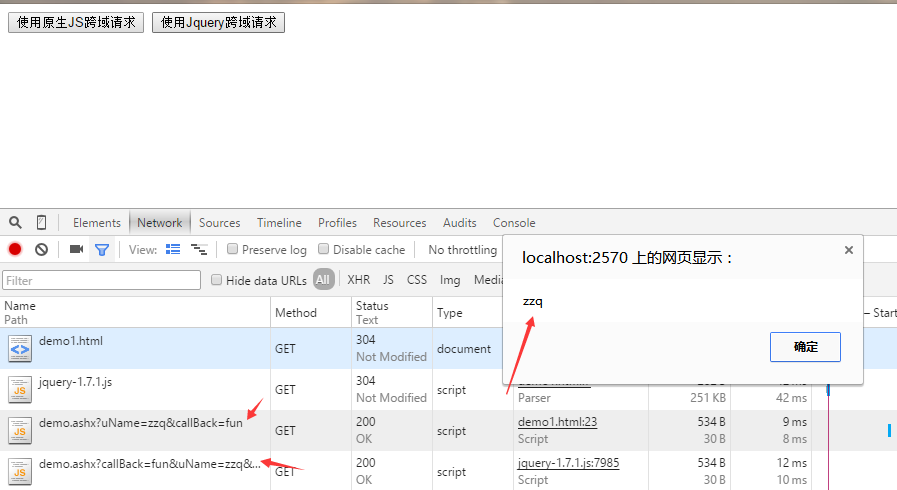
3、测试,将两个网站都打开,http://localhost:2571:填写第一步创建网站的地址


两个请求都是返回同样的信息
二、添加请求头实现跨域
1、同样是先创建一个Web项目,跟上面一样使用的是一般处理程序,*.ashx,这里我只贴出重要的部分
 1         public void ProcessRequest(HttpContext context)
 2         {
 3             //接收参数
 4             string uName = context.Request["uName"];
 5             string data = "{"name":"" + uName + "","age":"23"}";
 6             //只需在服务端添加以下两句
 7             context.Response.AddHeader("Access-Control-Allow-Origin", "*");
 8             //跨域可以请求的方式
 9             context.Response.AddHeader("Access-Control-Allow-Methods", "POST,GET");
10             context.Response.Write(data);
11         }
2、创建一个新Web项目并新建html文件
 1 <!DOCTYPE html>
 2 <html xmlns="http://www.w3.org/1999/xhtml">
 3 <head>
 4     <meta http-equiv="Content-Type" content="text/html; charset=utf-8" />
 5     <title>添加请求头跨域访问Demo</title>
 6     <script src="/jquery-1.7.1.js"></script>
 7     <script type="text/javascript">
 8         function crosRequest() {
 9             $.post("http://localhost:2571/XHR2Demo.ashx", { uName: "zzq" }, function (data) {
10                 for (var i in data) {
11                     alert(data[i]);
12                 }
13             }, "json")
14         }
15     </script>
16 </head>
17 <body>
18     <input type="button" value="添加请求头跨域访问" onclick="crosRequest()" />
19 </body>
20 </html>
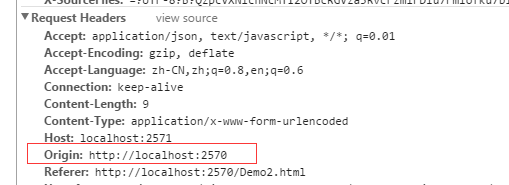
3、最后就是测试,查看效果了

加了以下信息


三、CROS实现WebApi跨域
1、新建WebApi项目并通过NuGet下载程序包,搜索程序包【Microsoft.AspNet.WebApi.Cors】,一般我喜欢下载一个中文包,方便查看注释

2、在Global的Application_Start中加上如下代码
1 var cors = new EnableCorsAttribute("*", "*", "*");
2 GlobalConfiguration.Configuration.EnableCors(cors);
注意这两句放Application_Start方法最前面,否则会导致不能跨域,暂不知其原因

3、创建一个新Web项目并新建html文件
 1 <!DOCTYPE html>
 2 <html xmlns="http://www.w3.org/1999/xhtml">
 3 <head>
 4     <meta http-equiv="Content-Type" content="text/html; charset=utf-8" />
 5     <title>WebApi跨域Demo</title>
 6     <script src="/jquery-1.10.2.js"></script>
 7     <script type="text/javascript">
 8         $(function () {
 9             getData();
10         });
11         function getData() {
12             var furl = "http://localhost:19125/api/home";
13             $.get(furl, function (data) {
14                 for (var i = 0; i < data.length; i++) {
15                     alert(data[i]);
16                 }
17             });
18         }
19     </script>
20 </head>
21 <body>
22     WebApi跨域Demo
23 </body>
24 </html>
4、最后测试看看效果

加了以下信息

总结
1、手动创建JSONP跨域
优点:无浏览器要求,可以在任何浏览器中使用此方式
缺点:只支持get请求方式,请求的后端出错不会有提示,造成不能处理异常
2、添加请求头实现跨域
优点:支持任意请求方式,并且后端出错会像非跨域那样有报错,可以对异常进行处理
缺点:兼容性不是很好,IE的话 <IE10 都不支持此方式
第三种的话我觉得原理就是第二种的实现,实际测试发现跟第二种一样,通过查看请求报文中的Head也能看出
