先看一下效果
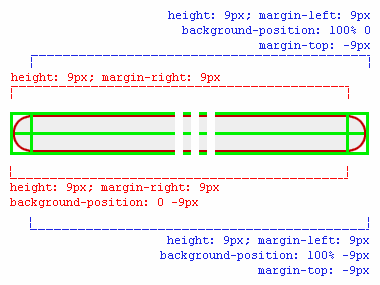
既然是图片圆角,肯定少不了图片,我们先把图片处理好,如下:![]()
这里由于显示问题,我就做一个1000*18的图片,一般会做成1280*18px的,不过这个根据每个人的需要
下面就看一下结构吧:
xhtml:
<div class="top-left"></div> <!--左上圆角-->
<div class="top-right"></div> <!--右上圆角-->
<div class="inside"><p class="notopgap">热热同学的小记热热同学的小记热热同学的小记热热同学的小记</p></div>
<div class="bottom-left"></div> <!--左下圆角-->
<div class="bottom-right"></div> <!--右下圆角-->
<div class="top-right"></div> <!--右上圆角-->
<div class="inside"><p class="notopgap">热热同学的小记热热同学的小记热热同学的小记热热同学的小记</p></div>
<div class="bottom-left"></div> <!--左下圆角-->
<div class="bottom-right"></div> <!--右下圆角-->
css:
.top-left, .top-right, .bottom-left, .bottom-right { width:500px; height: 9px; font-size: 2px; background-image: url('corners1280x18.gif');}
.top-left, .bottom-left { margin:0 9px 0 0}
.top-right, .bottom-right { margin:-9px 0 0 9px;}
.top-right {background-position: 100% 0;}
.bottom-left { background-position: 0 -9px;}
.bottom-right { background-position: 100% -9px;}
.inside {width:487px; border: 1px solid #C00000; border-width:0 1px;background: #EFEFEF; color: #000000; padding:0 10px;}
.notopgap{ margin-top: 0; }
我想看到这里,大家都应该知道是什么思路了吧,这种方法就是调节能力强一些,你可以随意定义这个圆角框的宽度,这样我们就可以全局定义一个圆角样式,根据需要调节宽度在不同容器中使用了~~~
ok啦,就到这里