借助官网的一张图,更改 Vuex 的 store 中的状态的唯一方法是提交 mutation。不可以直接对其进行赋值改变。需要注意的是,mutations只能做一些同步的操作。
index.js:
import Vue from 'vue'
import Vuex from 'vuex'
import state from "./state"
import getters from './getters'
import mutations from "./mutations"
import actions from "./actions"
import user from './module/user'


Vue.use(Vuex)

export default new Vuex.Store({
  state,
  getters,
  mutations,
  actions,
  modules: {
    user
  }
})
mutations.js
const mutations = {
  SET_APP_NAME(state, params) {
    //若params是对象格式
    state.appName = params.appName;
    //若params是字符串格式
    //state.appName = params;
  }
}
export default mutations;
state.js:
const state = {
  appName:'admin'
}
export default state
user.js:
const state = {
  //
  userName:'Caoqi'
}
const getters = {
  firstLetter: (state) => {
    return state.userName.substr(0, 1)
  }
}
const mutations = {
  //
  SET_USER_NAME(state, params) {
    state.userName = params.userName;
  }
}
const actions = {
  //
}
export default {
  //namespaced:true,//有利于模块更加密闭,不受外界的干扰
  state,
  getters,
  mutations,
  actions
}
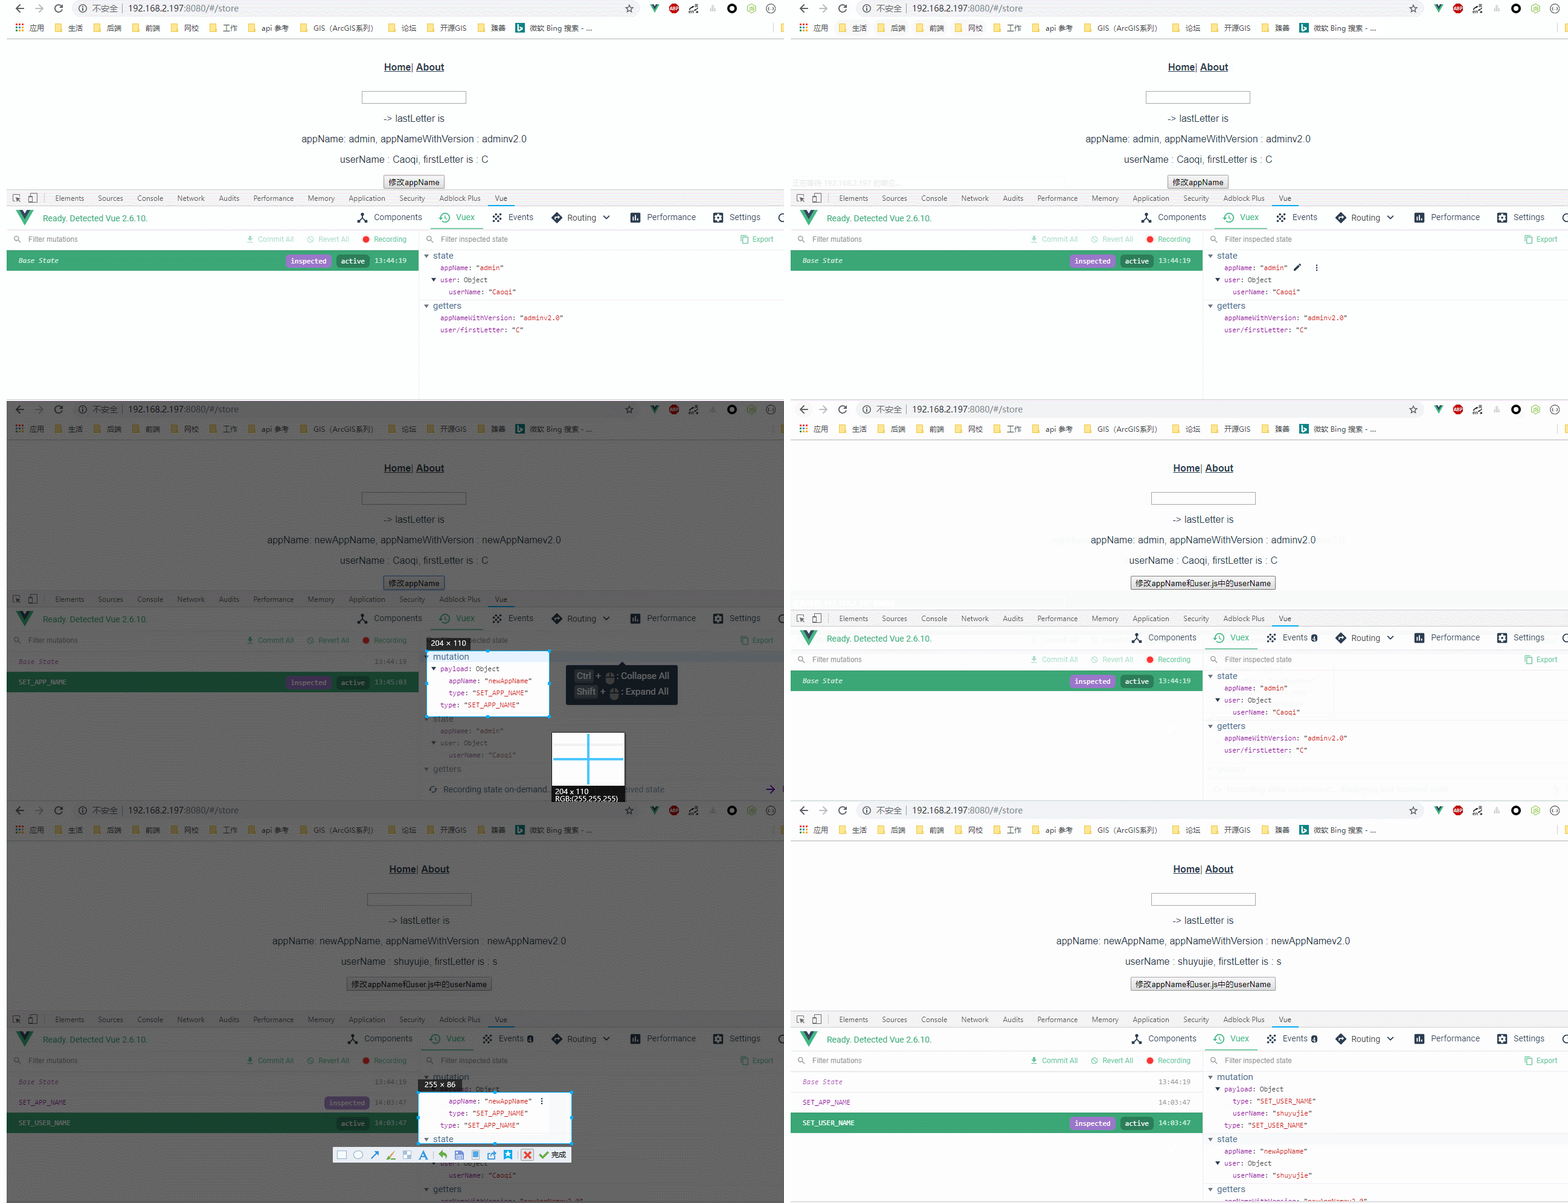
下面通过mutations.js修改state.js中的appName值,修改之前页面显示效果如下图所示,此时appName值为admin

store.vue代码:
<template>
  <div>
    <a-input :value="inputValue" @input="handlerInput"></a-input>
    <p>{{ inputValue }} -> lastLetter is {{ inputValueLastLetter }}</p>
    <p>appName: {{ appName }}, appNameWithVersion : {{ appNameWithVersion }}</p>
    <p>userName : {{ userName }}, firstLetter is : {{ firstLetter }}</p>
    <button @click="handleChangeAppName">修改appName和user.js中的userName</button>
  </div>
</template>
<script>
import AInput from "_c/AInput.vue";
import AShow from "_c/AShow.vue";
//变量的解构赋值
import { mapState, mapGetters } from "vuex";
import { stat } from "fs";
export default {
  name: "store",
  data() {
    return {
      inputValue: ""
    };
  },
  components: {
    AInput: AInput,
    AShow: AShow
  },
  computed: {
    //ES6展开操作符 mapState展开会形成一个对象 使用对象展开运算符将此对象混入到外部对象中
    ...mapState({
      appName: state => state.appName,
      userName: state => state.user.userName
    }),
    // 使用对象展开运算符将 getter 混入 computed 对象中
    // ...mapGetters(["appNameWithVersion"]),
    appNameWithVersion() {
      //通过属性访问getters,Getter 会暴露为 store.getters 对象,可以以属性的形式访问这些值:
      return this.$store.getters.appNameWithVersion;
    },
    ...mapGetters(["firstLetter"]),
    inputValueLastLetter() {
      return this.inputValue.substr(-1, 1);
    }
  },
  methods: {
    handlerInput(val) {
      this.inputValue = val;
    },
    handleChangeAppName() {
      //可以在组件中使用 this.$store.commit('xxx') 提交 mutation
      //第一种修改appName的写法
      //this.$store.commit("SET_APP_NAME", "newAppName");
      //第二种修改appName的写法
      this.$store.commit({
        type: "SET_APP_NAME",
        appName: "newAppName"
      });

     this.$store.commit({
        type: "SET_USER_NAME",
        userName: "shuyujie"
      });
    }
  }
};
</script>
效果图:

还可以借助于在组件中提交 Mutation来实现,效果是一样的:
<template>
  <div>
    <a-input :value="inputValue" @input="handlerInput"></a-input>
    <p>{{ inputValue }} -> lastLetter is {{ inputValueLastLetter }}</p>
    <p>appName: {{ appName }}, appNameWithVersion : {{ appNameWithVersion }}</p>
    <p>userName : {{ userName }}, firstLetter is : {{ firstLetter }}</p>
    <button @click="handleChangeAppName">修改appName和user.js中的userName</button>
  </div>
</template>
<script>
import AInput from "_c/AInput.vue";
import AShow from "_c/AShow.vue";
//变量的解构赋值
import { mapState, mapGetters, mapMutations } from "vuex";
import { stat } from "fs";
export default {
  name: "store",
  data() {
    return {
      inputValue: ""
    };
  },
  components: {
    AInput: AInput,
    AShow: AShow
  },
  computed: {
    //ES6展开操作符 mapState展开会形成一个对象 使用对象展开运算符将此对象混入到外部对象中
    ...mapState({
      appName: state => state.appName,
      userName: state => state.user.userName
    }),
    // 使用对象展开运算符将 getter 混入 computed 对象中
    // ...mapGetters(["appNameWithVersion"]),
    appNameWithVersion() {
      //通过属性访问getters,Getter 会暴露为 store.getters 对象,可以以属性的形式访问这些值:
      return this.$store.getters.appNameWithVersion;
    },
    ...mapGetters(["firstLetter"]),
    inputValueLastLetter() {
      return this.inputValue.substr(-1, 1);
    }
  },
  methods: {
    handlerInput(val) {
      this.inputValue = val;
    },
    //
   ...mapMutations([
     "SET_USER_NAME", //将 `this.SET_USER_NAME()` 映射为 `this.$store.commit('SET_USER_NAME')`
     "SET_APP_NAME"//将 `this.SET_APP_NAME()` 映射为 `this.$store.commit('SET_APP_NAME')`
   ]),
    handleChangeAppName() {
      this.SET_APP_NAME({
        appName: "newAppName"
      });
      this.SET_USER_NAME({
        userName: "shuyujie"
      });
    }
  }
};
</script>
若要给state对象增加属性,则需要使用vue.set方法:
import vue from 'vue'
const mutations = {
  SET_APP_NAME(state, params) {
    //若params是对象格式
    state.appName = params.appName;
    //若params是字符串格式
    //state.appName = params;
  },
  SET_APP_VERSION(state) {
    vue.set(state, 'appVersion', 'v100.0')
    //state.appVersion = 'v2.0'
  }
}
export default mutations;
此时store.vue组件的代码如下,增加了对state对象增加属性的commit方法:
<template>
  <div>
    <a-input :value="inputValue" @input="handlerInput"></a-input>
    <p>{{ inputValue }} -> lastLetter is {{ inputValueLastLetter }}</p>
    <p>appName: {{ appName }}, appNameWithVersion : {{ appNameWithVersion }}</p>
    <p>userName : {{ userName }}, firstLetter is : {{ firstLetter }}</p>
    <button @click="handleChangeAppName">修改appName和user.js中的userName</button>
    <p>动态给state增加appVersion: {{ appVersion }}</p>
  </div>
</template>
<script>
import AInput from "_c/AInput.vue";
import AShow from "_c/AShow.vue";
//变量的解构赋值
import { mapState, mapGetters, mapMutations } from "vuex";
import { stat } from "fs";
export default {
  name: "store",
  data() {
    return {
      inputValue: ""
    };
  },
  components: {
    AInput: AInput,
    AShow: AShow
  },
  computed: {
    //ES6展开操作符 mapState展开会形成一个对象 使用对象展开运算符将此对象混入到外部对象中
    ...mapState({
      appName: state => state.appName,
      appVersion: state => state.appVersion,
      userName: state => state.user.userName
    }),
    // 使用对象展开运算符将 getter 混入 computed 对象中
    // ...mapGetters(["appNameWithVersion"]),
    appNameWithVersion() {
      //通过属性访问getters,Getter 会暴露为 store.getters 对象,可以以属性的形式访问这些值:
      return this.$store.getters.appNameWithVersion;
    },
    ...mapGetters(["firstLetter"]),
    inputValueLastLetter() {
      return this.inputValue.substr(-1, 1);
    }
  },
  methods: {
    handlerInput(val) {
      this.inputValue = val;
    },
    //
    ...mapMutations([
      "SET_USER_NAME", //将 `this.SET_USER_NAME()` 映射为 `this.$store.commit('SET_USER_NAME')`
      "SET_APP_NAME"//将 `this.SET_APP_NAME()` 映射为 `this.$store.commit('SET_APP_NAME')`
      ]),
    handleChangeAppName() {
      this.SET_APP_NAME({
        appName: "newAppName"
      });
      this.SET_USER_NAME({
        userName: "shuyujie"
      });
      this.$store.commit('SET_APP_VERSION')
    }
  }
};
</script>
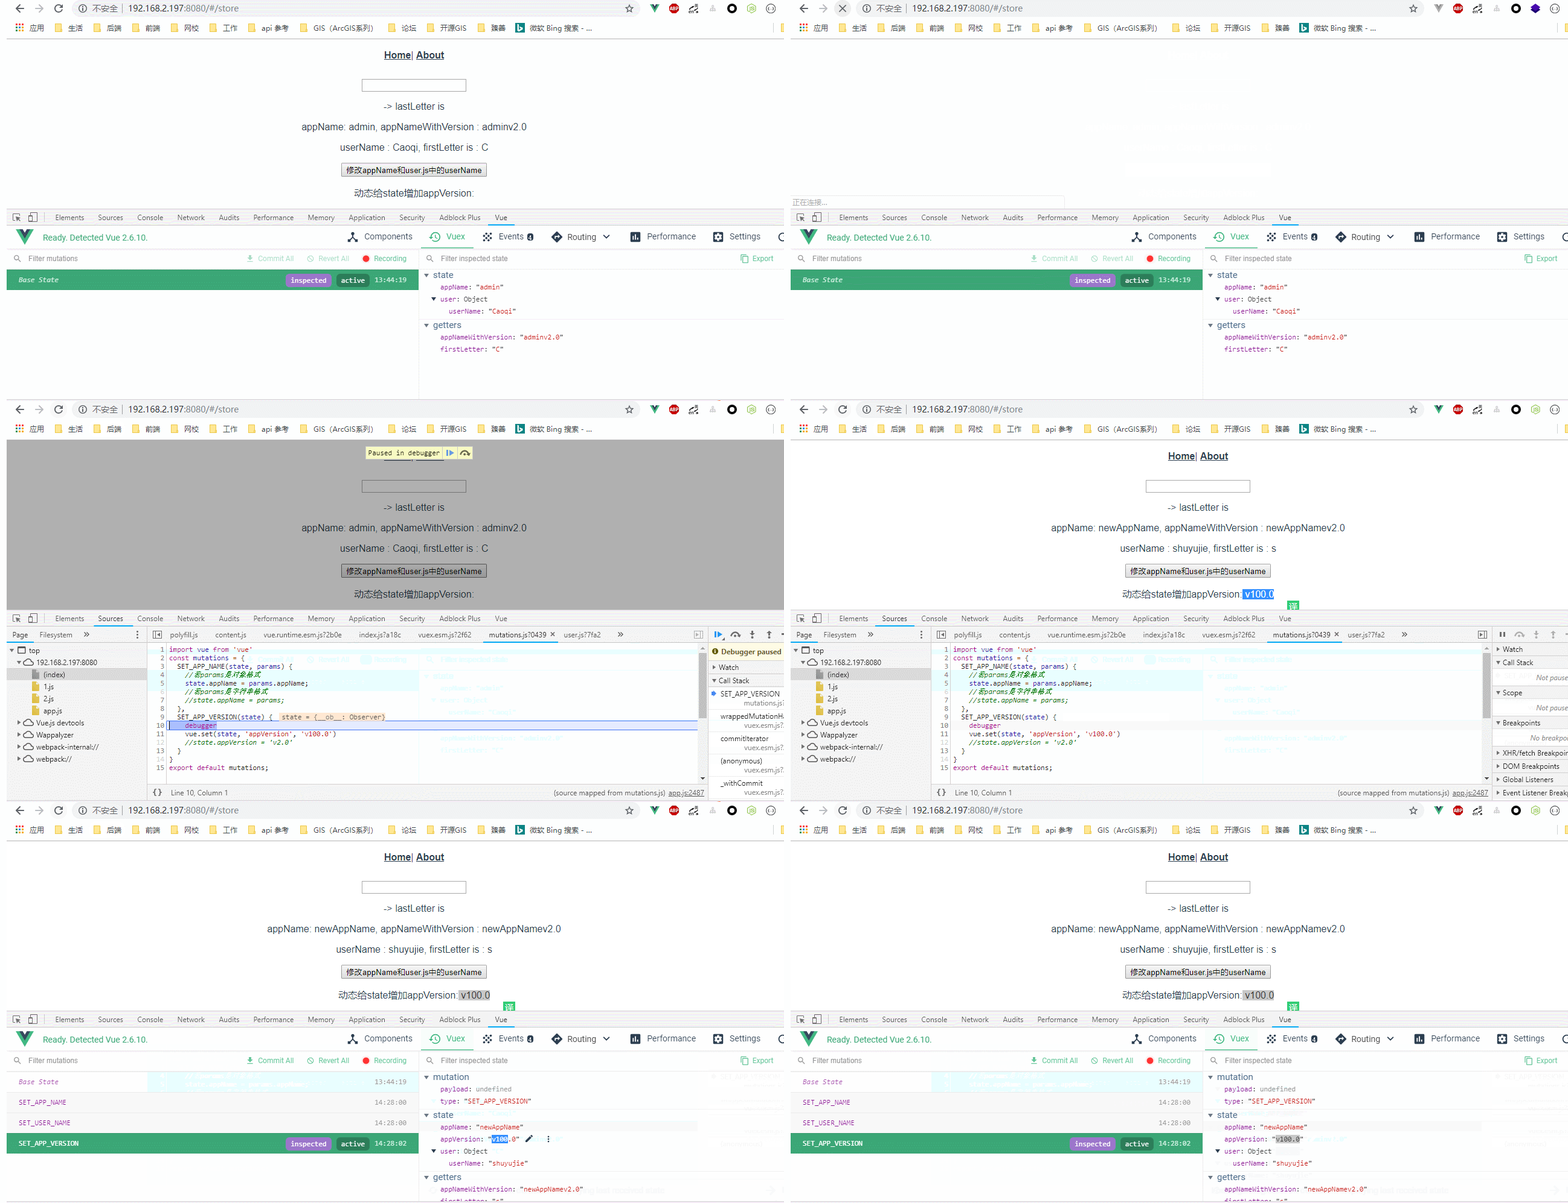
效果图如下所示:


