一,核心类和接口
DispatcherServlet 前置控制器
这个类主要处理页面请求,在web.xml中的配置是
<!-- springmvc 后台配置 -->
<servlet> //使用DispatcherServlet这个servlet来处理页面请求
<servlet-name>back</servlet-name>
<servlet-class>org.springframework.web.servlet.DispatcherServlet</servlet-class>
<init-param> //具体配置在springmvc-back.xml中
<param-name>contextConfigLocation</param-name>
<param-value>classpath:springmvc-back.xml</param-value>
</init-param>
</servlet>
<servlet-mapping> //要处理的请求url名称
<servlet-name>back</servlet-name>
<url-pattern>*.do</url-pattern>
</servlet-mapping>
springmvc-back.xml配置详情
<!-- jsp视图 -->
<bean id="jspViewResolver" //对controller返回的url进行加工装配,前面加上文件夹名称,后面加上.jsp
class="org.springframework.web.servlet.view.InternalResourceViewResolver">
<property name="prefix" value="/WEB-INF/back_page/" />
<property name="suffix" value=".jsp" />
</bean>
<!-- 从请求和响应读取/编写字符串 -->
<bean id="stringHttpMessage"
class="org.springframework.http.converter.StringHttpMessageConverter">
<property name="supportedMediaTypes">
<list>
<value>text/plain;charset=UTF-8</value>
</list>
</property>
</bean>
<!-- 用于将对象转化为JSON -->
<bean id="jsonConverter"
class="org.springframework.http.converter.json.MappingJacksonHttpMessageConverter"></bean>
<bean
class="org.springframework.web.servlet.mvc.annotation.AnnotationMethodHandlerAdapter">
<property name="messageConverters">
<list>
<ref bean="stringHttpMessage" />
<ref bean="jsonConverter" />
</list>
</property>
</bean>
<!-- 上传图片 -->
<bean id="multipartResolver"
class="org.springframework.web.multipart.commons.CommonsMultipartResolver">
<!-- 最大上传尺寸 B 1M -->
<property name="maxUploadSize" value="1024000000" />
</bean>
</beans>
二:HandlerMapping接口 处理请求的映射
实现类:SimpleUrlHandlerMapping 通过配置文件把url映射到Controller
DefaultAnnotationHandlerMapping 通过注解,把一个url映射到Controller
一般来说我们都是使用注解的方式,在Controller类上面@ResultMapping
三:HandlerAdapter接口,处理请求的的映射
实现类:AnotationMethodHandlerAdapter类,通过注解,把一个url映射到Controller类下面的方法上
也就是在Controller下面的方法上@ResultMapping("url")
四:Controller接口 控制器
添加了@Controller注解的类就单人Action的职责
五:HandlerInterceptor接口 拦截器接口
我们自己来实现这个接口,来实现拦截器的功能
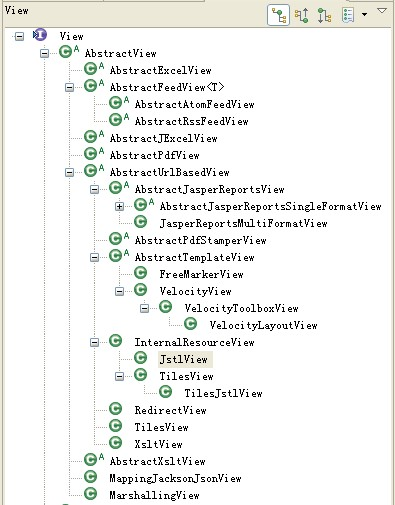
六:ViewResolver 接口

实现类
UrlBaseViewResolver类,通过配置文件,把一个视图请求交给ViewResolver来处理
InternalResourceViewResolver 比上面的类,添加了对jstl的支持

七:
HandlerExceptionResolver接口 --异常处理
SimpleMappingExceptionResolver实现类
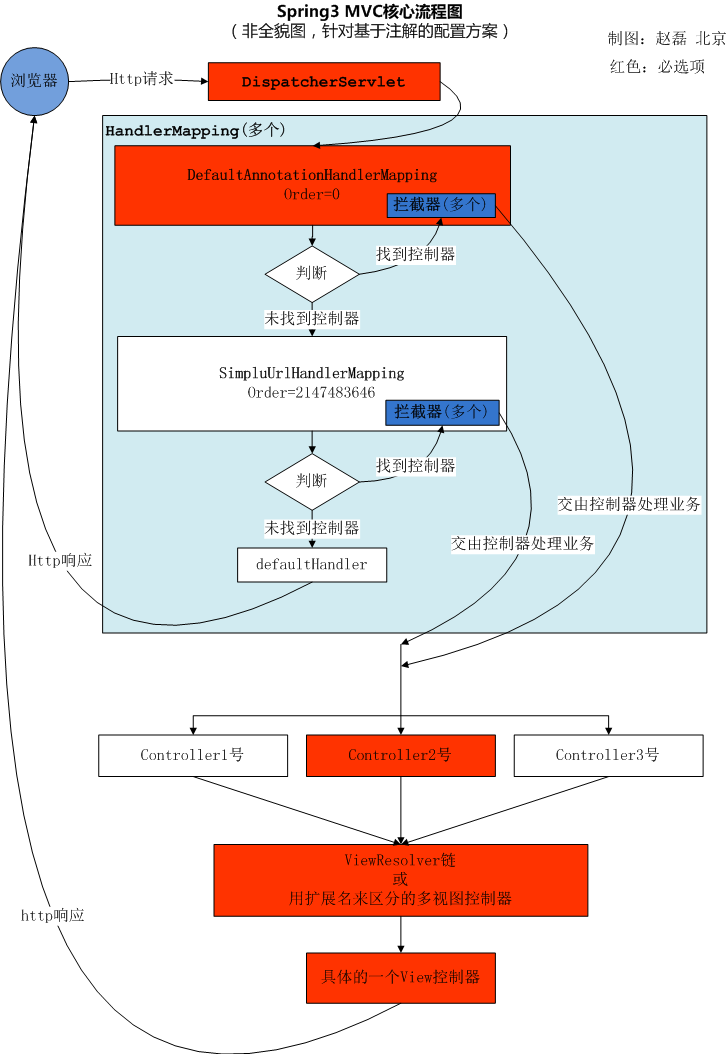
核心流程图

具体流程
1.从浏览器通过post/get发起一个请求
2.前置控制器DispatcherServlet处理该请求,根据url-param映射,识别出名称,再通过拦截器拦截,与相对应的controller匹配,如果没有找到相应的映射名称,则返回浏览器
3.controller处理完毕后返回一个字符串,提交给ViewResolver处理,根据视图配置来找到具体的view控制器,找到具体的页面
以下配置是在
<!-- jsp视图 -->
<bean id="jspViewResolver"
class="org.springframework.web.servlet.view.InternalResourceViewResolver">
<property name="prefix" value="/WEB-INF/back_page/" />
<property name="suffix" value=".jsp" />
</bean>
4.返回到浏览器
DispatcherServlet详细说明
使用springmvc,配置DispatcherServlet是第一步
DispatcherServlet是一个servlet,所以可以配置多个DispatcherServlet
它是前置控制器,配置在web.xml中,拦截匹配的请求,Servlet拦截匹配的规则要自己定义
把拦截下来的请求,根据某某规则分发到目标controller来处理
某某规则,是规则使用了哪个HandlerMapping接口的实现类的不用而不用
<web-app>
    <servlet>
        <servlet-name>example</servlet-name>
        <servlet-class>org.springframework.web.servlet.DispatcherServlet</servlet-class>
        <load-on-startup>1</load-on-startup>
    </servlet>
    <servlet-mapping>
        <servlet-name>example</servlet-name>
        <url-pattern>*.form</url-pattern>
    </servlet-mapping>
</web-app>
以上就是一个DispatcherServlet的配置
<load-on-startup>1</load-on-startup>是启动顺序,让这个Servlet随Servletp容器一起启动。
<url-pattern>*.form</url-pattern> 会拦截*.form结尾的请求。
<servlet-name>example</servlet-name>这个Servlet的名字是example,可以有多个DispatcherServlet,是通过名字来区分的。每一个DispatcherServlet有自 己的WebApplicationContext上下文对象。同时保存的ServletContext中和Request对象中,关于key,以后说明。
在DispatcherServlet的初始化过程中,框架会在web应用的 WEB-INF文件夹下寻找名为[servlet-name]-servlet.xml 的配置文件,生成文件中定义的bean。
第二个例子
<servlet>
    <servlet-name>springMVC</servlet-name>
    <servlet-class>org.springframework.web.servlet.DispatcherServlet</servlet-class>
    <init-param>
        <param-name>contextConfigLocation</param-name>
        <param-value>classpath*:/springMVC.xml</param-value>
    </init-param>
    <load-on-startup>1</load-on-startup>
</servlet>
<servlet-mapping>
    <servlet-name>springMVC</servlet-name>
    <url-pattern>/</url-pattern>
</servlet-mapping>
指明了配置文件的名称,不使用默认配置文件名,而使用springMVC.xml中的配置
其中<param-value>**.xml</param-value> 这里可以使用多种写法
1、不写,使用默认值:/WEB-INF/<servlet-name>-servlet.xml
2、<param-value>/WEB-INF/classes/springMVC.xml</param-value>
3、<param-value>classpath*:springMVC-mvc.xml</param-value>
4、多个值用逗号分隔
Servlet拦截匹配规则可以自己 定义,拦截哪种url合适
当映射为@RequestMapping("/user/add")时,为例:
1、拦截*.do、*.htm, 例如:/user/add.do
这是最传统的方式,最简单也最实用。不会导致静态文件(jpg,js,css)被拦截。
2、拦截/,例如:/user/add
可以实现现在很流行的REST风格。很多互联网类型的应用很喜欢这种风格的URL。
弊端:会导致静态文件(jpg,js,css)被拦截后不能正常显示。想实现REST风格,事情就是麻烦一些。后面有解决办法还算简单。
3、拦截/*,这是一个错误的方式,请求可以走到Action中,但转到jsp时再次被拦截,不能访问到jsp。
父子上下文 WebApplicationContext
如果你使用listener 来加载配置,一般在Struts+Spring+Hibernate的项目中都是使用listener监听器的,如下
<listener>
  <listener-class>org.springframework.web.context.ContextLoaderListener</listener-class>
</listener>
Spring会创建一个WebApplicationContext上下文,称之为父上下文(父容器),保存在ServletContext中,key是WebApplicationContext.ROOT_WEB_APPLICATION_CONTEXT_ATTRRIBUTE的值
可以使用Spring提供的工具类提出这个值
WebApplicationContextUtils.getWebApplicationContext(ServletContext);
DispatcherServlet是一个servlet,可以配置多个,每个DispatcherServlet都有一个自己的上下文,也叫做WebApplicationContext,称为子上下文,子上下文可以访问父上下文的的内容,但是反之不行,它也保存在ServletContext中 key是org.springframework.web.servlet.FrameworkServlet.CONTEXT"+Servlet名称
可以使用工具类取出上下文对象.RequestContextUtils.getWebApplicationContext(request);
spring并没有限制我们一定要使用父子上下文,我们可以自己决定怎么使用
方案一,传统型
父上下文保存数据源,服务层,dao层,事务的bean
子上下文保存Mvc相关的action的bean
事务控制在服务层
由于父上下文不能访问子上下文,事务的bean在父上下文中,所以对子上下文的action进行aop事务管理
mvc.xml配置详解
- <?xml version="1.0" encoding="UTF-8"?>
- <beans
- xmlns="http://www.springframework.org/schema/beans"
- xmlns:xsi="http://www.w3.org/2001/XMLSchema-instance"
- xmlns:tx="http://www.springframework.org/schema/tx"
- xmlns:context="http://www.springframework.org/schema/context"
- xmlns:mvc="http://www.springframework.org/schema/mvc"
- xsi:schemaLocation="http://www.springframework.org/schema/beans
- http://www.springframework.org/schema/beans/spring-beans-3.0.xsd
- http://www.springframework.org/schema/tx
- http://www.springframework.org/schema/tx/spring-tx-3.0.xsd
- http://www.springframework.org/schema/context
- http://www.springframework.org/schema/context/spring-context-3.0.xsd
- http://www.springframework.org/schema/mvc
- http://www.springframework.org/schema/mvc/spring-mvc-3.0.xsd">
- <!-- 自动扫描的包名 -->
- <context:component-scan base-package="com.app,com.core,JUnit4" ></context:component-scan>
- <!-- 默认的注解映射的支持 -->
- <mvc:annotation-driven />
- <!-- 视图解释类 -->
- <bean class="org.springframework.web.servlet.view.InternalResourceViewResolver">
- <property name="prefix" value="/WEB-INF/jsp/"/>
- <property name="suffix" value=".jsp"/><!--可为空,方便实现自已的依据扩展名来选择视图解释类的逻辑 -->
- <property name="viewClass" value="org.springframework.web.servlet.view.JstlView" />
- </bean>
- <!-- 拦截器 -->
- <mvc:interceptors>
- <bean class="com.core.mvc.MyInteceptor" />
- </mvc:interceptors>
- <!-- 对静态资源文件的访问 方案一 (二选一) -->
- <mvc:default-servlet-handler/>
- <!-- 对静态资源文件的访问 方案二 (二选一)-->
- <mvc:resources mapping="/images/**" location="/images/" cache-period="31556926"/>
- <mvc:resources mapping="/js/**" location="/js/" cache-period="31556926"/>
- <mvc:resources mapping="/css/**" location="/css/" cache-period="31556926"/>
- </beans>
如何访问到静态文件
- <servlet-mapping>
- <servlet-name>default</servlet-name>
- <url-pattern>*.jpg</url-pattern>
- </servlet-mapping>
- <servlet-mapping>
- <servlet-name>default</servlet-name>
- <url-pattern>*.js</url-pattern>
- </servlet-mapping>
- <servlet-mapping>
- <servlet-name>default</servlet-name>
- <url-pattern>*.css</url-pattern>
- </servlet-mapping>
- 要配置多个,每种文件配置一个
要写在DispatcherServlet的前面,这样就不会进入spring
Tomcat, Jetty, JBoss, and GlassFish 自带的默认Servlet的名字 -- "default"
Google App Engine 自带的 默认Servlet的名字 -- "_ah_default"
Resin 自带的 默认Servlet的名字 -- "resin-file"
WebLogic 自带的 默认Servlet的名字 -- "FileServlet"
WebSphere 自带的 默认Servlet的名字 -- "SimpleFileServlet"
方案二: 在spring3.0.4以后版本提供了mvc:resources , 使用方法:
- <!-- 对静态资源文件的访问 -->
- <mvc:resources mapping="/images/**" location="/images/" />