前言
初到新公司,接手8-10个java后台项目,代码量比较大,框架使用比较混乱,两个月左右的时间把开发到发布的流程整个熟悉了一遍,这面领导要求做项目以后的整体技术改造规划,所以引入一些代码检查工具,保证改造的同时提高代码质量
下面是搭建步骤:
准备环境
jdk1.8
mysql5.6+
下载安装包
- 服务端sonarqube:
http://www.sonarqube.org/downloads/
- 客户端工具sonar-runner:
- 中文补丁包下载:
http://docs.codehaus.org/display/SONAR/Chinese+Pack
解压路径:/usr/local
创建数据库
mysql -u root -p

mysql> CREATE DATABASE sonar CHARACTER SET utf8 COLLATE utf8_general_ci;

mysql> CREATE USER 'sonar' IDENTIFIED BY 'sonar';

mysql> GRANT ALL ON sonar.* TO 'sonar'@'%' IDENTIFIED BY 'sonar';

mysql> GRANT ALL ON sonar.* TO 'sonar'@'localhost' IDENTIFIED BY 'sonar';

mysql> FLUSH PRIVILEGES;
修改配置文件
vim /usr/local/sonarqube-5.6.6/confsonar.properties

sonar.host.url=http://localhost:9000/sonarqube

sonar.jdbc.url=jdbc:mysql://localhost:3306/sonar?useUnicode=true&characterEncoding=utf8&rewriteBatchedStatements=true&useConfigs=maxPerformance

sonar.jdbc.username=root

sonar.jdbc.password=123456
vim /usr/local/sonarqube-5.6.6/wrapper.conf
wrapper.java.command=/Library/Internet Plug-Ins/JavaAppletPlugin.plugin/Contents/Home/bin/java
注意:把wrapper.conf中的wrapper.java.command修改成jdk1.8路径
否则会找系统自带jdk版本的命令执行,启动的时候可能报错
vim /usr/local/sonar-runner-2.4/conf/sonar-runner.properties

sonar.host.url=http://localhost:9000/sonarqube

sonar.jdbc.url=jdbc:mysql://localhost:3306/sonar?useUnicode=true&characterEncoding=utf8&rewriteBatchedStatements=true&useConfigs=maxPerformance

sonar.jdbc.username=root

sonar.jdbc.password=123456
配置环境变量
vim ~/.bash_profile

export SONAR_HOME=/usr/local/sonarqube-5.6.6

export SONAR_RUNNER_HOME=/usr/local/sonar-runner-2.4

export PATH=$M2:$PATH:$SONAR_RUNNER_HOME/bin:$JAVA_8_HOME/bin
配置完成后环境变量生效
source ~/.bash_profile
试验:sonar-runner -version
启动SonarQube
cd /usr/local/sonarqube-5.6.6/bin/macosx-universal-64

./sonar.sh start
查看启动日志:
tail -f /usr/local/sonarqube-5.6.6/logs/sonar.log
关闭命令:
./sonar.sh stop
登录:http://localhost:9000/sonarqube
默认密码:admin/admin
扫描项目
- maven 环境
Maven仓库中就有SonarQube Scanner工具的插件,只要在$M2_HOME/conf/setting.xml文件中添加如下配置
<pluginGroups>

         <pluginGroup>org.sonarsource.scanner.maven</pluginGroup>

</pluginGroups>

<profile>

     <id>sonar</id>

<activation>

      <activeByDefault>true</activeByDefault>

</activation>

<properties>

     <sonar.host.url>http://127.0.0.1:9000/sonarqube</sonar.host.url>

</properties>

</profile>
配置完成后,在项目中,执行mvn sonar:sonar,SonarQube Scanner会自动扫描,根据pom.xml文件得出项目相关信息,不需要自定义sonar-project.properties。扫描完成后就会上传只Sonarqube服务器中。稍后,登陆服务器中就可以看到分析结果了。
- 手动扫描
打开要进行代码分析的项目根目录,新建sonar-project.properties文件
sonar.projectKey=my:task

# this is the name displayed in the SonarQube UI

sonar.projectName=My task

sonar.projectVersion=1.0

sonar.projectDescription= task 定时任务调度

# Path is relative to the sonar-project.properties file. Replace "" by "/" on Windows.

# Since SonarQube 4.2, this property is optional if sonar.modules is set.

# If not set, SonarQube starts looking for source code from the directory containing

# the sonar-project.properties file.

#sources是源文件所在的目录

sonar.sources=master/src,slave/src

sonar.binaries=WebRoot/WEB-INF/classes

# Encoding of the source code. Default is default system encoding

sonar.language=java

sonar.my.property=value

sonar.sourceEncoding=UTF-8
在项目跟目录执行 输入命令:sonar-runner
项目报告介绍
查看项目报告 : http://localhost:9000/sonarqube
-
项目列表

-
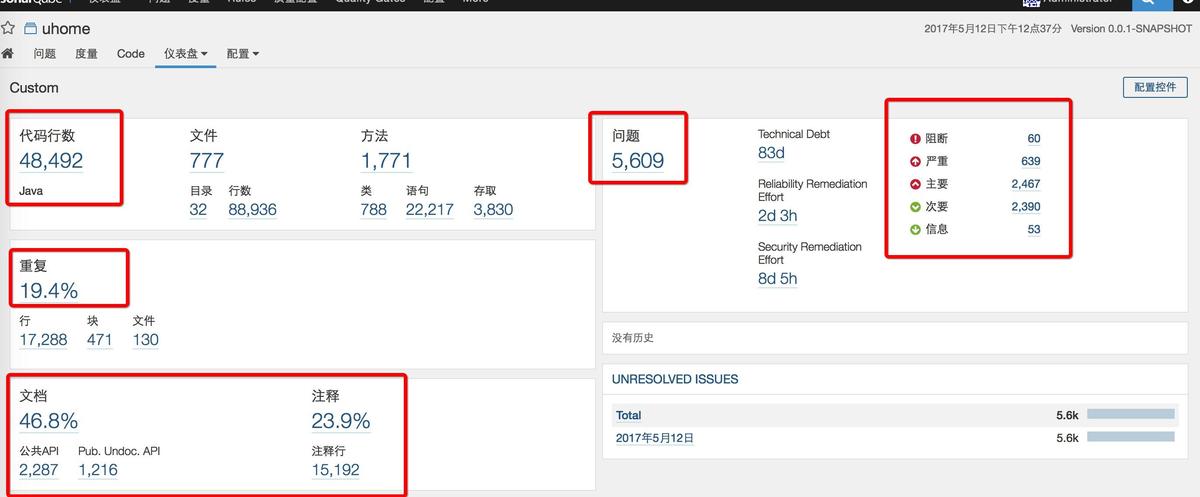
仪表盘-custom中查看项目整体情况

阻断和严重问题,还有重复代码量都有体现,我们可以点击去看详细问题进行修复。
总结
通过SonarQube工具,作为码农可以及时审查自己的代码水平和问题,进行及时修复,优化代码的质量,这种工作我们要持之以恒的态度,才能使项目始终保持高可用,高效,干净整洁的状态。
由于本人是刚入门的阶段,后期还会在补充SonarQube的高级配置和jenkins进行集成的介绍,敬请期待。