本专题我将讨论一下开源服务,随着开源社区的日趋丰富,开源软件、开源服务,已经成为人类的一种公共资源,发展势头可谓一日千里,所以不可不知。SSHD服务,在我们的linux服务器上经常用到,很重要,涉及到服务器的安全,对这个服务的安全配置要高度重视。本文将从以下三个方面进行阐述开源服务及ssh服务。
- 一、学习开源服务的步骤和方法
- 二、SSHD服务安装、配置、使用
- 三、设置安全的SSHD服务
一、学习开源服务的步骤和方法:
1、 了解服务的作用:名称,功能,特点
2、 安装
3、 配置文件位置,端口
4、 服务启动关闭的脚本
5、 此服务的使用方法
6、 修改配置文件,实战举例
7、 排错(从下到上,从内到外)。
二、SSHD服务安装、配置、使用
SSHD服务
介绍:SSH 协议:安全外壳协议。为 Secure Shell 的缩写。SSH 为建立在应用层和传输层基础上的安全协议。
作用:sshd服务使用SSH协议可以用来进行远程控制, 或在计算机之间传送文件
相比较之前用telnet方式来传输文件要安全很多,因为telnet使用明文传输,是加密传输。
服务安装:
需要安装OpenSSH 四个安装包:
OpenSSH软件包,提供了服务端后台程序和客户端工具,用来加密远程控件和文件传输过程中的数据,并由此来代替原来的类似服务。
安装包:
OpenSSH 服务需要4 个软件包
openssh-askpass-5.3p1-118.1.el6_8.x86_64 #支持对话框窗口的显示,是一个基于X 系统的密码诊断工具
openssh-ldap-5.3p1-118.1.el6_8.x86_64 #这个包不是必须的,我在yum install openssh* -y 安装时,顺带将这个包装了。
openssh-5.3p1-118.1.el6_8.x86_64 #包含OpenSSH 服务器及客户端需要的核心文件
openssh-clients-5.3p1-118.1.el6_8.x86_64 #OpenSSH 客户端软件包
openssh-server-5.3p1-118.1.el6_8.x86_64 #OpenSSH 服务器软件包
这四个软件包在我们的RHEL镜像软件安装包里有。
[root@xiaolyu77 ~]# ll /mnt/Packages/openssh*
-r--r--r-- 3 root root 264144 Nov 25 2013 /mnt/Packages/openssh-5.3p1-94.el6.x86_64.rpm
-r--r--r-- 2 root root 55748 Nov 25 2013 /mnt/Packages/openssh-askpass-5.3p1-94.el6.x86_64.rpm
-r--r--r-- 3 root root 411336 Nov 25 2013 /mnt/Packages/openssh-clients-5.3p1-94.el6.x86_64.rpm
-r--r--r-- 3 root root 318860 Nov 25 2013 /mnt/Packages/openssh-server-5.3p1-94.el6.x86_64.rpm
[root@xiaolyu77 ~]#

说明:这里我给出我的xshell的配色方案,因为作为程序人,整天对着一个白底黑字还是黑底黄字,对眼睛的伤害非常大。
我的配色方案是眼科专家给出的,最利于眼睛保护的。xshell最佳配色方案下载 下载完成后,直接在xshell中导入即可。
因为在上一篇博文中我已经讲了如何配置本地和在线yum源,这里直接用yum安装方式来安装openssh软件包。
yum install openssh* -y

因为我的openssh安装过,而我又配置了网络yum源,所以这里会更新旧的安装包。
确认软件包是否已经安装:
rpm -qa | grep openssh

查看软件安装生产的文件:
rpm -ql openssh

OpenSSH 配置文件
ll /etc/ssh

OpenSSH 常用配置文件有两个/etc/ssh/ssh_config 和/etc/ssh/sshd_config。
ssh_config 为客户端配置文件
sshd_config 为服务器端配置文件
服务启动关闭脚本:
方法1:
service sshd restart/stop/start/status

方法2:
/etc/init.d/sshd restart/stop/start/status

设置开机启动服务:
chkconfig sshd on
chkconfig --list sshd

如何使用ssh来远程连接主机:
方法一、
1、ssh [远程主机用户名] @[远程服务器主机名或IP地址]
如果用root进程登录远程主机可以这样:就是直接写要登录远程主机的ip地址,不用带远程主机的用户名。
root用户登录:
[root@xiaolyu77 ~]# ssh 192.168.31.76

查看生成的knows-hosts文件。
cat .ssh/known_hosts

普通用户登录:
[root@xiaolyu76 ~]# useradd xiao && echo 123456 | passwd --stdin xiao


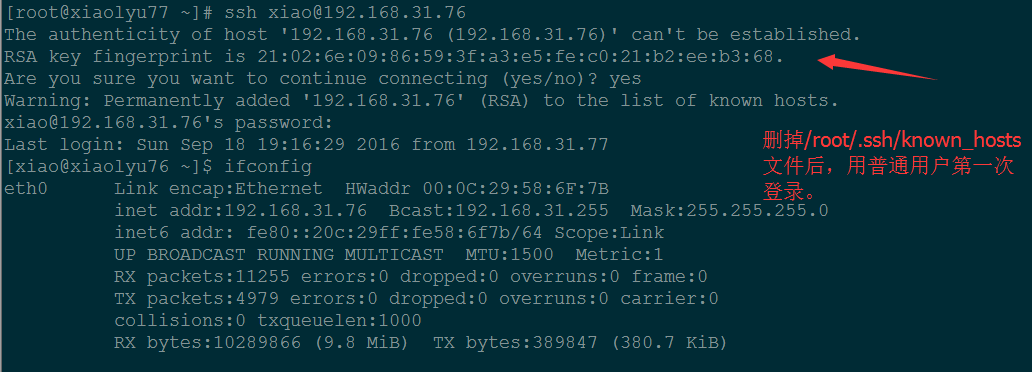
因为我第一次用root用户登录,.ssh/known_hosts文件已经生成,所以当我再用普通用户xiao登录时,不会出现RSA指纹签名的信息。
下面我删掉/root/.ssh/known_hosts文件,再用普通用户登陆一下。

重新换一个窗口登录77主机,发现/root/.ssh/knows_hosts文件又重新生成了。

总结:
1. 第一次登录服务器时系统没有保存远程主机的信息,为了确认该主机身份会提示用户是否继续连接,输入yes 后登录,这时系统会将远程服务器信息写入用户目录下: $HOME/.ssh/known_hosts 文件中,下次再进行登录时因为保存有该主机信息就不会再提示了.
如果是root用户,known_hosts会写在/root/.ssh/known_hosts文件中。
2. RSA算法基于一个十分简单的数论事实:将两个大素数相乘十分容易,但是想要对其乘积进行因式分解却极其困难,因此可以将乘积公开作为加密密钥。
方法二、
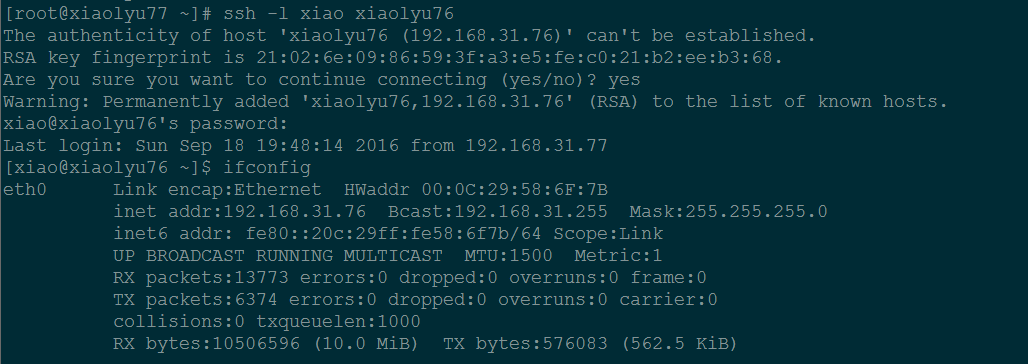
ssh -l [远程主机用户名] [远程服务器主机名或IP 地址]
[root@xiaolyu77 ~]# ssh -l xiao xiaolyu76

说明:两种登录方式效果相同,推荐第一种,因为第一种登录方法和大多数服务的登录方法相同,本人也习惯用第一种。
三、SSHD配置文件及安全配置:
介绍下配置文件,以及需要安全调优的地方
注:参数前面有#,表示是默认值。 当然#号也表示注示。
/etc/ssh/sshd_config 配置文件
说明:这里以xiaolyu76作为服务器,xiaolyu77作为客户端。
#下面是系统默认的sshd_config的配置文件:
[root@xiaolyu76 ~]# cat /etc/ssh/sshd_config
#    $OpenBSD: sshd_config,v 1.80 2008/07/02 02:24:18 djm Exp $

# This is the sshd server system-wide configuration file.  See
# sshd_config(5) for more information.

# This sshd was compiled with PATH=/usr/local/bin:/bin:/usr/bin

# The strategy used for options in the default sshd_config shipped with
# OpenSSH is to specify options with their default value where
# possible, but leave them commented.  Uncommented options change a
# default value.

#Port 22
#AddressFamily any
#ListenAddress 0.0.0.0
#ListenAddress ::

# Disable legacy (protocol version 1) support in the server for new
# installations. In future the default will change to require explicit
# activation of protocol 1
Protocol 2

# HostKey for protocol version 1
#HostKey /etc/ssh/ssh_host_key
# HostKeys for protocol version 2
#HostKey /etc/ssh/ssh_host_rsa_key
#HostKey /etc/ssh/ssh_host_dsa_key

# Lifetime and size of ephemeral version 1 server key
#KeyRegenerationInterval 1h
#ServerKeyBits 1024

# Logging
# obsoletes QuietMode and FascistLogging
#SyslogFacility AUTH
SyslogFacility AUTHPRIV
#LogLevel INFO

# Authentication:

#LoginGraceTime 2m
#PermitRootLogin yes
#StrictModes yes
#MaxAuthTries 6
#MaxSessions 10

#RSAAuthentication yes
#PubkeyAuthentication yes
#AuthorizedKeysFile    .ssh/authorized_keys
#AuthorizedKeysCommand none
#AuthorizedKeysCommandRunAs nobody

# For this to work you will also need host keys in /etc/ssh/ssh_known_hosts
#RhostsRSAAuthentication no
# similar for protocol version 2
#HostbasedAuthentication no
# Change to yes if you don't trust ~/.ssh/known_hosts for
# RhostsRSAAuthentication and HostbasedAuthentication
#IgnoreUserKnownHosts no
# Don't read the user's ~/.rhosts and ~/.shosts files
#IgnoreRhosts yes

# To disable tunneled clear text passwords, change to no here!
#PasswordAuthentication yes
#PermitEmptyPasswords no
PasswordAuthentication yes

# Change to no to disable s/key passwords
#ChallengeResponseAuthentication yes
ChallengeResponseAuthentication no

# Kerberos options
#KerberosAuthentication no
#KerberosOrLocalPasswd yes
#KerberosTicketCleanup yes
#KerberosGetAFSToken no
#KerberosUseKuserok yes

# GSSAPI options
#GSSAPIAuthentication no
GSSAPIAuthentication yes
#GSSAPICleanupCredentials yes
GSSAPICleanupCredentials yes
#GSSAPIStrictAcceptorCheck yes
#GSSAPIKeyExchange no

# Set this to 'yes' to enable PAM authentication, account processing,
# and session processing. If this is enabled, PAM authentication will
# be allowed through the ChallengeResponseAuthentication and
# PasswordAuthentication.  Depending on your PAM configuration,
# PAM authentication via ChallengeResponseAuthentication may bypass
# the setting of "PermitRootLogin without-password".
# If you just want the PAM account and session checks to run without
# PAM authentication, then enable this but set PasswordAuthentication
# and ChallengeResponseAuthentication to 'no'.
#UsePAM no
UsePAM yes

# Accept locale-related environment variables
AcceptEnv LANG LC_CTYPE LC_NUMERIC LC_TIME LC_COLLATE LC_MONETARY LC_MESSAGES
AcceptEnv LC_PAPER LC_NAME LC_ADDRESS LC_TELEPHONE LC_MEASUREMENT
AcceptEnv LC_IDENTIFICATION LC_ALL LANGUAGE
AcceptEnv XMODIFIERS

#AllowAgentForwarding yes
#AllowTcpForwarding yes
#GatewayPorts no
#X11Forwarding no
X11Forwarding yes
#X11DisplayOffset 10
#X11UseLocalhost yes
#PrintMotd yes
#PrintLastLog yes
#TCPKeepAlive yes
#UseLogin no
#UsePrivilegeSeparation yes
#PermitUserEnvironment no
#Compression delayed
#ClientAliveInterval 0
#ClientAliveCountMax 3
#ShowPatchLevel no
#UseDNS yes
#PidFile /var/run/sshd.pid
#MaxStartups 10:30:100
#PermitTunnel no
#ChrootDirectory none

# no default banner path
#Banner none

# override default of no subsystems
Subsystem    sftp    /usr/libexec/openssh/sftp-server

# Example of overriding settings on a per-user basis
#Match User anoncvs
#    X11Forwarding no
#    AllowTcpForwarding no
#    ForceCommand cvs server
1. 端口:Port 22
设置sshd 监听端口号
# SSH 预设使用 22 这个port,也可以使用多个port,即重复使用 port 这个设定项目!
# 例如想要开放 sshd 端口为 22和 222 ,则多加一行内容为: Port 222 即可
# 然后重新启动 sshd 这样就好了。 建议修改 port number 为其它端口。防止别人暴力破解。
eg:修改sshd服务默认监听的端口为222
vim /etc/ssh/sshd_config

将Port 22修改为Port 222

重启sshd服务: service sshd restart
测试sshd服务的端口是否已经改变了: netstat -tlunp | grep sshd

修改完端口默认端口后,登录方法:
ssh -p 222 192.168.31.76 #-p后面跟的就是修改后的端口号。

2. 设置sshd 服务器绑定的本地IP 地址。
当本地有多个网卡时,就会出现多个ip地址,可以选择一个ip地址作为sshd服务器的ip地址。
当然了,0.0.0.0 表示本地所有的ip地址。

ListenAddress 是监听本地ip地址的,而不是远端ip地址的。
这个值可以写成本地某一个 ip地址或所有地址(0.0.0.0)。

#Protocol 2
选择的 SSH 协议版本,可以是 1 也可以是 2 ,CentOS 5.x 预设是仅支援 V2。出于安全考虑,设置为最新的协议版本
#HostKey /etc/ssh/ssh_host_key
设置包含计算机私人密匙的文件
#SyslogFacility AUTHPRIV
当有人使用 SSH 登入系统的时候,SSH 会记录信息,这个信息要记录的类型为AUTHPRIV。
在这个配置文件中,没有看到登录系统的默认日志存放路径,那么登录系统的默认日志存放在哪?
sshd服务日志存放在: /var/log/secure 。
ls /var/log/secure

例: 为什么sshd配置文件中没有指定日志,但日志却存放在了: /var/log/secure ?
vim /etc/rsyslog.conf

就是在这个/etc/rsyslog.conf定义了sshd服务日志的存放路径。
#LogLevel INFO
# 登录记录的等级!INFO级别以上。
3.下面是安全调优的重点:
#LoginGraceTime 2m
# 当使用者连上 SSH server 之后,会出现输入密码的画面
# 在多久时间内没有成功连上 SSH server 就强迫断线!若无单位则默认时间为秒!
可以根据实际情况来修改实际
# PermitRootLogin yes
#是否允许 root 登入!预设是允许的,但是建议设定成 no !
真实的生产环境服务器,是不允许root账号登陆的!!!
#PasswordAuthentication yes
# 密码验证当然是需要的!所以这里写 yes,也可以设置为no
#在真实的生产服务器上,根据不同安全级别要求,有的是设置不需要密码登陆的,通过认证的秘钥来登陆
# PermitEmptyPasswords no
# 若上面那一项如果设定为 yes 的话,这一项就最好设定为 no ,
# 这个项目在是否允许以空的密码登入!当然不许!
# PrintMotd yes
# 登入后是否显示出一些信息呢?例如上次登入的时间、地点等等,预设是 yes
# 亦即是打印出 /etc/motd 这个文档的内容。
例:给sshd服务添加一些警告信息
#服务器端:
[root@xiaolyu76 ~]# cat /etc/motd
[root@xiaolyu76 ~]# echo 'Warning ! From now on, all of your operations have been recorded!'> /etc/motd
#客户端:
[root@xiaolyu77 ~]# ssh -p222 xiaolyu76
root@xiaolyu76's password:
Last login: Mon Sep 19 02:08:16 2016 from xiaolyu77
Warning ! From now on, all of your operations have been recorded!


# PrintLastLog yes
# 显示上次登入的信息!预设也是 yes !实际生产上也是yes! 从上面可以明显的看到这个参数的效果。
# UseDNS yes
#一般来说,为了要判断客户端来源是正常合法的,因此会使用 DNS 去反查客户端的主机名
# 不过如果是在内网互连,这项目设定为 no 会让联机速度比较快。