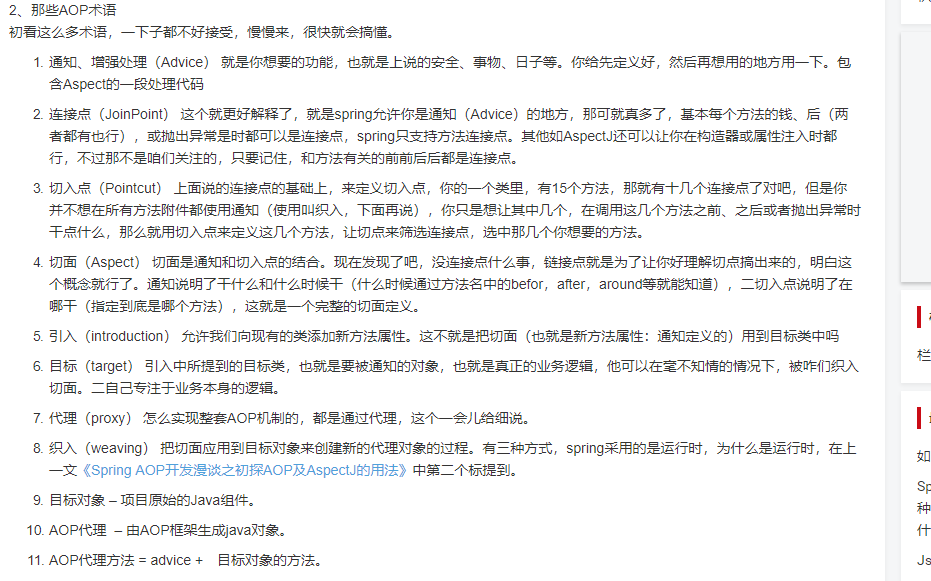
AOP的专业术语:

1、创建Maven管理项目:
pom.xml导入依赖
<properties>
		<!-- springframe 版本控制 -->
		<spring.version>4.1.1.RELEASE</spring.version>
	</properties>
	<dependencies>
		<!-- 允许创建jsp页面 -->
		<dependency>
			<groupId>javax.servlet</groupId>
			<artifactId>servlet-api</artifactId>
			<version>2.5</version>
			<scope>provided</scope>
		</dependency>
		<!-- jsp页面标签 -->
		<dependency>
			<groupId>jstl</groupId>
			<artifactId>jstl</artifactId>
			<version>1.2</version>
		</dependency>
		<!-- jsp API -->
		<dependency>
			<groupId>javax.servlet</groupId>
			<artifactId>jsp-api</artifactId>
			<version>2.0</version>
			<scope>provided</scope>
		</dependency>
		<!-- servlet Api -->
		<dependency>
			<groupId>javax.servlet</groupId>
			<artifactId>javax.servlet-api</artifactId>
			<version>4.0.1</version>
			<scope>provided</scope>
		</dependency>
		<!-- springframe start -->
		<dependency>
			<groupId>org.springframework</groupId>
			<artifactId>spring-core</artifactId>
			<version>${spring.version}</version>
		</dependency>

		<dependency>
			<groupId>org.springframework</groupId>
			<artifactId>spring-web</artifactId>
			<version>${spring.version}</version>
		</dependency>

		<dependency>
			<groupId>org.springframework</groupId>
			<artifactId>spring-oxm</artifactId>
			<version>${spring.version}</version>
		</dependency>

		<dependency>
			<groupId>org.springframework</groupId>
			<artifactId>spring-tx</artifactId>
			<version>${spring.version}</version>
		</dependency>

		<dependency>
			<groupId>org.springframework</groupId>
			<artifactId>spring-jdbc</artifactId>
			<version>${spring.version}</version>
		</dependency>

		<dependency>
			<groupId>org.springframework</groupId>
			<artifactId>spring-webmvc</artifactId>
			<version>${spring.version}</version>
		</dependency>

		<dependency>
			<groupId>org.springframework</groupId>
			<artifactId>spring-aop</artifactId>
			<version>${spring.version}</version>
		</dependency>

		<dependency>
			<groupId>org.springframework</groupId>
			<artifactId>spring-context-support</artifactId>
			<version>${spring.version}</version>
		</dependency>

		<dependency>
			<groupId>org.springframework</groupId>
			<artifactId>spring-test</artifactId>
			<version>${spring.version}</version>
		</dependency>
		<!-- springframe end -->

		<!--mysql数据库驱动 -->
		<dependency>
			<groupId>mysql</groupId>
			<artifactId>mysql-connector-java</artifactId>
			<version>5.1.38</version>
		</dependency>
		<!--log4j日志包 -->
		<dependency>
			<groupId>org.apache.logging.log4j</groupId>
			<artifactId>log4j-core</artifactId>
			<version>2.6.1</version>
		</dependency>
		<!-- JUnit单元测试工具 -->
		<dependency>
			<groupId>junit</groupId>
			<artifactId>junit</artifactId>
			<version>4.10</version>
		</dependency>
		<!-- aspectJ AOP 织入器 -->
		<dependency>
			<groupId>org.aspectj</groupId>
			<artifactId>aspectjweaver</artifactId>
			<version>1.8.9</version>
		</dependency>
		<!-- jstl -->
		<dependency>
			<groupId>javax.servlet</groupId>
			<artifactId>jstl</artifactId>
			<version>1.2</version>
		</dependency>
	</dependencies>
2、创建目标对象
com.service.UserService.java(j接口)、com.service.impl.UserServiceImpl.java(实现类)
package com.service;

public interface UserService {
     void save();
     void update();
     void delete();
     void select();
}
package com.service.impl;

import com.service.UserService;
public class UserServiceImpl implements UserService {

	@Override
	public void save() {
		System.out.println("保存成功");

	}

	@Override
	public void update() {
		System.out.println("更新成功");

	}

	@Override
	public void delete() {
		//int i=9/0;
		System.out.println("删除成功");

	}

	@Override
	public void select() {
		System.out.println("查询成功");

	}

}
3、创建Transaction-advice类(事务同通知类)
com.transactionAdvice.transactionAdvice.java
package com.transactionAdvice;

import java.io.Serializable;

import org.aspectj.lang.ProceedingJoinPoint;
public class transactionAdvice{
       public transactionAdvice() {}

       public void before() {
           System.out.println("before-->前置通知");
       }

       public void after() {
           System.out.println("after-->后置通知(无论是否出现异常都执行)");
       }
       //可以用于commit
       public void afterReturning() {
           System.out.println("afterReturning-->后置通知(出现异常不会执行)");
       }
       //可以用于rollback
       public void throwingException() {
           System.out.println("throwingException-->出现异常时执行!");
       }

       public Object around(ProceedingJoinPoint point) throws Throwable {
           System.out.println("around-before");
           Object object=point.proceed();

           System.out.println("around-after");
           return object;
       }
}
4、配置applicationContext.xml
注意:execution(* com.service..*ServiceImpl.*(..)),这是一个execution()表达式,第一个*表示方法的任意返回值,*ServiceImpl表示只要是ServiceImpl后缀的类,*(..)便是任意方法,任意方法里面的可以有任意形参。
整句话的意思是:com.service下的全部子包下的,后缀带有(ServiceImpl)的全部类,类下面的全部方法(如果去掉“(..)”里面的两个点,则表示不带形参的方法),方法下的任意返回值都是切入点。
eg: execution(public void com.service.impl.UserServiceImpl.delete()) ,就特指com.service.impl.UserServiceImpl下的delete()方法,返回值是void
<?xml version="1.0" encoding="UTF-8"?>
<beans xmlns="http://www.springframework.org/schema/beans"
	xmlns:p="http://www.springframework.org/schema/p"
	xmlns:context="http://www.springframework.org/schema/context"
	xmlns:tx="http://www.springframework.org/schema/tx"
	xmlns:aop="http://www.springframework.org/schema/aop"
	xmlns:xsi="http://www.w3.org/2001/XMLSchema-instance"
	xsi:schemaLocation="http://www.springframework.org/schema/beans
        http://www.springframework.org/schema/beans/spring-beans-4.0.xsd
        http://www.springframework.org/schema/context
        http://www.springframework.org/schema/context/spring-context-4.0.xsd
        http://www.springframework.org/schema/tx
        http://www.springframework.org/schema/tx/spring-tx-4.0.xsd
        http://www.springframework.org/schema/aop
        http://www.springframework.org/schema/aop/spring-aop-4.0.xsd">
    <!-- 实现类Bean -->
	<bean id="userService" class="com.service.impl.UserServiceImpl" />
	<!-- 事务通知类Bean -->
	<bean id="TransactionAdvice" class="com.transactionAdvice.transactionAdvice" />
    <aop:config>
		<!-- 设置切入点 -->
		<aop:pointcut expression="execution(* com.service..*ServiceImpl.*(..))" id="pointcut" />
		<!-- 将通知织入到相对应的切入点中 -->
		<aop:aspect ref="TransactionAdvice">
		    <aop:before method="before" pointcut-ref="pointcut"/>
		    <aop:after method="after" pointcut-ref="pointcut"/>
		    <aop:after-returning method="afterReturning" pointcut-ref="pointcut"/>
		    <aop:after-throwing method="throwingException" pointcut-ref="pointcut"/>
		    <aop:around method="around" pointcut-ref="pointcut"/>
		</aop:aspect>
	</aop:config>
	<!-- 依赖注入的时候允许注入给实现类,而非强制是接口 -->
	<aop:aspectj-autoproxy proxy-target-class="true"/>
</beans>
5、测试用例
package Junit;

import javax.annotation.Resource;

import org.junit.Test;
import org.junit.runner.RunWith;

import com.service.UserService;
import com.service.impl.UserServiceImpl;

import org.springframework.beans.factory.annotation.Autowired;
import org.springframework.test.context.ContextConfiguration;
import org.springframework.test.context.junit4.SpringJUnit4ClassRunner;

@RunWith(SpringJUnit4ClassRunner.class)
@ContextConfiguration("/applicationContext.xml")
public class AopTest {
    @Resource(name="userService")
    private UserService us;
    @Test
    public void AopTest() {
    	us.delete();
    }
}
效果:
