此处OpenStack集成 OpenDaylight 过程及简单的测试Case.
软件版本
OpenDaylight: 0.6.2-Carbon
OpenStack: ocata
OpenVswitch: 2.8.0
部署OpenDaylight
下载OpenDaylight https://www.opendaylight.org/technical-community/getting-started-for-developers/downloads-and-documentation
tar –xvf  distribution-karaf-0.6.2-Carbon.tar.gz
cd distribution-karaf-0.6.2-Carbon

#启动opendaylight
./bin/karaf

#安装plugin
feature:install odl-netvirt-openstack odl-dlux-core odl-mdsal-apidocs
logout

#配置opendaylight
vim etc/custom.properties

ovsdb.of.version=1.3
ovsdb.l3.fwd.enabled=yes
ovsdb.l3.arp.responder.disabled=yes

vim etc/opendaylight/datastore/initial/config/netvirt-dhcpservice-config.xm
<dhcpservice-config xmlns="urn:opendaylight:params:xml:ns:yang:dhcpservice:config">
  <controller-dhcp-enabled>true</controller-dhcp-enabled>
  <dhcp-dynamic-allocation-pool-enabled>true</dhcp-dynamic-allocation-pool-enabled>
</dhcpservice-config>

#重新启动opendaylight
./bin/karaf
部署OpenStack
部署openstack参考文档:https://docs.openstack.org/ocata/install-guide-rdo/
控制节点
systemctl stop neutron-l3-agent
systemcll stop neutron-dhcp-agent

systemctl disable neutron-l3-agent
systemcll disable neutron-dhcp-agent


#安装 networking-odl driver
yum install networking-odl


#配置neutron
vim /etc/neutron/neutron.conf
[DEFAULT]
service_plugins = odl-router_v2


vim /etc/neutron/plugins/ml2/ml2_conf.ini
[ml2]
type_drivers = flat,vlan,vxlan
tenant_network_types = vxlan
mechanism_drivers = opendaylight_v2

[ml2_type_flat]
flat_networks = phynet0

[ml2_type_vlan]
network_vlan_ranges = phynet0:200:210


vim /etc/neutron/plugins/ml2/ml2_conf_odl.ini
[ml2_odl]
url = http://sdnip:8080/controller/nb/v2/neutron
username = admin
password = admin

#更新数据库
/usr/bin/neutron-db-manage --config-file /etc/neutron/neutron.conf --config-file /etc/neutron/plugins/ml2/ml2_conf.ini upgrade head

# 启动neutron-server
systemctl start neutron-server
计算节点
#重置 openvswitch
systemctl stop openvswitch
rm -f /etc/openvswitch/conf.db
systemctl start openvswitch
ovs-vsctl add-br br-ex

ovs-vsctl set Open_vSwitch . other_config:local_ip=$hostip
ovs-vsctl set Open_vSwitch . other_config:provider_mappings=phynet0:br-ex

#配置节点agent
neutron-odl-ovs-hostconfig –datapath_type=system
ovs-vsctl set-manager tcp:$sdnip:6640
Case
neutron net-create demo
neutron subnet-create demo 192.168.10.0/24

# 验证opendaylight network
curl -u admin:admin http://$sdnip:8080/controller/nb/v2/neutron/networks

nova boot --image cirros --flavor m1.tiny --nic net-id=$net-id vm02
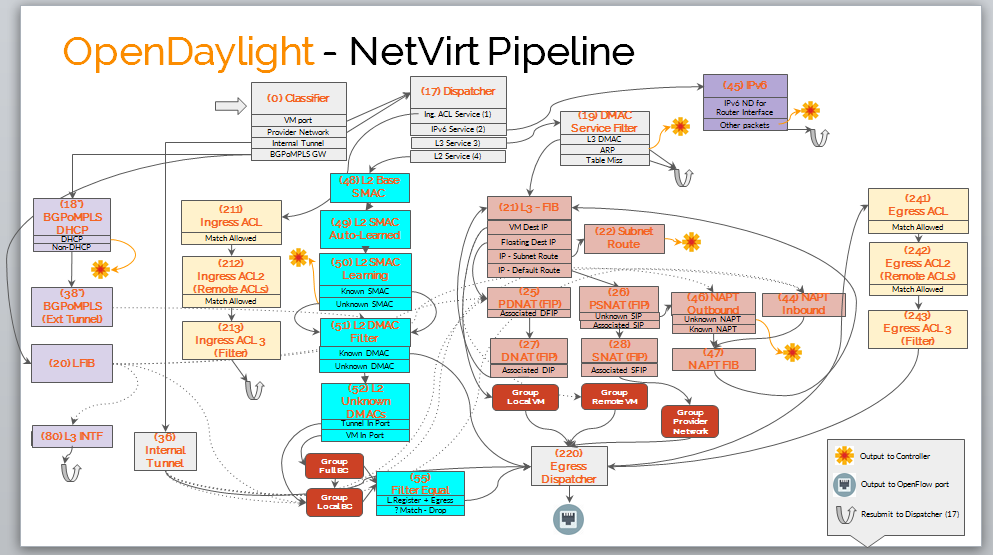
Netvrit Pipeline:
