内容:
一:概念、原理
二:实验过程
一、概念
一、keepalived原理及配置解析
keepalived:vrrp协议的实现
vrrp协议:virtual router redundancy protocol 即虚拟路由器冗余协议
vrrp基本实现及工作流程:
VRRP通过在一组路由器(一个VRRP组)之间共享一个虚拟IP(VIP)解决静态配置的问题,此时仅需要客户端以VIP作为其默认网关即可。
如图为一个基本的VLAN拓扑,其中,Device A、B、C共同组成一个VRRP组,其VIP为10.1.1.1,配置在路由器A的物理接口上,因此A为master路由器,B和C为backup路由器。
VRRP组中,master(路由器A)负责转发发往VIP地址的报文,客户端A、B、C都以此VIP作为其默认网关。一旦master故障,backup路由器B和C中具有最高优先级的路由器将成为master并接管VIP地址,而当原来的master路由器A重新上线时,如果工作在抢占模式下,其将重新成为master路由器。如果工作在非抢占模式下,其将作为backup路由器备用。
VRRP是一个“选举”协议,它能够动态地将一个虚拟路由器的责任指定至同一个VRRP组中的其它路由器上,从而消除了静态路由配置的单点故障。

VRRP术语:
VRRP虚拟路由(VRRP router):由一个master路由器和多个backup路由器组成,主机将虚拟路由器作为默认网关。
VRID(虚拟路由器标志):同一个虚拟路由器VRID必须唯一。
master路由器:虚拟路由器中承担报文转发任务的路由器。
backup路由器:master路由器故障时,能够接替master路由器工作的路由器。
优先级:vrrp根据优先级高低确定虚拟路由器组中每台路由器地位。
IP地址拥有者(IP Address Owner):如果一个VRRP设备将虚拟路由器IP地址作为真实的接口地址,则该设备被称为IP地址拥有者。如果IP地址拥有者是可用的,通常它将成为Master。
抢占模式:backup路由器工作于该模式下时,当它收到vrrp报文后,会将自身优先级与报文中的优先级作比较,如果自身优先级高,则会主动抢占成为master路由器,否则维持原状。
非抢占模式:backup路由器工作于该模式下时,只要master路由器不出现故障,则维持原状。
VRRP的优势:
冗余:可以使用多个路由器设备作为LAN客户端的默认网关,大大降低了默认网关成为单点故障的可能性;
负载共享:允许来自LAN客户端的流量由多个路由器设备所共享;
多VRRP组:在一个路由器物理接口上可配置多达255个VRRP组;
多IP地址:基于接口别名在同一个物理接口上配置多个IP地址,从而支持在同一个物理接口上接入多个子网;
抢占:在master故障时允许优先级更高的backup成为master;
通告协议:使用IANA所指定的组播地址224.0.0.18进行VRRP通告;
VRRP追踪:基于接口状态来改变其VRRP优先级来确定最佳的VRRP路由器成为master;
二、实验过程
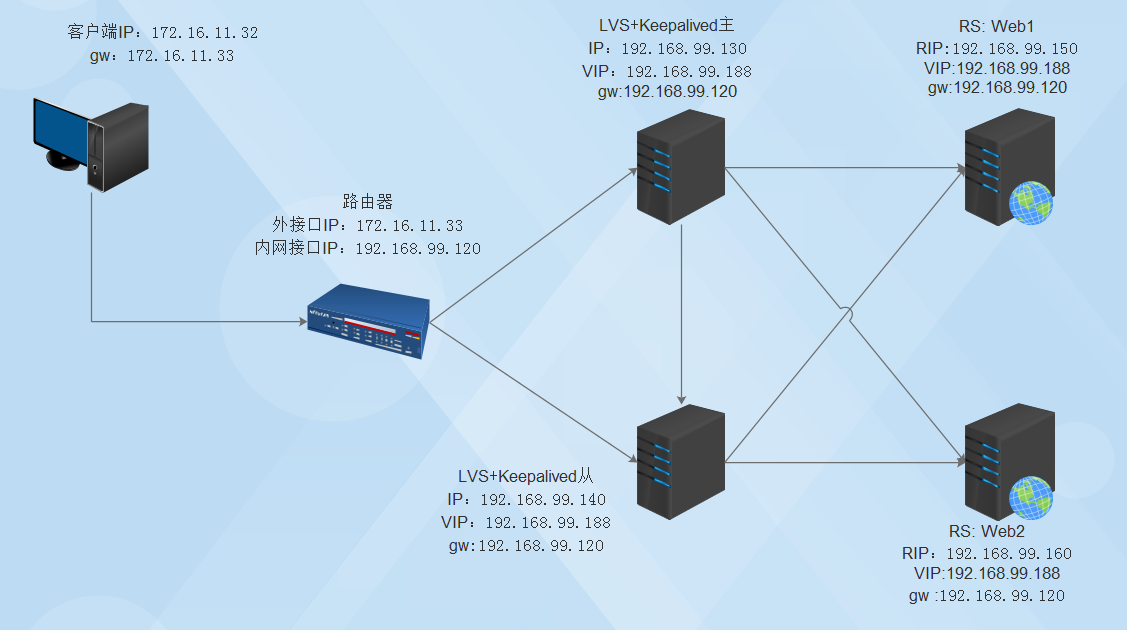
实验拓扑图:

先配置好基本环境 (关闭防火墙、selinux策略禁用等)
双主配置
一、单主模式即一台为主节点,一台为从节点 (双主模型是两台服务器互为主备,即一台为主备,另一台为备主(配置文件内容相反),让两台服务器并行运行,也可以实现减轻单台keepalived主机上的压力。 双主模型需要注意此时需要有2个VIP地址)
先配置路由器99.120 ,在上面开启路由转发功能,使其都能互通
 [root@centos7 ~]# echo 'net.ipv4.ip_forward = 1' >> /etc/sysctl.conf
 [root@centos7 ~]# sysctl -p
 net.ipv4.ip_forward = 1
在99.130、140主机上安装软件
① 安装软件包
[root@centos7 ~]# yum install -y lvsadm keepalived
keepalived配置文件详解
   notification_email {             #邮件通知机制,当keepalived发生故障时,进行发邮件通知
    root@mylinuxops.com             #可以将其修改也可以将其改为本机
   }
   notification_email_from root@peter.com  #邮件从哪里发出去
   smtp_server 127.0.0.1            #本机的smtp服务器地址
   smtp_connect_timeout 30          #smtp的连接超时时长
   router_id n1.mylinuxops.com      #虚拟路由的表示符一般写本机,确保每个节点都不相同
   vrrp_skip_check_adv_addr         #跳过检查数据报文,默认会检查。
   vrrp_strict                      #严格遵循vrrp协议,没有vip,单播地址,ipv6地址将无法启动
   vrrp_iptables                    #不生成iptables规则
   vrrp_mcast_group4 224.0.0.18     #组播,默认情况下向224.0.0.18发送组播消息
   vrrp_garp_interval 0             #arp报文发送延迟
   vrrp_gna_interval 0              #消息发送延迟

}

vrrp_instance VI_1 {        #配置实例的名称
    state BACKUP            #服务器角色
    nopreempt               #关闭VIP的抢占,state都为BACKUP时生效。
    interface eth0         #默认的接口
    virtual_router_id 66    #虚拟路由ID
    priority 80             #优先级
    advert_int 2            #探测时间
    authentication {        #认证方式
        auth_type PASS
        auth_pass 1111
    }
    virtual_ipaddress {     #虚拟的IP地址,将地址绑定在哪个网卡上,子接口是哪个
        192.168.99.188 dev eth0 label eth0:1
    }
}
②编辑99.130主机keepalived主的配置文件/etc/keepalived/keepalived.conf
[root@centos7 ~]# cd /etc/keepalived/
[root@centos7 keepalived]#ls
keepalived.conf
[root@centos7 keepalived]# cp keepalived.conf keepalived.conf.bak
[root@centos7 keepalived]# cat keepalived.conf
global_defs {
   notification_email {
        root@peter.com
   }
   notification_email_from root@peter.com
   smtp_server 127.0.0.1
   smtp_connect_timeout 30
   router_id s1.peter.com
   vrrp_skip_check_adv_addr
   #vrrp_strict
   vrrp_iptables
   vrrp_garp_interval 0
   vrrp_gna_interval 0
}

vrrp_instance VI_1 {
    state MASTER
    interface eth0
    virtual_router_id 66
    priority 100
    advert_int 2
    authentication {
        auth_type PASS
        auth_pass 1111
    }
    unicast_src_ip 192.168.99.130 label eth0:0
    unicast_peer {
        192.168.99.140
    }

    virtual_ipaddress {
        192.168.99.188 dev eth0 label eth0:0
        192.168.99.189 dev eth0 label eth0:1
    }
}

vrrp_instance VI_2 {
    state BACKUP
    interface eth0
    virtual_router_id 77
    priority 80
    advert_int 2
    authentication {
        auth_type PASS
        auth_pass 1111
    }
    unicast_src_ip 192.168.99.130 label eth0:0
    unicast_peer {
        192.168.99.140
    }
    virtual_ipaddress {
        192.168.99.200 dev eth0 label eth0:2
        192.168.99.201 dev eth0 label eth0:3
    }
}
③ 编辑从节点99.140的配置文件
[root@centos7 keepalived]# vim keepalived.conf
global_defs {
   notification_email {
        root@peter.com
   }
   notification_email_from root@peter.com
   smtp_server 127.0.0.1
   smtp_connect_timeout 30
   router_id s1.peter.com
   vrrp_skip_check_adv_addr
   #vrrp_strict
   vrrp_iptables
   vrrp_garp_interval 0
   vrrp_gna_interval 0
}

vrrp_instance VI_1 {
    state BACKUP
    interface eth0
    virtual_router_id 66
    priority 80
    advert_int 2
    authentication {
        auth_type PASS
        auth_pass 1111
    }
    unicast_src_ip 192.168.99.140 label eth0:0
    unicast_peer {
        192.168.99.130
    }

    virtual_ipaddress {
        192.168.99.188 dev eth0 label eth0:0
        192.168.99.189 dev eth0 label eth0:1
    }
}
vrrp_instance VI_2 {
    state MASTER
    interface eth0
    virtual_router_id 77
    priority 80
    advert_int 2
    authentication {
        auth_type PASS
        auth_pass 1111
    }
    unicast_src_ip 192.168.99.140 label eth0:0
    unicast_peer {
        192.168.99.130
    }
    virtual_ipaddress {
        192.168.99.200 dev eth0 label eth0:2
        192.168.99.201 dev eth0 label eth0:3
    }
}
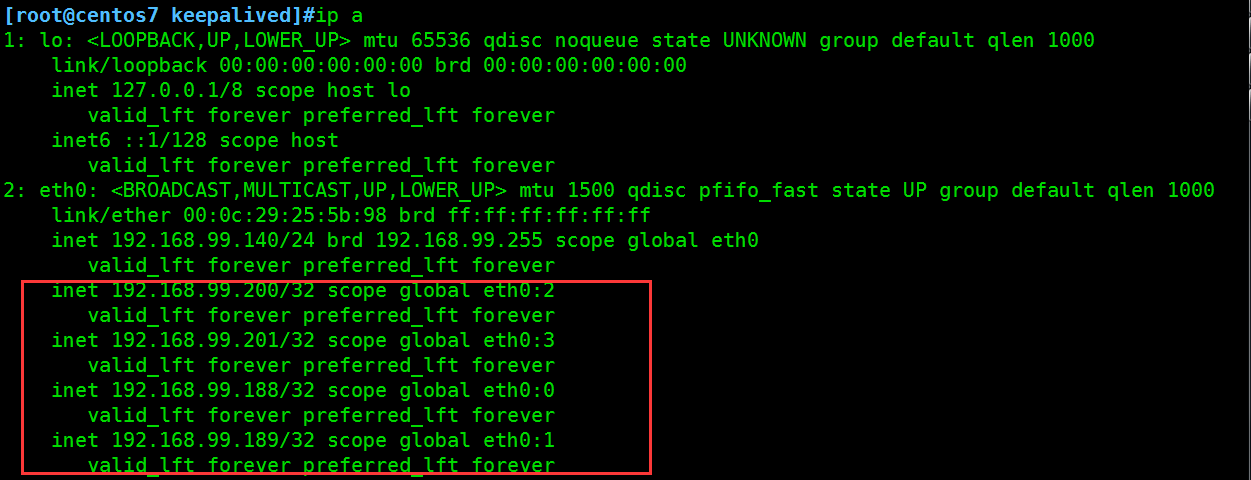
④ 先启动从节点的keepalived服务并查看日志(因为此时主节点还没有启动服务所以从节点的两个实例配置都会变为MASTER,也应该会有4个vip地址绑定在本机eth0网卡)
[root@centos7 keepalived]#systemctl restart keepalived ;tail -f /var/log/messages
Aug 12 22:13:10 centos7 Keepalived_vrrp[7238]: Stopped
Aug 12 22:13:10 centos7 systemd: Stopped LVS and VRRP High Availability Monitor.
Aug 12 22:13:10 centos7 Keepalived[7236]: Stopped Keepalived v1.3.5 (03/19,2017), git commit v1.3.5-6-g6fa32f2
Aug 12 22:13:14 centos7 systemd: Starting LVS and VRRP High Availability Monitor...
Aug 12 22:13:14 centos7 Keepalived[7252]: Starting Keepalived v1.3.5 (03/19,2017), git commit v1.3.5-6-g6fa32f2
Aug 12 22:13:14 centos7 Keepalived[7252]: Opening file '/etc/keepalived/keepalived.conf'.
Aug 12 22:13:14 centos7 systemd: PID file /var/run/keepalived.pid not readable (yet?) after start.
Aug 12 22:13:14 centos7 Keepalived[7253]: Starting Healthcheck child process, pid=7254
Aug 12 22:13:14 centos7 Keepalived[7253]: Starting VRRP child process, pid=7255
Aug 12 22:13:14 centos7 systemd: Started LVS and VRRP High Availability Monitor.
Aug 12 22:13:14 centos7 Keepalived_healthcheckers[7254]: Opening file '/etc/keepalived/keepalived.conf'.
Aug 12 22:13:14 centos7 Keepalived_vrrp[7255]: Registering Kernel netlink reflector
Aug 12 22:13:14 centos7 Keepalived_vrrp[7255]: Registering Kernel netlink command channel
Aug 12 22:13:14 centos7 Keepalived_vrrp[7255]: Registering gratuitous ARP shared channel
Aug 12 22:13:14 centos7 Keepalived_vrrp[7255]: Opening file '/etc/keepalived/keepalived.conf'.
Aug 12 22:13:14 centos7 Keepalived_vrrp[7255]: VRRP_Instance(VI_1) removing protocol VIPs.
Aug 12 22:13:14 centos7 Keepalived_vrrp[7255]: VRRP_Instance(VI_2) removing protocol VIPs.
Aug 12 22:13:14 centos7 Keepalived_vrrp[7255]: Using LinkWatch kernel netlink reflector...
Aug 12 22:13:14 centos7 Keepalived_vrrp[7255]: VRRP_Instance(VI_1) Entering BACKUP STATE
Aug 12 22:13:14 centos7 Keepalived_vrrp[7255]: VRRP sockpool: [ifindex(2), proto(112), unicast(1), fd(10,11)]
Aug 12 22:13:16 centos7 Keepalived_vrrp[7255]: VRRP_Instance(VI_2) Transition to MASTER STATE
Aug 12 22:13:18 centos7 Keepalived_vrrp[7255]: VRRP_Instance(VI_2) Entering MASTER STATE
Aug 12 22:13:18 centos7 Keepalived_vrrp[7255]: VRRP_Instance(VI_2) setting protocol VIPs.
Aug 12 22:13:18 centos7 Keepalived_vrrp[7255]: Sending gratuitous ARP on eth0 for 192.168.99.200
Aug 12 22:13:18 centos7 Keepalived_vrrp[7255]: VRRP_Instance(VI_2) Sending/queueing gratuitous ARPs on eth0 for 192.168.99.200
Aug 12 22:13:18 centos7 Keepalived_vrrp[7255]: Sending gratuitous ARP on eth0 for 192.168.99.201
Aug 12 22:13:18 centos7 Keepalived_vrrp[7255]: VRRP_Instance(VI_2) Sending/queueing gratuitous ARPs on eth0 for 192.168.99.201
Aug 12 22:13:18 centos7 Keepalived_vrrp[7255]: Sending gratuitous ARP on eth0 for 192.168.99.200
Aug 12 22:13:18 centos7 Keepalived_vrrp[7255]: Sending gratuitous ARP on eth0 for 192.168.99.201
Aug 12 22:13:20 centos7 Keepalived_vrrp[7255]: VRRP_Instance(VI_1) Transition to MASTER STATE
Aug 12 22:13:22 centos7 Keepalived_vrrp[7255]: VRRP_Instance(VI_1) Entering MASTER STATE
Aug 12 22:13:22 centos7 Keepalived_vrrp[7255]: VRRP_Instance(VI_1) setting protocol VIPs.
Aug 12 22:13:22 centos7 Keepalived_vrrp[7255]: Sending gratuitous ARP on eth0 for 192.168.99.188
Aug 12 22:13:22 centos7 Keepalived_vrrp[7255]: VRRP_Instance(VI_1) Sending/queueing gratuitous ARPs on eth0 for 192.168.99.188
Aug 12 22:13:22 centos7 Keepalived_vrrp[7255]: Sending gratuitous ARP on eth0 for 192.168.99.189
Aug 12 22:13:22 centos7 Keepalived_vrrp[7255]: VRRP_Instance(VI_1) Sending/queueing gratuitous ARPs on eth0 for 192.168.99.189
Aug 12 22:13:22 centos7 Keepalived_vrrp[7255]: Sending gratuitous ARP on eth0 for 192.168.99.188
Aug 12 22:13:22 centos7 Keepalived_vrrp[7255]: Sending gratuitous ARP on eth0 for 192.168.99.189
Aug 12 22:13:23 centos7 Keepalived_vrrp[7255]: Sending gratuitous ARP on eth0 for 192.168.99.200
Aug 12 22:13:23 centos7 Keepalived_vrrp[7255]: VRRP_Instance(VI_2) Sending/queueing gratuitous ARPs on eth0 for 192.168.99.200
Aug 12 22:13:23 centos7 Keepalived_vrrp[7255]: Sending gratuitous ARP on eth0 for 192.168.99.201
Aug 12 22:13:23 centos7 Keepalived_vrrp[7255]: VRRP_Instance(VI_2) Sending/queueing gratuitous ARPs on eth0 for 192.168.99.201
Aug 12 22:13:23 centos7 Keepalived_vrrp[7255]: Sending gratuitous ARP on eth0 for 192.168.99.200
Aug 12 22:13:23 centos7 Keepalived_vrrp[7255]: Sending gratuitous ARP on eth0 for 192.168.99.201
Aug 12 22:13:27 centos7 Keepalived_vrrp[7255]: Sending gratuitous ARP on eth0 for 192.168.99.188
Aug 12 22:13:27 centos7 Keepalived_vrrp[7255]: VRRP_Instance(VI_1) Sending/queueing gratuitous ARPs on eth0 for 192.168.99.188
Aug 12 22:13:27 centos7 Keepalived_vrrp[7255]: Sending gratuitous ARP on eth0 for 192.168.99.189
Aug 12 22:13:27 centos7 Keepalived_vrrp[7255]: VRRP_Instance(VI_1) Sending/queueing gratuitous ARPs on eth0 for 192.168.99.189
Aug 12 22:13:27 centos7 Keepalived_vrrp[7255]: Sending gratuitous ARP on eth0 for 192.168.99.189
Aug 12 22:13:27 centos7 Keepalived_vrrp[7255]: Sending gratuitous ARP on eth0 for 192.168.99.188
Aug 12 22:13:27 centos7 Keepalived_vrrp[7255]: Sending gratuitous ARP on eth0 for 1
⑤ 查看本地eth0网卡是否有4个VIP的地址

⑥ 此时如果开启主节点的keepalived,vip地址就会自动被移除,并变为backup状态
[root@centos7 keepalived]# tail -f /var/log/messages
Aug 12 21:54:20 centos7 Keepalived_vrrp[7156]: Sending gratuitous ARP on eth0 for 192.168.99.188
Aug 12 21:54:20 centos7 Keepalived_vrrp[7156]: Sending gratuitous ARP on eth0 for 192.168.99.188
Aug 12 21:54:20 centos7 Keepalived_vrrp[7156]: Sending gratuitous ARP on eth0 for 192.168.99.188
Aug 12 21:54:20 centos7 Keepalived_vrrp[7156]: Sending gratuitous ARP on eth0 for 192.168.99.188
Aug 12 21:54:25 centos7 Keepalived_vrrp[7156]: Sending gratuitous ARP on eth0 for 192.168.99.188
Aug 12 21:54:25 centos7 Keepalived_vrrp[7156]: VRRP_Instance(VI_1) Sending/queueing gratuitous ARPs on eth0 for 192.168.99.188
Aug 12 21:54:25 centos7 Keepalived_vrrp[7156]: Sending gratuitous ARP on eth0 for 192.168.99.188
Aug 12 21:54:25 centos7 Keepalived_vrrp[7156]: Sending gratuitous ARP on eth0 for 192.168.99.188
Aug 12 21:54:25 centos7 Keepalived_vrrp[7156]: Sending gratuitous ARP on eth0 for 192.168.99.188
Aug 12 21:54:25 centos7 Keepalived_vrrp[7156]: Sending gratuitous ARP on eth0 for 192.168.99.188
Aug 12 21:55:16 centos7 Keepalived_vrrp[7156]: VRRP_Instance(VI_1) Received advert with higher priority 100, ours 80
Aug 12 21:55:16 centos7 Keepalived_vrrp[7156]: VRRP_Instance(VI_1) Entering BACKUP STATE          # 状态从master变为backup
Aug 12 21:55:16 centos7 Keepalived_vrrp[7156]: VRRP_Instance(VI_1) removing protocol VIPs.     # 并且自动移除了vip的地址,vip地址就飘到了主节点上的eth0网卡上
此时的模式配置是抢占模式,即当主节点启动后vip就会被抢过来,从节点又沦为backup模式
二、配置为不抢占模式
1、两个节点同样配置
[root@centos7 keepalived]# vim keepalived.conf
global_defs {
   notification_email {
        root@peter.com
   }
   notification_email_from root@peter.com
   smtp_server 127.0.0.1
   smtp_connect_timeout 30
   router_id s1.peter.com
   vrrp_skip_check_adv_addr
   #vrrp_strict
   vrrp_iptables
   vrrp_garp_interval 0
   vrrp_gna_interval 0
}

vrrp_instance VI_1 {
    state BACKUP        #状态都配置为BACKUP
    interface eth0
    virtual_router_id 66
    priority 100
    advert_int 2
    nopreempt           #配置不抢占
    authentication {
        auth_type PASS
        auth_pass 1111
    }
    unicast_src_ip 192.168.99.130 label eth0:0
    unicast_peer {
        192.168.99.140
    }
    virtual_ipaddress {
        192.168.99.188 dev eth0 label eth0:0
        192.168.99.189 dev eth0 label eth0:1
    }
}

vrrp_instance VI_2 {
    state BACKUP       #改为BACKUP
    interface eth0
    virtual_router_id 77
    priority 80
    advert_int 2
    nopreempt     #同样配置
    authentication {
        auth_type PASS
        auth_pass 1111
    }
    unicast_src_ip 192.168.99.130 label eth0:0
    unicast_peer {
        192.168.99.140
    }

    virtual_ipaddress {
        192.168.99.200 dev eth0 label eth0:2
        192.168.99.201 dev eth0 label eth0:3
    }
}
此时当一个节点挂掉后,vip就会飘到另一台机器上,当原先的节点恢复工作后也不会抢回vip的地址
三、keepalived和lvs实现IPVS
环境利用上面的环境
1、配置后端两个RS服务器,都安装httpd,并配置测试的主页面
[root@centos7 ~]# yum install -y httpd
[root@centos7 ~]# echo RS1_99.150_test-Pages > /var/www/html/index.html
2、配置keepalived添加virtual_server段,两台同样配置
[root@centos7 keepalived]# vim keepalived.conf
global_defs {
   notification_email {
        root@peter.com
   }
   notification_email_from root@peter.com
   smtp_server 127.0.0.1
   smtp_connect_timeout 30
   router_id s1.peter.com
   vrrp_skip_check_adv_addr
   #vrrp_strict
   vrrp_iptables
   vrrp_garp_interval 0
   vrrp_gna_interval 0
}

vrrp_instance VI_1 {
    state BACKUP
    interface eth0
    virtual_router_id 66
    priority 100
    advert_int 2
    nopreempt
    authentication {
        auth_type PASS
        auth_pass 1111
    }
    unicast_src_ip 192.168.99.130 label eth0:0
    unicast_peer {
        192.168.99.140
    }

    virtual_ipaddress {
        192.168.99.188/24 dev eth0 label eth0:0
       #192.168.99.189 dev eth0 label eth0:1
    }
}

vrrp_instance VI_2 {
    state BACKUP
    interface eth0
    virtual_router_id 77
    priority 80
    advert_int 2
    nopreempt
    authentication {
        auth_type PASS
        auth_pass 1111
    }
    unicast_src_ip 192.168.99.130 label eth0:0
    unicast_peer {
        192.168.99.140
    }

    virtual_ipaddress {
        192.168.99.200/24 dev eth0 label eth0:2
       #192.168.99.201 dev eth0 label eth0:3
    }
}
virtual_server 192.168.99.188 80 {
    delay_loop 6
    lb_algo wrr
    lb_kind DR
    protocol TCP

    real_server 192.168.99.150 80 {
        weight 1
        TCP_CHECK {      #对后端服务器做tcp的监测
        connect_timeout 5  #定义连接超时时长
        retry 3             #重试次数
        delay_before_retry 3   #每次重试的间隔时间
        connect_port 80     #监测的端口
        }
    }
    real_server 192.168.99.160 80 {
        weight 1
        TCP_CHECK {
        connect_timeout 5
        retry 3
        delay_before_retry 3
        connect_port 80
        }
    }
}
2、配置完keepalived后重启服务即可,keepalived会自动添加lvs策略

此时配置就基本完成了,还剩最后一步
3、需要把vip的地址绑定在后端web的lo网卡上,并且需要配置一下关闭自动应答,如果不关闭就会地址冲突,写个脚本实现
两个web端都需要配置
[root@centos7 hx]#  vim lvs_dr_rs.sh
#!/bin/bash
#Author:Peter Xu
#Date:2019-08-13
vip=192.168.99.188
mask='255.255.255.255'
dev=lo:1
#rpm -q httpd &> /dev/null || yum -y install httpd &>/dev/null
#service httpd start &> /dev/null && echo "The httpd Server is Ready!"
#echo "<h1>`hostname`</h1>" > /var/www/html/index.html

case $1 in
start)
    echo 1 > /proc/sys/net/ipv4/conf/all/arp_ignore
    echo 1 > /proc/sys/net/ipv4/conf/lo/arp_ignore
    echo 2 > /proc/sys/net/ipv4/conf/all/arp_announce
    echo 2 > /proc/sys/net/ipv4/conf/lo/arp_announce
    ifconfig $dev $vip netmask $mask #broadcast $vip up
    #route add -host $vip dev $dev
    echo "The RS Server is Ready!"
    ;;
stop)
    ifconfig $dev down
    echo 0 > /proc/sys/net/ipv4/conf/all/arp_ignore
    echo 0 > /proc/sys/net/ipv4/conf/lo/arp_ignore
    echo 0 > /proc/sys/net/ipv4/conf/all/arp_announce
    echo 0 > /proc/sys/net/ipv4/conf/lo/arp_announce
    echo "The RS Server is Canceled!"
    ;;
*)
    echo "Usage: $(basename $0) start|stop"
    exit 1
    ;;
esac
[root@centos7 hx]# sh lvs_dr_rs.sh start   #执行脚本即可完成配置
The RS Server is Ready!
4、最后我们通过客户端进行测试访问,我们配置的lvs策略是轮询(方便看效果)

访问成功了
实验完成