这个系列自开始写的时候终端很久了,没办法这段时间实在是太忙,无暇顾及啊。不过我在这里开始就给大家一个好的答复。希望以后时间能多点。 从系列三开始我开始讲Code first add-migration 大家知道之前的model first虽然设计领域比较直观和明了。但是有一个很大的缺陷,每次设计好领域后都需要重新去生成数据库结构,然后导致数据的丢失,这个痛苦我想大家在用Model first 的时候都深有体会,那么我们庆幸我们有Code First 中的数据迁移足够去为我们解决这些事问题了,让我们即使改变领域但是我们依旧可以保持我们的配置数据(例如菜单配置)。
首先我们打开vs新建一个Egojit.Domain层,下一步就很重要了,我们打开Nuget如图所示

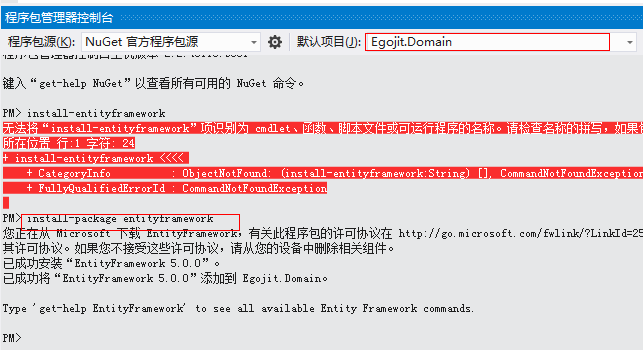
在控制台输入install-package entityframework 去安装entityframework 默认安装的是5.0如果出现如图所示3.说明你安装成功!它会给你自动加载entityframework库.并且自动为项目添加packages.config配置包,代码如下:
<?xml version="1.0" encoding="utf-8"?>
<packages>
  <package id="EntityFramework" version="5.0.0" targetFramework="net40" />
</packages>
 这样我们就为我们的项目加上了EF。而不需要手动去添加。
然后为我们的项目添加一个User类,我们这里只是为了测试EF code first add-migration.User代码如下:
using System;
using System.Collections.Generic;
using System.ComponentModel.DataAnnotations;
using System.Linq;
using System.Text;

namespace Egojit.Domain
{
    public class User
    {
        [Key]
        public Guid Id { get; set; }

        public string Name { get; set; }

        public string Pwd { get; set; }
    }
}
比较简单的代码。但足够我们去理解。
然后我们再为我们的项目添加Context类 EgojitFrameworkContext。代码如下:
using System;
using System.Collections.Generic;
using System.Data.Entity;
using System.Linq;
using System.Text;

namespace Egojit.Domain
{
    public class EgojitFrameworkContext:DbContext
    {
        public DbSet<User> Users { get; set; }
    }
}
这个EgojitFrameworkContext类需要继承自DbContext,它就像一个容器去管理我们的领域各个类。
第四步我们需要配置数据库,否则我们不知道数据库生成到哪App.config文件的配置如下:
<?xml version="1.0" encoding="utf-8"?>
<configuration>
  <configSections>
    <!-- For more information on Entity Framework configuration, visit http://go.microsoft.com/fwlink/?LinkID=237468 -->
    <section name="entityFramework" type="System.Data.Entity.Internal.ConfigFile.EntityFrameworkSection, EntityFramework, Version=4.4.0.0, Culture=neutral, PublicKeyToken=b77a5c561934e089" requirePermission="false" />
  </configSections>
  <connectionStrings>
    <add name="EgojitFrameworkContext" connectionString="Data Source=.;Database=EgojitFramework;user Id=sa;pwd=2011623;MultipleActiveResultSets=true" providerName="System.Data.SqlClient" />

  </connectionStrings>
  <entityFramework>
    <defaultConnectionFactory type="System.Data.Entity.Infrastructure.SqlConnectionFactory, EntityFramework" />
  </entityFramework>
</configuration>
connectionStrings配置节很重要。这样我们就可以去生成数据库了,
第五步需要在Nuget控制台中执行 enable-migrations命令,在第一次的时候需要执行这个命令,以后修改了领域就不需要了如图:

这样会在项目中生成一个Migrations文件夹,并在这个文件夹中生成类Configuration。代码如下:
namespace Egojit.Domain.Migrations
{
    using System;
    using System.Data.Entity;
    using System.Data.Entity.Migrations;
    using System.Linq;

    internal sealed class Configuration : DbMigrationsConfiguration<Egojit.Domain.EgojitFrameworkContext>
    {
        public Configuration()
        {
            AutomaticMigrationsEnabled = false;
        }

        protected override void Seed(Egojit.Domain.EgojitFrameworkContext context)
        {
            //  This method will be called after migrating to the latest version.

            //  You can use the DbSet<T>.AddOrUpdate() helper extension method
            //  to avoid creating duplicate seed data. E.g.
            //
            //    context.People.AddOrUpdate(
            //      p => p.FullName,
            //      new Person { FullName = "Andrew Peters" },
            //      new Person { FullName = "Brice Lambson" },
            //      new Person { FullName = "Rowan Miller" }
            //    );
            //
        }
    }
}
第六步我们执行add-migration db命令如图:
这样会生成领域结构变化的代码:这个代码类名称是根据时间命名和我们执行add-migration命令时加的db去组合生成的。代码是:
namespace Egojit.Domain.Migrations
{
    using System;
    using System.Data.Entity.Migrations;

    public partial class db : DbMigration
    {
        public override void Up()
        {
            CreateTable(
                "dbo.Users",
                c => new
                    {
                        Id = c.Guid(nullable: false),
                        Name = c.String(),
                        Pwd = c.String(),
                    })
                .PrimaryKey(t => t.Id);

        }

        public override void Down()
        {
            DropTable("dbo.Users");
        }
    }
}
我们从代码中我们就可以看到我们的领域被改变了,而且被改变了什么。
最后一步我们需要在Nuget中执行update-database 命令将改变提交到我们配置的数据库。
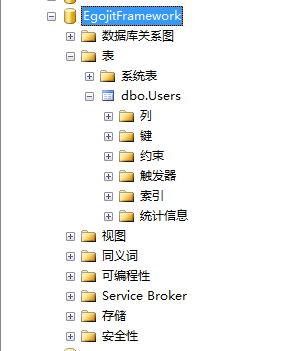
这样我们就在数据库中神奇的生成了EgojitFramework数据库为什么叫这个名字,大家领悟下App.config配置文件就行了。同时也生成了Users表.如图:

当然表中没有数据,我们现在手动添加一条记录:
 这样我们测试当我们修改了领域的时候是否数据会被清除。我们为User类添加一个Age字段。代码如下:
using System;
using System.Collections.Generic;
using System.ComponentModel.DataAnnotations;
using System.Linq;
using System.Text;

namespace Egojit.Domain
{
    public class User
    {
        [Key]
        public Guid Id { get; set; }

        public string Name { get; set; }

        public string Pwd { get; set; }

        public int? age { get; set; }
    }
}
执行add-migration gg,然后update-database提交到数据库。add-migration gg生成的代码如下:
namespace Egojit.Domain.Migrations
{
    using System;
    using System.Data.Entity.Migrations;

    public partial class gg : DbMigration
    {
        public override void Up()
        {
            AddColumn("dbo.Users", "age", c => c.Int());
        }

        public override void Down()
        {
            DropColumn("dbo.Users", "age");
        }
    }
}
可以容易看出我们添加了age字段,我们刷新数据库去查看如图发现之前的数据保留了:

好了就到这里。add-migraion大功告成,以后修改领域就不用怕了,我们只需要两条命令就OK了。
版权声明:出自栀子网http://www.zhizinet.com