目录:

  1、权限的管理

    1-1、什么是权限管理

    1-2、什么是身份认证

    1-3、什么是授权

  2、什么是shiro

  3、shiro的架构

  4、shiro中的认证

    4-1、认证的认识

    4-2、关键对象

    4-3、认证的流程

    4-4、代码测试

    4-5、自定义Realm

      4-5-1、为什么自定义Realm

      4-5-2、Realm类结构图

    4-6、认证时加入MD5和盐(salt)

  5、授权

    5-1、授权的认识

    5-2、关键对象

    5-3、授权的流程

    5-4、授权的方式

    5-5、权限字符串

    5-6、shiro中检查授权是否拥有的实现方式

    5-7、代码测试

  6、SpringBoot整合Shiro

    6-1、创建SpringBoot项目

    6-2、导入依赖

    6-3、配置环境

    6-4、创建需要的文件和资源

    6-5、资源权限约定

    6-6、配置认证控制测试效果

    6-7、shiro中常见过滤器

    6-8、认证的实现

    6-9、退出认证

    6-10、认证时加入MD5和盐

    6-11、授权实现

      6-11-1、页面资源方式权限控制

      6-11-2、代码方式权限控制

      6-11-3、方法调用方式权限控制

      6-11-4、测试权限控制

      6-11-5、结合数据库表来测试授权实现

    6-12、使用CacheManager

      6-12-1、作用

      6-12-2、Shiro默认的本地缓存EhCache

        6-12-2-1、引入依赖

        6-12-2-2、开启缓存

        6-12-2-3、测试

      6-12-3、使用Redis作为缓存实现

        6-12-3-1、引入依赖

        6-12-3-2、配置Redis相关

        6-12-3-3、自定义缓存管理器(CacheManager)和缓存实现(Cache)

        6-12-3-4、如遇见SimpleByteSource未序列化错误请看这里

        6-12-3-5、测试

      6-12-4、图片验证码(可选)

  7、Thymeleaf中使用Shiro标签

    7-1、引入依赖

    7-2、配置方言

    7-3、页面引入命名空间和常用标签
注意:本文仅仅是笔记。
1 权限的管理
1-1 什么是权限管理
权限管理说白了就是,约束系统资源能被谁访问,不能被谁访问。现在基本上涉及到用户参数的系统都需要进行权限的约束和管理。权限管理实现的目的就是对用户访问资源的控制,用户只能访问已经被授权的资源。
权限管理大致非为身份认证和授权两个点,对于绝大多数资源需要用户经过了身份认证,而对于需要权限控制的资源,则需要用户被授予指定权限,简称授权。
1-2 什么是身份认证
原意是判断一个用户是否为合法用户的处理过程,简单地讲就是登录,需要确定你有账号,账号正常,那么才能进入系统,这就是身份认证,当然登录并不是唯一的认证方式,也有很多其他的认证方式,例如指纹认证、刷卡、人脸等。
1-3 什么是授权
授权就是给予已经认证的用户访问某些资源的权限的过程,用户必须认证后才能进行授权,用户只能访问被授访问权限的资源,没有被授予权限的资源是无法访问的。
2 什么是shiro
官方是这样说的:
Apache Shiro™ is a powerful and easy-to-use Java security framework that performs authentication,
authorization, cryptography, and session management. With Shiro’s easy-to-understand API, you can
quickly and easily secure any application – from the smallest mobile applications to the largest web and enterprise applications.
翻译后就是:
Apache Shiro™是一个功能强大、易于使用的java安全框架,它执行身份验证, 授权、密码学和会话管理。 使用Shiro的易于理解的API,您可以 快速和容易地安全任何应用程序-从最小的移动应用程序到最大的Web和企业应用程序。
白话文就是:
shiro很强大、简单,它的功能有进行身份认证、授权、加密、会话管理灯,shiro的易于理解的API可以让您快速且容易的和任何应用程序集成,
其实还有一种权限框架,是SpringSecurity,它的功能比Shiro更加的强大,但是SpringSecurity的学习难度更大,花费时间更久,所以两者各有千秋,具体选择看工作中公司要求。
3 shiro的架构
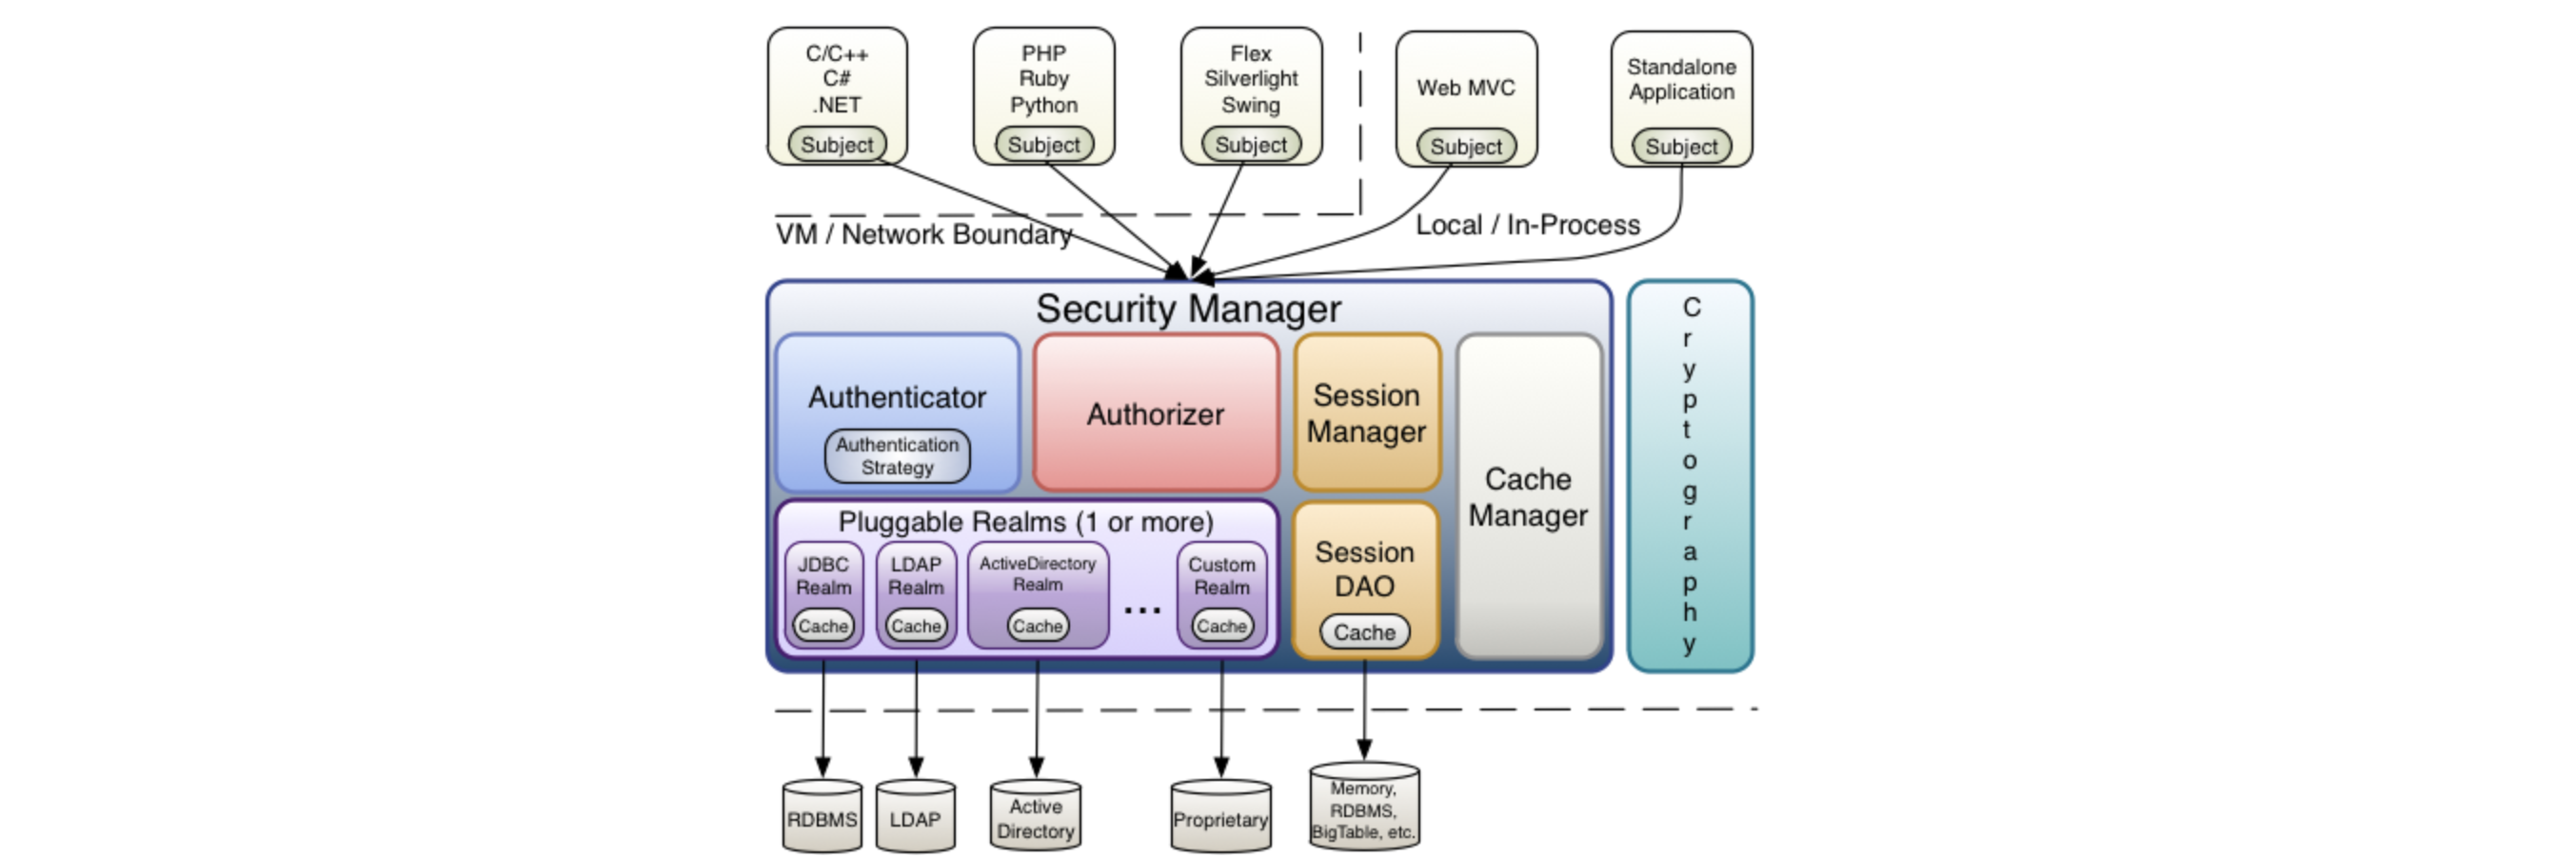
上面的就是不同的语言,例如c/c++/.net/php等,他们都可以是主体,然后来进行认证授权等操作。中间左边是核心组件,例如认证、授权、会话管理、缓存管理、realm、会话dao等。
我们来详细的每个都看看是什么意思:
Subject:
主体,subject代表着当前的用户,概念理解为当前操作的主体,以后也都是叫主体。
Subject是一个接口,定义了很多认证授权相关的方法。
SecurityManager:
安全管理器,SecurityManager对所有的Subject进行安全管理。
Authenticator:
认证器,即对用户身份进行认证。
Authorizer:
授权器,用户通过认证后,访问其他受限资源的时候,需要通过授权器判断该用户是否具有访问此功能的权限。
Realm:
领域,可以看成数据源,SecurityManager进行认证和授权的时候,需要获取用户或用户权限数据,这个Realm就是来完成认证、授权数据的获取的。
SessionManager:
会话管理,shiro自己定义了一套会话管理,它不依赖于我们servlet的session,所以shiro可以用在非web应用上,也可以将会话统一集中在一个点来管理,所以shiro也可以实现单点登录。
SessionDAO:
会话DAO,是对会话操作的一套接口。
CacheManager:
缓存管理,比如将用户权限数据存储在缓存中,这样可以提交性能。
Cryptography:
密码管理,提供了一套加密/解密的组件,方便开发,比如散列,md5这种。
4 shiro中的认证
4-1 认证的认识
身份认证,就是判断一个用户是为合法用户的处理过程。最常用的简单身份认证方式是通过核对用户名和密码,看是否与数据库中存储的该用户的用户名和口令一致,用这种方式来判断用户身份是否正确。
4-2 关键对象
- Subject:主体
- 访问系统的用户,也就是主体。
- Principal:身份信息
- 主体进行身份认证的标识,该标识必须唯一。一个主体可以有多个身份信息,但必须有一个主身份(Primary Principal),这个主身份唯一且不能重复。
- 多个身份标识比如,用户名,手机号,邮箱地址,这些都是主体的身份标识,但用户名就可以作为主身份,因为它唯一且不重复。
- Credential:凭证信息
- 说白了就是只有主体自己知道的安全信息,别人不知道的,比如说私钥,密码等。
4-3 认证的流程
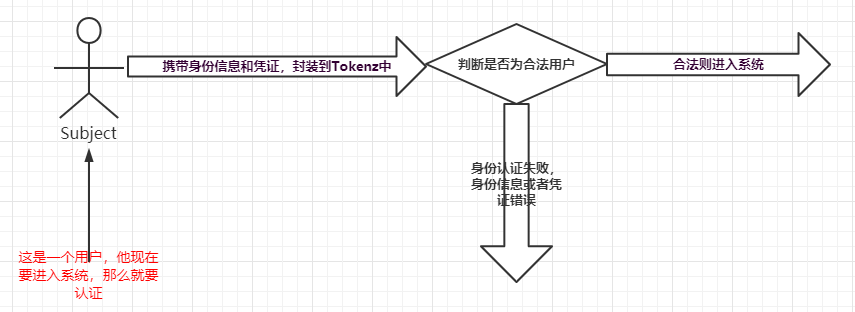
主体将身份信息和凭证封装到Token中,然后进行校验。
4-4 代码测试
环境:
IDEA+Maven+shiro1.5.3
首先在pom.xml中加入依赖:
<dependency>
  <groupId>org.apache.shiro</groupId>
  <artifactId>shiro-core</artifactId>
  <version>1.5.3</version>
</dependency>
然后在resources中创建shiro.ini文件,并填充以下内容:
[users]
xiaochen=zhangsan
zhangsan=123456
创建TestAuthenticator类,内容如下:

 1 public class TestAuthenticator {
 2
 3     public static void main(String[] args) {
 4
 5         /*  创建SecurityManager   */
 6         DefaultSecurityManager securityManager = new DefaultSecurityManager();
 7         /*  设置Realm,这里设置的是iniRealm  */
 8         securityManager.setRealm(new IniRealm("classpath:shiro.ini"));
 9         /*  给安全工具类设置安全管理    */
10         SecurityUtils.setSecurityManager(securityManager);
11         /*  获取当前的主体对象   */
12         Subject subject = SecurityUtils.getSubject();
13         /*  创建认证需要的Token   */
14         UsernamePasswordToken token = new UsernamePasswordToken("zhangsan", "21321");
15         try {
16             /*  开始登陆    */
17             subject.login(token);
18         } catch (UnknownAccountException e) {
19             e.printStackTrace();
20             System.out.println("错误原因:账号不存在");
21         } catch (IncorrectCredentialsException e){
22             e.printStackTrace();
23             System.out.println("错误原因:密码错误");
24         }
25
26     }
27 }
然后我们运行时候会发现,用户名和密码信息是存放在Token中的,而我们的用户名和密码信息来源就是我们的shiro.ini文件,这个时候我们使用的Realm就是IniRealm,Realm就是数据源,不同的Realm获取数据的来源不一样,如果我们用户名和密码需要查询数据库的话,那么我们就可以自定义Realm。
我们认证的方法就是Subject的login方法,如果身份信息错误,那么抛出UnknownAccountException异常,凭证错误则抛出IncorrectCredentialsException异常,除此之外,还有其他的认证的异常。
例如:
-
-
LockedAccountException(帐号被锁定)
-
ExcessiveAttemptsException(登录失败次数过多)
-
4-5 自定义Realm
这里呢我们就要自定义Realm,自定义Realm就是为了自定义获取认证信息、授权信息的作用,比如说上面的例子,我们的用户数据是从shiro.ini文件中获取的,那么使用的Realm是IniRealm,现在我们要自定义获取的方法,那么就要自定义Realm,自定义Realm需要继承AuthorizingRealm这个抽象类,并实现其中的doGetAuthorizationInfo和doGetAuthenticationInfo方法,doGetAuthorizationInfo方法是用于获取授权信息的方法,doGetAuthenticationInfo是用于获取认证信息的方法。
TestCustomRealmForSecurity:

package com.shiro.demo2;

import org.apache.shiro.SecurityUtils;
import org.apache.shiro.authc.IncorrectCredentialsException;
import org.apache.shiro.authc.UnknownAccountException;
import org.apache.shiro.authc.UsernamePasswordToken;
import org.apache.shiro.mgt.DefaultSecurityManager;
import org.apache.shiro.subject.Subject;

/**
 * 测试使用自定义Realm的Custom
 */
public class TestCustomRealmForSecurity {

    public static void main(String[] args) {
        // 创建安全管理器
        DefaultSecurityManager securityManager = new DefaultSecurityManager();
        // 给安全管理器设置自定义的realm
        securityManager.setRealm(new CustomRealm());
        // 给安全工具类设置安全管理器
        SecurityUtils.setSecurityManager(securityManager);
        // 通过SecurityUtil获取当前主体
        Subject subject = SecurityUtils.getSubject();
        // 创建UserNamePasswordToken用于登录
        UsernamePasswordToken token =  new UsernamePasswordToken("zhangsan","123456");
        try {
            /*  开始登陆   */
            subject.login(token);
            System.out.println("登陆成功!");
        } catch (UnknownAccountException e) {
            e.printStackTrace();
            System.out.println("错误原因:账号不存在");
        } catch (IncorrectCredentialsException e){
            e.printStackTrace();
            System.out.println("错误原因:密码错误");
        }
    }
}
CustomRealm:

package com.shiro.demo2;

import org.apache.shiro.authc.*;
import org.apache.shiro.authz.AuthorizationInfo;
import org.apache.shiro.realm.AuthorizingRealm;
import org.apache.shiro.subject.PrincipalCollection;

/**
 * 自定义Realm。继承于AuthorizingRealm
 */
public class CustomRealm extends AuthorizingRealm {

    /**
     * 获取授权信息的方法
     *
     * @param principals   主体信息,可以获取当前用户的唯一身份信息
     * @return  将用户的权限数据和角色数据封装到此对象中,并返回,如果不返回,则代表没有任何权限
     */
    @Override
    protected AuthorizationInfo doGetAuthorizationInfo(PrincipalCollection principals) {
        return null;
    }

    /**
     * 获取认证信息的方法
     *
     * @param token 用户认证的时候封装的Token对象,我们这里使用的是UserNamePasswordToken
     * @return 我们将获取到的用户数据中的身份信息和凭证封装到此AuthenticationInfo对象中,返回给调用者,然后用来对比用户认证信息,如果返回null,那么就会抛出UnknownAccountException异常
     * @throws AuthenticationException 认证错误异常,是所有认证期间异常的父类,我们的UnknownAccountException和IncorrectCredentialsException等异常都是它的儿子
     */
    @Override
    protected AuthenticationInfo doGetAuthenticationInfo(AuthenticationToken token) throws AuthenticationException {
        /*强转为UserNamePasswordToken*/
        UsernamePasswordToken usernamePasswordToken = (UsernamePasswordToken) token;
        /*获取token中的用户数据,这里我们获取用户名,也就是身份信息*/
        String username = (String) usernamePasswordToken.getPrincipal();
        /*我们固定的*/
        if ("zhangsan".equals(username)) {
            /*
            * 返回SimpleAuthenticationInfo对象,
            * 三个参数:
            *   1:用户身份信息
            *   2:该用户的密码(数据库中的密码)
            *   3:该Subject的
            * */
            return new SimpleAuthenticationInfo(username,"123456",this.getName());
        }
        return null;
    }
}
我们可以发现,我们用户身份信息和凭证,都是在CustomeReal中设置的,而不是从shiro.ini中获取的。
4-5-1 为什么自定义Realm
首先我们要清楚,自定义Realm的时候,我们可以做什么。
我们自定义Realm了以后,就可以自定义获取认证信息、获取授权信息的方法,那么这个正是我们需要的,就比如登录,我们以后就需要在doGetAuthenticationInfo方法中根据用户名查询用户信息,然后再封装到返回info对象中,让shiro进行比对密码的认证操作。
所以我们需要自定义Realm。
4-5-2 Realm类结构图

4-6 认证时加入MD5和盐(salt)
大家都知道MD5加密,它可以将任意的文件加密成一串字符串,且不可逆,那么我们密码一般在数据库也是存的密文,不会存储明文。
那么将明文转为密文的操作呢就可以使用MD5的方式,先将用户密码加密为密文存储到数据库,然后登陆的时候,将密码再加密一次和数据库中已经加密好的数据进行比对,一致则说明正确。
那么这个MD5的不好的地方就是如果用户输入的密码比较简单,那么就很可能被破解,这个破解的方式并不是解密,而是使用已有的MD5加密结果一个一个比对,如果比如对到了那么就被破解了,这种方式不太靠谱,耗时长,但是如果加密前内容比较简单,那么隐患就比较大,所以我们MD5加密的时候需要配置着盐(slat)来处理。
盐就是一串字符,在原有明文上加上这串盐,再进行加密操作,登陆时候,将原有密码加上这串盐,再加密后和数据库比对。
盐和md5的一般搭配方式有,盐+明文->加密 | 明文+盐->加密 | 盐+明文+盐->加密 | 明文里夹杂着盐,盐使用散列的方式加进来。或者说你可以不止加盐,加用户名,手机号,生日,邮箱,地址等,统统都可以
然后我们加密的次数也可以多加几次,比如说我们要加密123,我们加密一次后,将结果再加密,通常加密1024或2048次,这样更安全(但没有绝对的安全,这个自行判定)。
然后就是代码的测试,我们先固定盐(盐在实际应用中都是随机的,故而需要存储到用户数据中)为“aqwe23f./?,”,明文密码为“123456”,加密次数为1024,那么加密后的结果就是:64b9c54630e9a09387f4db4b102e65aa
首先是加密明文的一个小工具类:
 public static String getMD5(String source,String salt,int count){
        return new Md5Hash(source,salt,count).toHex();
    }
然后是CustomRealm:

package com.shiro.demo3;

import org.apache.shiro.authc.*;
import org.apache.shiro.authz.AuthorizationInfo;
import org.apache.shiro.realm.AuthorizingRealm;
import org.apache.shiro.subject.PrincipalCollection;
import org.apache.shiro.util.ByteSource;

/**
 */
public class CustomRealm extends AuthorizingRealm {

    /*授权*/
    @Override
    protected AuthorizationInfo doGetAuthorizationInfo(PrincipalCollection principals) {
        return null;
    }

    /**
     * 获取认证信息的方法
     */
    @Override
    protected AuthenticationInfo doGetAuthenticationInfo(AuthenticationToken token) throws AuthenticationException {
        /*强转为UserNamePasswordToken*/
        UsernamePasswordToken usernamePasswordToken = (UsernamePasswordToken) token;
        /*获取token中的用户数据,这里我们获取用户名,也就是身份信息*/
        String username = (String) usernamePasswordToken.getPrincipal();
        /*我们固定的*/
        if ("zhangsan".equals(username)) {
            /**
             * 第一个参数:身份信息(用户名)
             * 第二个参数:凭证(数据库中存储的密文-->就是加密后的密码)
             * 第三个参数:盐,我们盐需要进行使用ByteSource.Util.bytes("盐")这方法转换为ByteSource
             * 第四个参数:当前realm名称,使用AuthorizingRealm的getName方法即可
             */
            return new SimpleAuthenticationInfo(username,"64b9c54630e9a09387f4db4b102e65aa", ByteSource.Util.bytes("aqwe23f./?,"),this.getName());
        }
        return null;
    }
}
然后是TestMD5Security:

package com.shiro.demo3;

import org.apache.shiro.SecurityUtils;
import org.apache.shiro.authc.IncorrectCredentialsException;
import org.apache.shiro.authc.UnknownAccountException;
import org.apache.shiro.authc.UsernamePasswordToken;
import org.apache.shiro.authc.credential.HashedCredentialsMatcher;
import org.apache.shiro.mgt.DefaultSecurityManager;
import org.apache.shiro.subject.Subject;

/**
 * 测试mo5加密的认证方式
 */
public class TestMD5Security {
    public static void main(String[] args) {
        // 创建安全管理器
        DefaultSecurityManager securityManager = new DefaultSecurityManager();
        // 创建Realm
        CustomRealm realm = new CustomRealm();
        // ============给Realm设置加密的代码============
        // 创建验证器
        HashedCredentialsMatcher hashedCredentialsMatcher = new HashedCredentialsMatcher();
        // 设置加密类型名称
        hashedCredentialsMatcher.setHashAlgorithmName("MD5");
        // 设置加密次数
        hashedCredentialsMatcher.setHashIterations(1024);
        // 给realm设置验证器
        realm.setCredentialsMatcher(hashedCredentialsMatcher);
        // ============给Realm设置加密的代码结束============
        // 给安全管理器设置自定义的realm
        securityManager.setRealm(realm);
        // 给安全工具类设置安全管理器
        SecurityUtils.setSecurityManager(securityManager);
        // 通过SecurityUtil获取当前主体
        Subject subject = SecurityUtils.getSubject();
        // 创建UserNamePasswordToken用于登录
        UsernamePasswordToken token =  new UsernamePasswordToken("zhangsan","123456");
        try {
            /*  开始登陆   */
            subject.login(token);
            System.out.println("登陆成功!");
        } catch (UnknownAccountException e) {
            e.printStackTrace();
            System.out.println("错误原因:账号不存在");
        } catch (IncorrectCredentialsException e){
            e.printStackTrace();
            System.out.println("错误原因:密码错误");
        }
    }
}
需要注意的是,我们在将realm设置给SecurityManager之前,需要给Realm设置密码匹配器,然后在realm中返回AuthenticationInfo信息对象的时候,需要将盐传参数传给它。
5 授权
5-1 授权的认识
授权,也就是访问控制,控制谁能访问哪些资源,这个”谁“是认证后的主体/用户,在访问受限资源(受限制的资源或需要经过授权后才能访问的资源)以前,需要先经过授权。
5-2 关键对象
也就是who对what进行how操作。
who:即主体Subject,主体需要访问系统中的资源
what:即资源Resource,如某个请求,按钮,方法等,资源包括资源类型和资源实例,比如商品信息为资源类型,id为1的商品为资源实例。
how:即权限Permission,规定了主体对资源的操作许可,权限离开了资源是没有意义的。权限这个比如:查询用户权限、添加用户权限等。
5-3 授权的流程

5-4 授权的方式
- 基于角色的访问控制
- RBAC基于角色的访问控制(Role-Based Access Control)是以角色为中心进行访问控制
-
if(subject.hasRole("admin")){
   //操作什么资源
}
- 基于资源的访问控制
- RBAC基于资源的访问控制(Resource-Based Access Control)是以资源为中心进行访问控制
-
if(subject.isPermission("user:update:01")){ //资源实例
  //对01用户进行修改
}
if(subject.isPermission("user:update:*")){  //资源类型
  //对01用户进行修改
}
5-5 权限字符串
我们上面就使用了权限字符串,它的格式为:权限标识符:操作:资源实例标识符,意思是对哪个资源的哪个操作有哪些具体的操作,”:“是资源/操作/实例的分隔符,权限字符串中”*“代表着通配符,也就是所有的意思。
例如:
- 用户创建权限:user:create或user:create:*
- 查询所有用户权限:user:select:*
- 对1的这个用户的所有权限:user:*:1
- 对所有用户的所有权限:user:*:*
5-6 shiro中检查授权是否拥有的实现方式
编程式:
Subject subject = SecurityUtils.getSubject();
if(subject.hasRole(“admin”)) {
    //有权限
} else {
    //无权限
}
注解式:
@RequiresRoles("admin")
public void hello() {
    //有权限
}
标签式:
JSP/GSP 标签:在JSP/GSP 页面通过相应的标签完成:
<shiro:hasRole name="admin">
    <!— 有权限—>
</shiro:hasRole>
注意: Thymeleaf 中使用shiro需要额外集成!
5-7 代码测试
CustomRealm:

 1 package com.shiro.demo4;
 2
 3 import org.apache.shiro.authc.*;
 4 import org.apache.shiro.authz.AuthorizationInfo;
 5 import org.apache.shiro.authz.SimpleAuthorizationInfo;
 6 import org.apache.shiro.realm.AuthorizingRealm;
 7 import org.apache.shiro.subject.PrincipalCollection;
 8 import org.apache.shiro.util.ByteSource;
 9
10 /**
11  */
12 public class CustomRealm extends AuthorizingRealm {
13
14     /*授权*/
15     @Override
16     protected AuthorizationInfo doGetAuthorizationInfo(PrincipalCollection principals) {
17         // 获得当前认证后的主体/用户的唯一身份标识,也就是用户名
18         String username = (String) principals.getPrimaryPrincipal();
19         // 需要返回的信息对象,此对象中包含了权限信息和角色信息
20         SimpleAuthorizationInfo simpleAuthorizationInfo = new SimpleAuthorizationInfo();
21         simpleAuthorizationInfo.addRole("admin");
22         simpleAuthorizationInfo.addStringPermission("user:update:01");
23         simpleAuthorizationInfo.addStringPermission("user:delete:*");
24         // 不要忘记返回
25         return simpleAuthorizationInfo;
26     }
27
28     /**
29      * 获取认证信息的方法
30      */
31     @Override
32     protected AuthenticationInfo doGetAuthenticationInfo(AuthenticationToken token) throws AuthenticationException {
33         /*强转为UserNamePasswordToken*/
34         UsernamePasswordToken usernamePasswordToken = (UsernamePasswordToken) token;
35         /*获取token中的用户数据,这里我们获取用户名,也就是身份信息*/
36         String username = (String) usernamePasswordToken.getPrincipal();
37         /*我们固定的*/
38         if ("zhangsan".equals(username)) {
39             /**
40              * 第一个参数:身份信息(用户名)
41              * 第二个参数:凭证(数据库中存储的密文-->就是加密后的密码)
42              * 第三个参数:盐,我们盐需要进行使用ByteSource.Util.bytes("盐")这方法转换为ByteSource
43              * 第四个参数:当前realm名称,使用AuthorizingRealm的getName方法即可
44              */
45             return new SimpleAuthenticationInfo(username,"64b9c54630e9a09387f4db4b102e65aa", ByteSource.Util.bytes("aqwe23f./?,"),this.getName());
46         }
47         return null;
48     }
49 }
注意,给当前用户授权的时候,在doGetAuthorizationInfo方法中书写逻辑。
TestAuthorizationSecurity:

 1 package com.shiro.demo4;
 2
 3 import org.apache.shiro.SecurityUtils;
 4 import org.apache.shiro.authc.IncorrectCredentialsException;
 5 import org.apache.shiro.authc.UnknownAccountException;
 6 import org.apache.shiro.authc.UsernamePasswordToken;
 7 import org.apache.shiro.authc.credential.HashedCredentialsMatcher;
 8 import org.apache.shiro.mgt.DefaultSecurityManager;
 9 import org.apache.shiro.subject.Subject;
10
11 /**
12  * 测试授权
13  */
14 public class TestAuthorizationSecurity {
15     public static void main(String[] args) {
16         // 创建安全管理器
17         DefaultSecurityManager securityManager = new DefaultSecurityManager();
18         // 创建Realm
19         CustomRealm realm = new CustomRealm();
20         // ============给Realm设置加密的代码============
21         // 创建验证器
22         HashedCredentialsMatcher hashedCredentialsMatcher = new HashedCredentialsMatcher();
23         // 设置加密类型名称
24         hashedCredentialsMatcher.setHashAlgorithmName("MD5");
25         // 设置加密次数
26         hashedCredentialsMatcher.setHashIterations(1024);
27         // 给realm设置验证器
28         realm.setCredentialsMatcher(hashedCredentialsMatcher);
29         // ============给Realm设置加密的代码结束============
30         // 给安全管理器设置自定义的realm
31         securityManager.setRealm(realm);
32         // 给安全工具类设置安全管理器
33         SecurityUtils.setSecurityManager(securityManager);
34         // 通过SecurityUtil获取当前主体
35         Subject subject = SecurityUtils.getSubject();
36         // 创建UserNamePasswordToken用于登录
37         UsernamePasswordToken token =  new UsernamePasswordToken("zhangsan","123456");
38         try {
39             /*  开始登陆   */
40             subject.login(token);
41             System.out.println("登陆成功!");
42         } catch (UnknownAccountException e) {
43             e.printStackTrace();
44             System.out.println("错误原因:账号不存在");
45         } catch (IncorrectCredentialsException e){
46             e.printStackTrace();
47             System.out.println("错误原因:密码错误");
48         }
49         /*到达这里的时候,说明认证成功,也就是登陆成功,我们开始来判断权限*/
50         // 是否含有admin这个角色
51         System.out.println(subject.hasRole("admin"));
52         // 是否含有对01用户的更新权限
53         System.out.println(subject.isPermitted("user:update:01"));
54         // 是否含有更新所有用户的权限
55         System.out.println(subject.isPermitted("user:update:*"));
56         // 是否含有删除01用户的权限
57         System.out.println(subject.isPermitted("user:delete:01"));
58         // 是否含有对所有用户的删除权限
59         System.out.println(subject.isPermitted("user:delete:*"));
60     }
61 }
多试试添加不同的权限。
6 SpringBoot整合Shiro
6-1 创建SpringBoot项目
可以使用脚手架,也可以创建maven后手动加配置文件。
pom.xml:

<dependencies>
<dependency>
            <groupId>org.springframework.boot</groupId>
            <artifactId>spring-boot-starter-web</artifactId>
            <exclusions>
                <exclusion>
                    <groupId>org.springframework.boot</groupId>
                    <artifactId>spring-boot-starter-logging</artifactId>
                </exclusion>
            </exclusions>
        </dependency>
        <dependency>
            <groupId>org.projectlombok</groupId>
            <artifactId>lombok</artifactId>
        </dependency>
        <dependency>
            <groupId>org.springframework.boot</groupId>
            <artifactId>spring-boot-starter-test</artifactId>
        </dependency>
        <dependency>
            <groupId>org.apache.commons</groupId>
            <artifactId>commons-lang3</artifactId>
        </dependency>
        <!-- log4j -->
        <dependency>
            <groupId>org.springframework.boot</groupId>
            <artifactId>spring-boot-starter-log4j</artifactId>
            <version>1.3.8.RELEASE</version>
        </dependency>
        <dependency>
            <groupId>org.springframework.boot</groupId>
            <artifactId>spring-boot-starter-thymeleaf</artifactId>
        </dependency>
    </dependencies>
然后在templates下创建index.html,然后用controller跳转,确保项目是没有问题的。
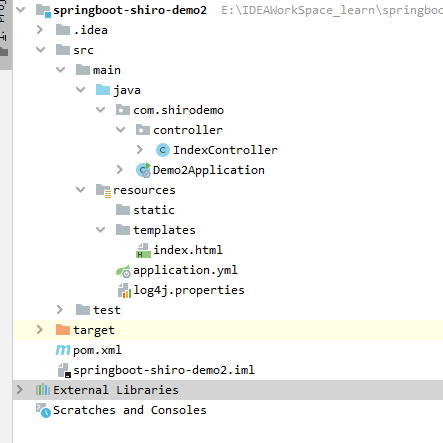
6-2 导入依赖
现在就来导入shiro的start,pom.xml:

<dependency>
            <groupId>org.apache.shiro</groupId>
            <artifactId>shiro-spring-boot-starter</artifactId>
            <version>1.5.3</version>
        </dependency>
6-3 配置环境
然后在目录下创建一个config目录,用来放置shiro的配置类:
1、创建配置类:
public class ShiroConfig {
}
2、创建自定义Realm类:

package com.shirodemo.config.shiro.realm;

import org.apache.shiro.authc.AuthenticationException;
import org.apache.shiro.authc.AuthenticationInfo;
import org.apache.shiro.authc.AuthenticationToken;
import org.apache.shiro.authz.AuthorizationInfo;
import org.apache.shiro.realm.AuthorizingRealm;
import org.apache.shiro.subject.PrincipalCollection;

/**
 * 自定义Realm
 */
public class CustomRealm extends AuthorizingRealm {
    @Override
    protected AuthorizationInfo doGetAuthorizationInfo(PrincipalCollection principals) {
        return null;
    }

    @Override
    protected AuthenticationInfo doGetAuthenticationInfo(AuthenticationToken token) throws AuthenticationException {
        return null;
    }
}
3、在ShiroConfig中加入配置方法(配置Realm、SecurityManager、ShiroFilterFactoryBean):

package com.shirodemo.config.shiro;

import com.shirodemo.config.shiro.realm.CustomRealm;
import org.apache.shiro.mgt.SecurityManager;
import org.apache.shiro.realm.Realm;
import org.apache.shiro.spring.web.ShiroFilterFactoryBean;
import org.apache.shiro.web.mgt.DefaultWebSecurityManager;
import org.springframework.context.annotation.Bean;
import org.springframework.context.annotation.Configuration;

/*
 * Shiro的配置类
 * */
@Configuration
public class ShiroConfig {

    /*
     * 配置ShiroFilterFactoryBean
     * */
    @Bean
    public ShiroFilterFactoryBean getShiroFilterFactoryBean(SecurityManager securityManager) {
        ShiroFilterFactoryBean shiroFilterFactoryBean = new ShiroFilterFactoryBean();
        shiroFilterFactoryBean.setSecurityManager(securityManager);
        return shiroFilterFactoryBean;
    }

    /*
     * 配置WebSecurityManager
     * */
    @Bean
    public DefaultWebSecurityManager getDefaultWebSecurityManager(Realm realm) {
        DefaultWebSecurityManager defaultWebSecurityManager = new DefaultWebSecurityManager();
        // 设置Realm
        defaultWebSecurityManager.setRealm(realm);
        return defaultWebSecurityManager;
    }

    /**
     * 配置自定义Realm
     */
    @Bean
    public Realm getRealm() {
        CustomRealm customRealm = new CustomRealm();
        return customRealm;
    }

}
6-4 创建需要的文件和资源
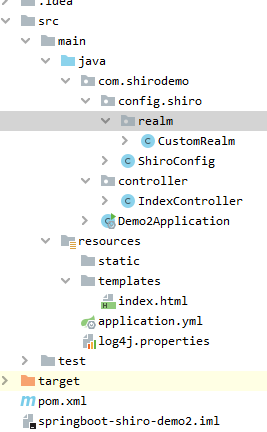
这是最终效果,加入一个index.html,然后加入controller转发,成功看到页面才代表配置正确,正常运行。
我们运行后发现index.html是可以运行的,因为我们还没有对认证和授权进行配置,那么默认所有资源都是可访问的。
6-5 资源权限约定
我们假设现有一个用户,用户名giaoge,密码123。
6-6 配置认证控制测试效果
我们在ShiroConfg的getShiroFilterFactoryBean方法修改一些代码,也就是需要加入权限控制的代码:
/*
     * 配置ShiroFilterFactoryBean
     * */
    @Bean
    public ShiroFilterFactoryBean getShiroFilterFactoryBean(SecurityManager securityManager) {
        ShiroFilterFactoryBean shiroFilterFactoryBean = new ShiroFilterFactoryBean();
        shiroFilterFactoryBean.setSecurityManager(securityManager);
        /*==================*/
        Map<String,String> map = new LinkedHashMap<>();
        map.put("/**","authc");
        shiroFilterFactoryBean.setFilterChainDefinitionMap(map);
        return shiroFilterFactoryBean;
    }
然后测试效果:
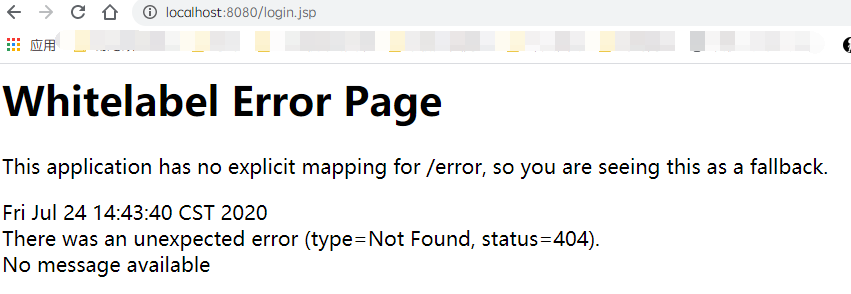
我们会发现当我们访问index.html的时候,它会自动地跳转到login.jsp,为什么呢?
因为我们加入了认证的控制,/**代表的就是所有请求,authc代表着一个过滤器,那么我们访问/**请求的时候,就会经过authc这个过滤器,这个过滤器要求当前用户已经认证,如果没有认证那么就会跳转到认证页面(登陆页面)。
但是我们注意,我们并没有设置认证页面的路径,它为什么会跳转到login.jsp呢,因为如果shiro对于认证页面有一个默认的路径,就是/login.jsp,当然我们在代码中也可以设则认证页面的路径,shiroFilterFactoryBean.setLoginUrl("认证页面路径");
6-7 shiro中常见过滤器
| 对应的过滤器 | 功能 | |
|---|---|---|
| anon | AnonymousFilter | 指定url可以匿名访问 |
| authc | FormAuthenticationFilter | 指定url需要form表单登录,默认会从请求中获取username、password,rememberMe等参数并尝试登录,如果登录不了就会跳转到loginUrl配置的路径。我们也可以用这个过滤器做默认的登录逻辑,但是一般都是我们自己在控制器写登录逻辑的,自己写的话出错返回的信息都可以定制嘛。 |
| authcBasic | BasicHttpAuthenticationFilter | 指定url需要basic登录 |
| logout | LogoutFilter | 登出过滤器,配置指定url就可以实现退出功能,非常方便 |
| noSessionCreation | NoSessionCreationFilter | 禁止创建会话 |
| perms | PermissionsAuthorizationFilter | 需要指定权限才能访问 |
| port | PortFilter | 需要指定端口才能访问 |
| rest | HttpMethodPermissionFilter | 将http请求方法转化成相应的动词来构造一个权限字符串,这个感觉意义不大,有兴趣自己看源码的注释 |
| roles | RolesAuthorizationFilter | 需要指定角色才能访问 |
| ssl | SslFilter | 需要https请求才能访问 |
| user | UserFilter |
6-8 认证的实现
注意我们前面有约定,我们先不查询数据库,暂定用户名为username,密码为123。
1、加入登陆页面,然后用一个Controller来访问该页面,路径为/login.html,然后在ShiroConfig中的getShiroFilterFactoryBean方法中加入如下代码:shiroFilterFactoryBean.setLoginUrl("login.html");代表着设置认证页面为/login.html
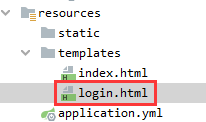
首先需要一个注册页面login.html:

<!DOCTYPE html>
<html lang="en">
<head>
    <meta charset="UTF-8">
    <title>登陆页面</title>
</head>
<body>
<center>
    <h1>登陆页面</h1>
    <form action="/login" method="post">
        <table border="1">
            <th>
                <td colspan="2" style="text-align: center">登录</td>
            </th>
            <tr>
                <td>登录名:</td>
                <td><input type="text" name="username"></td>
            </tr>
            <tr>
                <td>密码:</td>
                <td><input type="text" name="password"></td>
            </tr>
            <tr>
                <td colspan="2"><input type="submit" value="登录"></td>
            </tr>
        </table>
    </form>
</center>
</body>
</html>
然后创建一个LoginController用于处理登录请求:

package com.shirodemo.controller;

import org.apache.shiro.SecurityUtils;
import org.apache.shiro.authc.AuthenticationException;
import org.apache.shiro.authc.IncorrectCredentialsException;
import org.apache.shiro.authc.UnknownAccountException;
import org.apache.shiro.authc.UsernamePasswordToken;
import org.apache.shiro.subject.Subject;
import org.springframework.stereotype.Controller;
import org.springframework.web.bind.annotation.PostMapping;

/**
 *
 */
@Controller
public class LoginController {

    // 登录的Controller,也可以说是处理身份认证
    @PostMapping("/login")
    public String login(String username, String password) {
        // 获取主体对象/当前用户
        Subject subject = SecurityUtils.getSubject();
        // 封装成Token
        UsernamePasswordToken token = new UsernamePasswordToken(username, password);
        try {
            // 调用login方法去认证
            subject.login(token);
            System.out.println("登陆成功!");
            // 重定向到首页
            return "redirect:/index.html";
        } catch (UnknownAccountException e) {
            System.out.println("用户名不存在!");
            e.printStackTrace();
        } catch (IncorrectCredentialsException e) {
            System.out.println("密码错误!");
            e.printStackTrace();
        } catch (AuthenticationException e) {
            System.out.println("认证时出现异常!");
            e.printStackTrace();
        }
        return "redirect:/login.html";
    }
}
然后更改Realm的doGetAuthenticationInfo方法的代码:

@Override
    protected AuthenticationInfo doGetAuthenticationInfo(AuthenticationToken token) throws AuthenticationException {
        String username = (String) token.getPrincipal();
        if ("giaoge".equals(username)) {
            return new SimpleAuthenticationInfo(username, "123", this.getName());
        }
        return null;
    }
最重要的地方,不要忘记在ShrioConfig中更改添加权限控制,放行/login.html和/login,并且给/login.html设置人认证页面。

 /*
     * 配置ShiroFilterFactoryBean
     * */
    @Bean
    public ShiroFilterFactoryBean getShiroFilterFactoryBean(SecurityManager securityManager) {
        ShiroFilterFactoryBean shiroFilterFactoryBean = new ShiroFilterFactoryBean();
        shiroFilterFactoryBean.setSecurityManager(securityManager);
        shiroFilterFactoryBean.setLoginUrl("/login.html");
        /*==================*/
        Map<String,String> map = new LinkedHashMap<>();
        map.put("/login.html","anon"); // 指定login.html这个是公开的资源
        map.put("/login","anon"); // 指定login这个是公开的资源

        map.put("/**","authc");
        shiroFilterFactoryBean.setFilterChainDefinitionMap(map);
        return shiroFilterFactoryBean;
    }
然后运行测试,就会发现如果,只有通过giaoge,123这个账号通过登录后才能进入index.html,否则就不能访问除了/login.html,/login这两个请求以外的资源。
6-9 退出认证
退出认证我们使用的是subject的logout方法。
在index.html中加入一个a标签:
<a href="/logout">退出认证</a>
在LoginController中加入退出登录的方法:
/**
     * 退出认证
     */
    @GetMapping("/logout")
    public String logout(){
        Subject subject = SecurityUtils.getSubject();

        // 调用subject的logout方法退出登录,
        subject.logout();

        return "redirect:/login.html";
    }
就可以测试到退出登录的效果了。
6-10 认证时加入MD5和盐
我们约定盐是:
aqwe23f./?,
我们的明文密码和加密后的密码分别是:
123
0ae8a3afcf827511169db374c489b09d
加密次数为1024次。
然后修改ShiroConfig中的getRealm方法:

 /**
     * 配置自定义Realm
     */
    @Bean
    public Realm getRealm() {
        CustomRealm customRealm = new CustomRealm();
        // 创建验证器
        HashedCredentialsMatcher hashedCredentialsMatcher = new HashedCredentialsMatcher();
        // 设置加密类型名称
        hashedCredentialsMatcher.setHashAlgorithmName("MD5");
        // 设置加密次数
        hashedCredentialsMatcher.setHashIterations(1024);
        // 给realm设置验证器
        customRealm.setCredentialsMatcher(hashedCredentialsMatcher);
        return customRealm;
    }
然后修改CustomRealm中的认证方法中返回的SimpleAuthenticationInfo对象:

 @Override
    protected AuthenticationInfo doGetAuthenticationInfo(AuthenticationToken token) throws AuthenticationException {
        String username = (String) token.getPrincipal();
        if ("giaoge".equals(username)) {
            return new SimpleAuthenticationInfo(username, "0ae8a3afcf827511169db374c489b09d", ByteSource.Util.bytes("aqwe23f./?,"), this.getName());
        }
        return null;
    }
然后查看认证的效果。
6-11 授权实现
6-11-1 页面资源方式权限控制
如果是jsp页面,直接引入标签库,然后就可以使用,如果是thymlef,文章末尾会讲解如何使用:

<%@taglib prefix="shiro" uri="http://shiro.apache.org/tags" %>

<shiro:hasAnyRoles name="user,admin">
        <li><a href="">用户管理</a>
            <ul>
                <shiro:hasPermission name="user:add:*">
                <li><a href="">添加</a></li>
                </shiro:hasPermission>
                <shiro:hasPermission name="user:delete:*">
                    <li><a href="">删除</a></li>
                </shiro:hasPermission>
                <shiro:hasPermission name="user:update:*">
                    <li><a href="">修改</a></li>
                </shiro:hasPermission>
                <shiro:hasPermission name="user:find:*">
                    <li><a href="">查询</a></li>
                </shiro:hasPermission>
            </ul>
        </li>
        </shiro:hasAnyRoles>
        <shiro:hasRole name="admin">
            <li><a href="">商品管理</a></li>
            <li><a href="">订单管理</a></li>
            <li><a href="">物流管理</a></li>
        </shiro:hasRole>
6-11-2 代码方式权限控制
使用subject的hasRole等方法进行判断是否含有角色、权限:

@RequestMapping("save")
public String save(){
  System.out.println("进入方法");
  //获取主体对象
  Subject subject = SecurityUtils.getSubject();
  //代码方式
  if (subject.hasRole("admin")) {
    System.out.println("保存订单!");
  }else{
    System.out.println("无权访问!");
  }
  //基于权限字符串
  //....
  return "redirect:/index.jsp";
}
6-11-3 方法调用方式权限控制
在请求方法上加入注解:

@RequiresRoles(value={"admin","user"})//用来判断角色  同时具有 admin user
@RequiresPermissions("user:update:01") //用来判断权限字符串
@RequestMapping("save")
public String save(){
  System.out.println("进入方法");
  return "redirect:/index.jsp";
}
6-11-4 测试权限控制
修改首页html.html:

<!DOCTYPE html>
<html lang="en">
<head>
    <meta charset="UTF-8">
    <title>首页</title>
</head>
<body>
<center>
    <h1>首页</h1>
    <a href="/logout">退出认证</a>
    <br>
    <br>
    <a href="/userManager">用户管理</a>
    <br>
    <a href="/productManager">商品管理</a>
    <br>
    <a href="/stockManager">库存管理</a>
</center>
</body>
</html>
添加TestController用来测试请求授权:

package com.shirodemo.controller;

import org.apache.shiro.authz.annotation.Logical;
import org.apache.shiro.authz.annotation.RequiresRoles;
import org.springframework.web.bind.annotation.GetMapping;
import org.springframework.web.bind.annotation.RestController;

/**
 * 测试的Controller
 */
@RestController
public class TestController {

    // 用户管理
    @GetMapping("/userManager")
    // 含有admin或者user角色则可以访问
    @RequiresRoles(value = {"admin","user"}, logical = Logical.OR)
    public String userManager() {
        return "用户管理";
    }

    // 商品管理
    @GetMapping("/productManager")
    // 含有admin或者product角色则可以访问
    @RequiresRoles(value = {"admin","product"}, logical = Logical.OR)
    public String productManager() {
        return "商品管理";
    }

    // 库存管理
    @GetMapping("/stockManager")
    // 含有admin或者product角色则可以访问
    @RequiresRoles(value = {"admin","stock"}, logical = Logical.OR)
    public String stockManager() {
        return "库存管理";
    }
}
修改CustomRealm的doGetAuthorizationInfo方法内容:

 @Override
    protected AuthorizationInfo doGetAuthorizationInfo(PrincipalCollection principals) {
        // 获得唯一的主体信息
        String username = (String) principals.getPrimaryPrincipal();
        // 创建返回信息对象
        SimpleAuthorizationInfo simpleAuthorizationInfo = new SimpleAuthorizationInfo();
        simpleAuthorizationInfo.addRole("user");
        return simpleAuthorizationInfo;
    }
然后我们就可以发现,如果权限不足,那么会抛出org.apache.shiro.authz.AuthorizationException这个异常,那么我们就给mvc设置一个全局异常处理,然后捕获这个异常,再判断是ajax或者普通请求来判断返回数据还是跳转提示页面。
我这里为了懒,就不贴判断是不是ajax了,直接返回固定提示页面。

/**
 */
@ControllerAdvice
public class ExceptionHandler {

@org.springframework.web.bind.annotation.ExceptionHandler(AuthorizationException.class)
    public String handlerAuthorizationException(AuthorizationException e){
        System.out.println("请求被拒绝:" + e.getMessage());
        return "/permissionRefuse.html";
    }

}
页面和跳转controller自定。
6-11-5 结合数据库表来测试授权实现
代码修改太多,所以直接下载包导入idea看:
6-12 使用CacheManager
6-12-1 作用
其实我们授权的时候会发现,每次访问需要权限的请求的时候,都会去调用获取授权信息的方法,这样就会导致数据库的压力变大,我们希望的是,授权信息只获取一次,获取了一次后就放置到缓存中,后面需要授权信息的时候,直接从缓存中拿就行。
6-12-2 Shiro默认的本地缓存EhCache
6-12-2-1 引入依赖

<!--引入shiro和ehcache-->
<dependency>
  <groupId>org.apache.shiro</groupId>
  <artifactId>shiro-ehcache</artifactId>
  <version>1.5.3</version>
</dependency>
6-12-2-2 开启缓存
修改shiroconfig中创建CustomRealm那个方法的代码:

/**
     * 配置自定义Realm
     */
    @Bean
    public Realm getRealm() {
        CustomRealm customRealm = new CustomRealm();
        // 创建验证器
        HashedCredentialsMatcher hashedCredentialsMatcher = new HashedCredentialsMatcher();
        // 设置加密类型名称
        hashedCredentialsMatcher.setHashAlgorithmName("MD5");
        // 设置加密次数
        hashedCredentialsMatcher.setHashIterations(1024);
        /*=============================================*/
        // 开启缓存管理器
        // 缓存总开关
        customRealm.setCachingEnabled(true);
        // 设置认证的缓存开关
        customRealm.setAuthenticationCachingEnabled(true);
        // 设置授权的缓存开关
        customRealm.setAuthorizationCachingEnabled(true);
        // 设置缓存管理器,默认是本地缓存管理器
        customRealm.setCacheManager(new EhCacheManager());
        /*=============================================*/
        // 给realm设置验证器
        customRealm.setCredentialsMatcher(hashedCredentialsMatcher);
        return customRealm;
    }
6-12-2-3 测试
可以发现我们的授权查询方法只被调用了一次。
6-12-3 使用Redis作为缓存实现
6-12-3-1 引入依赖

<!--redis整合springboot-->
<dependency>
  <groupId>org.springframework.boot</groupId>
  <artifactId>spring-boot-starter-data-redis</artifactId>
</dependency>
6-12-3-2 配置Redis相关

spring:
  redis:
    host: localhost
    port: 6379
    database: 0
    password:
6-12-3-3 自定义缓存管理器(CacheManager)和缓存实现(Cache)
创建RedisCache继承于Cache:

package com.shirodemo.config.shiro.cache;

import org.apache.shiro.cache.Cache;
import org.apache.shiro.cache.CacheException;
import org.springframework.beans.factory.annotation.Autowired;
import org.springframework.boot.SpringApplication;
import org.springframework.context.ApplicationContext;
import org.springframework.data.redis.core.RedisTemplate;
import org.springframework.data.redis.serializer.StringRedisSerializer;
import org.springframework.stereotype.Component;
import org.springframework.web.context.support.WebApplicationContextUtils;

import java.util.Collection;
import java.util.Set;

/**
 * 自定义的redis缓存操作类
 */
public class RedisCache<K, V> implements Cache<K, V> {

    private RedisTemplate redisTemplate;

    private String cacheName = "shiro_cache_redis_prefix_";

    public RedisCache() {
    }

    public RedisCache(RedisTemplate redisTemplate) {
        this.redisTemplate = redisTemplate;
    }

    @Override
    public V get(K k) throws CacheException {
        return (V) redisTemplate.opsForHash().get(this.cacheName, k.toString());
    }

    @Override
    public V put(K k, V v) throws CacheException {
        redisTemplate.opsForHash().put(this.cacheName, k.toString(), v);
        return null;
    }

    @Override
    public V remove(K k) throws CacheException {
        return (V) redisTemplate.opsForHash().delete(this.cacheName, k.toString());
    }

    @Override
    public void clear() throws CacheException {
        redisTemplate.delete(this.cacheName);
    }

    @Override
    public int size() {
        return redisTemplate.opsForHash().size(this.cacheName).intValue();
    }

    @Override
    public Set<K> keys() {
        return redisTemplate.opsForHash().keys(this.cacheName);
    }

    @Override
    public Collection<V> values() {
        return redisTemplate.opsForHash().values(this.cacheName);
    }

}
创建RedisManager实现CacheManager:

package com.shirodemo.config.shiro.cache;

import org.apache.shiro.cache.Cache;
import org.apache.shiro.cache.CacheException;
import org.apache.shiro.cache.CacheManager;

/**
 * 自定义的缓存管理器
 */
public class RedisManager implements CacheManager {

    private RedisCache redisCache;

    public RedisManager(RedisCache redisCache) {
        this.redisCache = redisCache;
    }

    @Override
    public <K, V> Cache<K, V> getCache(String s) throws CacheException {
        return redisCache;
    }
}
在ShiroConfig中加入一个getCacheManager方法:

 /*
     * 自定义redis缓存管理器
     * */
    @Bean
    public CacheManager getCacheManager(RedisTemplate redisTemplate) {
        redisTemplate.setKeySerializer(new StringRedisSerializer());
        redisTemplate.setHashKeySerializer(new StringRedisSerializer());
        RedisCache redisCache = new RedisCache(redisTemplate);
        RedisManager redisManager = new RedisManager(redisCache);
        return redisManager;
    }
然后在配置realm的方法中,修改代码为:

/**
     * 配置自定义Realm
     */
    @Bean
    public Realm getRealm(CacheManager cacheManager) {
        CustomRealm customRealm = new CustomRealm();
        // 创建验证器
        HashedCredentialsMatcher hashedCredentialsMatcher = new HashedCredentialsMatcher();
        // 设置加密类型名称
        hashedCredentialsMatcher.setHashAlgorithmName("MD5");
        // 设置加密次数
        hashedCredentialsMatcher.setHashIterations(1024);
        /*=============================================*/
        // 开启缓存管理器
        // 缓存总开关
        customRealm.setCachingEnabled(true);
        // 设置认证的缓存开关
        customRealm.setAuthenticationCachingEnabled(true);
        // 设置授权的缓存开关
        customRealm.setAuthorizationCachingEnabled(true);
        // 设置缓存管理器,默认是本地缓存管理器
        customRealm.setCacheManager(cacheManager);
        /*=============================================*/
        // 给realm设置验证器
        customRealm.setCredentialsMatcher(hashedCredentialsMatcher);
        return customRealm;
    }
6-12-3-4 如遇见SimpleByteSource未序列化错误请看这里
因为SimpleByteSource没有直接或间接的实现序列化接口,所以我们创建MySimpleByteSource类自己去实现于ByteSource,并实现Serializable类:

package com.shirodemo.config.shiro.salt;

import org.apache.shiro.codec.Base64;
import org.apache.shiro.codec.CodecSupport;
import org.apache.shiro.codec.Hex;
import org.apache.shiro.util.ByteSource;
import org.apache.shiro.util.SimpleByteSource;

import java.io.File;
import java.io.InputStream;
import java.io.Serializable;
import java.util.Arrays;

/**
 * 自定义ByteSource
 */
public class MySimpleByteSource implements ByteSource, Serializable {

    private  byte[] bytes;
    private String cachedHex;
    private String cachedBase64;

    public MySimpleByteSource(){

    }

    public MySimpleByteSource(byte[] bytes) {
        this.bytes = bytes;
    }

    public MySimpleByteSource(char[] chars) {
        this.bytes = CodecSupport.toBytes(chars);
    }

    public MySimpleByteSource(String string) {
        this.bytes = CodecSupport.toBytes(string);
    }

    public MySimpleByteSource(ByteSource source) {
        this.bytes = source.getBytes();
    }

    public MySimpleByteSource(File file) {
        this.bytes = (new MySimpleByteSource.BytesHelper()).getBytes(file);
    }

    public MySimpleByteSource(InputStream stream) {
        this.bytes = (new MySimpleByteSource.BytesHelper()).getBytes(stream);
    }

    public static boolean isCompatible(Object o) {
        return o instanceof byte[] || o instanceof char[] || o instanceof String || o instanceof ByteSource || o instanceof File || o instanceof InputStream;
    }

    public byte[] getBytes() {
        return this.bytes;
    }

    public boolean isEmpty() {
        return this.bytes == null || this.bytes.length == 0;
    }

    public String toHex() {
        if (this.cachedHex == null) {
            this.cachedHex = Hex.encodeToString(this.getBytes());
        }

        return this.cachedHex;
    }

    public String toBase64() {
        if (this.cachedBase64 == null) {
            this.cachedBase64 = Base64.encodeToString(this.getBytes());
        }

        return this.cachedBase64;
    }

    public String toString() {
        return this.toBase64();
    }

    public int hashCode() {
        return this.bytes != null && this.bytes.length != 0 ? Arrays.hashCode(this.bytes) : 0;
    }

    public boolean equals(Object o) {
        if (o == this) {
            return true;
        } else if (o instanceof ByteSource) {
            ByteSource bs = (ByteSource)o;
            return Arrays.equals(this.getBytes(), bs.getBytes());
        } else {
            return false;
        }
    }

    private static final class BytesHelper extends CodecSupport {
        private BytesHelper() {
        }

        public byte[] getBytes(File file) {
            return this.toBytes(file);
        }

        public byte[] getBytes(InputStream stream) {
            return this.toBytes(stream);
        }
    }

}
然后在CustomRealm中,修改返回info对象的那行代码为:
return new SimpleAuthenticationInfo(user, user.getPassword(), new MySimpleByteSource(user.getSalt()), this.getName());
6-12-3-5 测试
发现我们的缓存被放置到了redis中。
6-12-4 图片验证码(可选)
按照常规验证码来弄就行,还是存在session中,代码就不写了。
7 Thymeleaf中使用Shiro标签
7-1 引入依赖

<dependency>
    <groupId>com.github.theborakompanioni</groupId>
    <artifactId>thymeleaf-extras-shiro</artifactId>
    <version>2.0.0</version>
</dependency>
7-2 配置方言

    // 配置thymeleaf的方言
    @Bean(name = "shiroDialect")
    public ShiroDialect shiroDialect(){
        return new ShiroDialect();
    }
7-3 页面引入命名空间和常用标签

<html xmlns="http://www.w3.org/1999/xhtml" xmlns:th="http://www.thymeleaf.org"
      xmlns:shiro="http://www.pollix.at/thymeleaf/shiro">
<!-- 验证当前用户是否为“访客”,即未认证(包含未记住)的用户。 -->
<p shiro:guest="">Please <a href="login.html">login</a></p>


<!-- 认证通过或已记住的用户。 -->
<p shiro:user="">
    Welcome back John! Not John? Click <a href="login.html">here</a> to login.
</p>

<!-- 已认证通过的用户。不包含已记住的用户,这是与user标签的区别所在。 -->
<p shiro:authenticated="">
    Hello, <span shiro:principal=""></span>, how are you today?
</p>
<a shiro:authenticated="" href="updateAccount.html">Update your contact information</a>

<!-- 输出当前用户信息,通常为登录帐号信息。 -->
<p>Hello, <shiro:principal/>, how are you today?</p>


<!-- 未认证通过用户,与authenticated标签相对应。与guest标签的区别是,该标签包含已记住用户。 -->
<p shiro:notAuthenticated="">
    Please <a href="login.html">login</a> in order to update your credit card information.
</p>

<!-- 验证当前用户是否属于该角色。 -->
<a shiro:hasRole="admin" href="admin.html">Administer the system</a><!-- 拥有该角色 -->

<!-- 与hasRole标签逻辑相反,当用户不属于该角色时验证通过。 -->
<p shiro:lacksRole="developer"><!-- 没有该角色 -->
    Sorry, you are not allowed to developer the system.
</p>

<!-- 验证当前用户是否属于以下所有角色。 -->
<p shiro:hasAllRoles="developer, 2"><!-- 角色与判断 -->
    You are a developer and a admin.
</p>

<!-- 验证当前用户是否属于以下任意一个角色。  -->
<p shiro:hasAnyRoles="admin, vip, developer,1"><!-- 角色或判断 -->
    You are a admin, vip, or developer.
</p>

<!--验证当前用户是否拥有指定权限。  -->
<a shiro:hasPermission="userInfo:add" href="createUser.html">添加用户</a><!-- 拥有权限 -->

<!-- 与hasPermission标签逻辑相反,当前用户没有制定权限时,验证通过。 -->
<p shiro:lacksPermission="userInfo:del"><!-- 没有权限 -->
    Sorry, you are not allowed to delete user accounts.
</p>

<!-- 验证当前用户是否拥有以下所有角色。 -->
<p shiro:hasAllPermissions="userInfo:view, userInfo:add"><!-- 权限与判断 -->
    You can see or add users.
</p>

<!-- 验证当前用户是否拥有以下任意一个权限。  -->
<p shiro:hasAnyPermissions="userInfo:view, userInfo:del"><!-- 权限或判断 -->
    You can see or delete users.
</p>
<a shiro:hasPermission="pp" href="createUser.html">Create a new User</a>
8 附录:
备注:如果redis一直报反序列化的错误的话,类似于这种:Caused by: org.springframework.core.serializer.support.SerializationFailedException: Failed to deserialize payload. Is the byte array a result of corresponding serialization for DefaultDeserializer?; nested exception is java.io.InvalidClassException: com.
那么就手动配置一下RedisTemplate,配置完后就不要再去手动的设置key序列化操作了:

package com.shirodemo.config.redis;

import org.springframework.context.annotation.Bean;
import org.springframework.context.annotation.Configuration;
import org.springframework.data.redis.connection.RedisConnectionFactory;
import org.springframework.data.redis.core.RedisTemplate;
import org.springframework.data.redis.serializer.Jackson2JsonRedisSerializer;
import org.springframework.data.redis.serializer.StringRedisSerializer;

import com.fasterxml.jackson.annotation.JsonAutoDetect;
import com.fasterxml.jackson.annotation.PropertyAccessor;
import com.fasterxml.jackson.databind.ObjectMapper;

@Configuration
public class RedisConfig {
    @Bean
    public RedisTemplate<String, String> redisTemplate(RedisConnectionFactory redisConnectionFactory) {
        RedisTemplate<String, String> redisTemplate = new RedisTemplate<>();
        redisTemplate.setConnectionFactory(redisConnectionFactory);


        // 使用Jackson2JsonRedisSerialize 替换默认序列化
        @SuppressWarnings("rawtypes")
        Jackson2JsonRedisSerializer jackson2JsonRedisSerializer = new Jackson2JsonRedisSerializer(String.class);


        ObjectMapper objectMapper = new ObjectMapper();
        objectMapper.setVisibility(PropertyAccessor.ALL, JsonAutoDetect.Visibility.ANY);
        objectMapper.enableDefaultTyping(ObjectMapper.DefaultTyping.NON_FINAL);


        jackson2JsonRedisSerializer.setObjectMapper(objectMapper);


        // 设置value的序列化规则和 key的序列化规则
        redisTemplate.setValueSerializer(jackson2JsonRedisSerializer);
        redisTemplate.setKeySerializer(new StringRedisSerializer());
        redisTemplate.afterPropertiesSet();
        return redisTemplate;
    }
}

