一、简介
源码地址:https://github.com/1692134188/HelloWechat_Flex.git
接上篇 斑马斑马-11-微信小程序-布局谋篇 中主要讲了flex布局,并用该布局完成了几个静态页面,本篇目标
- 数据绑定
- 列表渲染
- 条件判断
- 点击事件
- 微信常用API接口
二、数据绑定
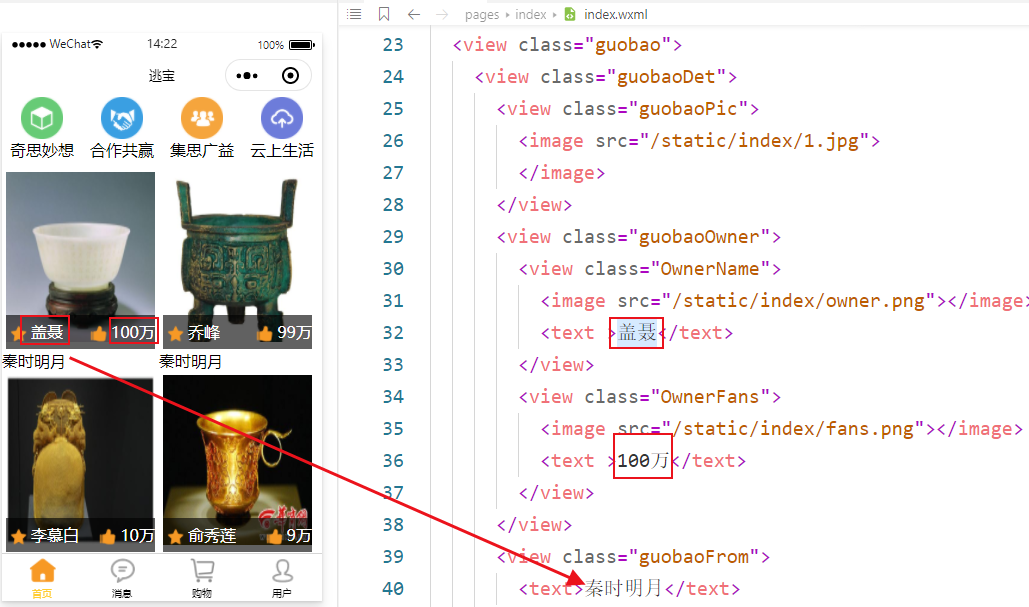
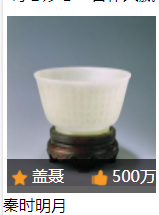
我们前端的页面都是在wxml中固定的, 现在我们通过Mustache 语法来实现数据绑定
1、简单绑定
WXML 中的动态数据均来自对应 Page 的 data。
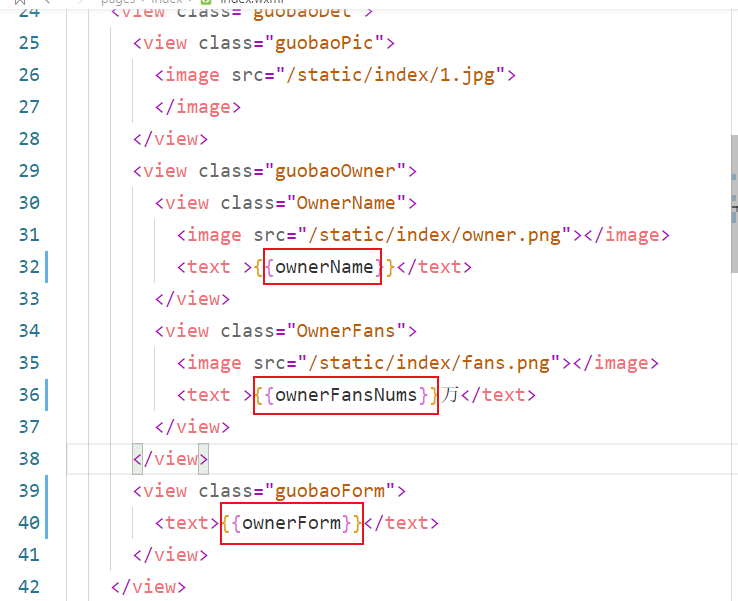

        <view class="guobaoDet">
            <view class="guobaoPic">
                <image src="/static/index/1.jpg">
                </image>
            </view>
            <view class="guobaoOwner">
                <view class="OwnerName">
                    <image src="/static/index/owner.png"></image>
                    <text >{{ownerName}}</text>
                </view>
                <view class="OwnerFans">
                    <image src="/static/index/fans.png"></image>
                    <text >{{ownerFansNums}}万</text>
                </view>
            </view>
            <view class="guobaoForm">
                <text>{{ownerForm}}</text>
            </view>
        </view>
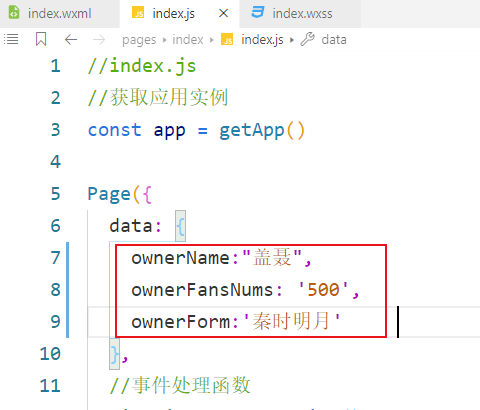

  data: {
    ownerName:"盖聂",
    ownerFansNums: '500',
    ownerForm:'秦时明月'
  },
2、对象绑定
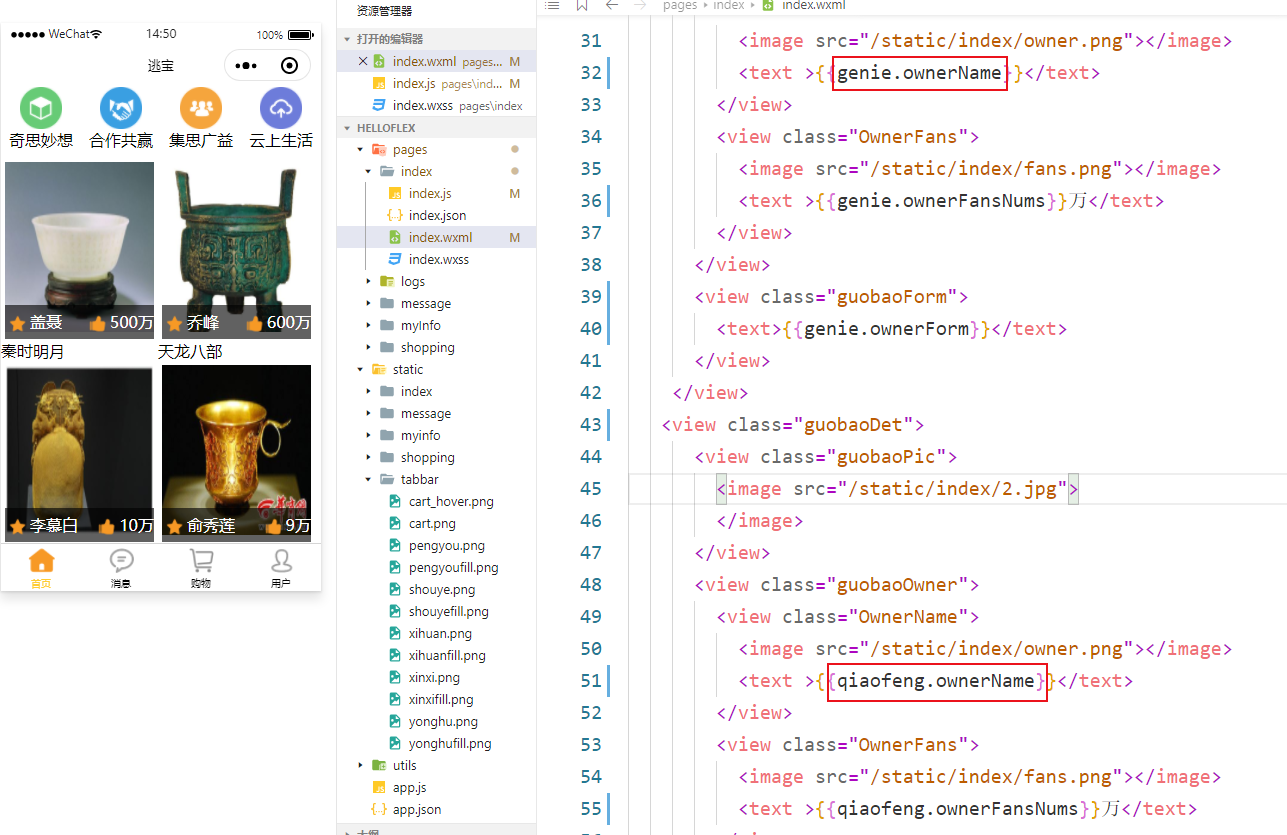
我们开发过程都是以一种面向对象的思想,类似这种情况,每一个国宝下都有一个守护者(姓名、粉丝数、来源),可以将其分装成一个object对象整体

    <view class="guobao">
        <view class="guobaoDet">
            <view class="guobaoPic">
                <image src="/static/index/1.jpg">
                </image>
            </view>
            <view class="guobaoOwner">
                <view class="OwnerName">
                    <image src="/static/index/owner.png"></image>
                    <text >{{genie.ownerName}}</text>
                </view>
                <view class="OwnerFans">
                    <image src="/static/index/fans.png"></image>
                    <text >{{genie.ownerFansNums}}万</text>
                </view>
            </view>
            <view class="guobaoForm">
                <text>{{genie.ownerForm}}</text>
            </view>
        </view>
     <view class="guobaoDet">
            <view class="guobaoPic">
                <image src="/static/index/2.jpg">
                </image>
            </view>
            <view class="guobaoOwner">
                <view class="OwnerName">
                    <image src="/static/index/owner.png"></image>
                    <text >{{qiaofeng.ownerName}}</text>
                </view>
                <view class="OwnerFans">
                    <image src="/static/index/fans.png"></image>
                    <text >{{qiaofeng.ownerFansNums}}万</text>
                </view>
            </view>
            <view class="guobaoForm">
                <text>{{qiaofeng.ownerForm}}</text>
            </view>
        </view>
    </view>

  data: {
    genie: {
      ownerName:"盖聂",
      ownerFansNums: '500',
      ownerForm:'秦时明月'
    },
    qiaofeng: {
      ownerName:"乔峰",
      ownerFansNums: '600',
      ownerForm:'天龙八部'
    }

  }
三、列表渲染
上面我们通过Mustache 语法实现了数据驱动页面,其实这种双向绑定的思想无论是在AngularJS、Vue、等前端框架,还是在python中如django的前端模糊、jinjia2语言中都是非常常用的。
我们虽然实现了html和js的数据分离,把一些可变的数据通过data从html中分离出来,但是html页面中还是存在大量重复代码,由于其结构高度相似,我们可以通过列表循环来优化
1、for循环重复渲染 wx:for
在组件上使用 wx:for 控制属性绑定一个数组,即可使用数组中各项的数据重复渲染该组件。
数组当前项的变量名默认为 item

/**index.wxss**/
.header{
  display: flex;
  flex-direction: row;
  justify-content: space-around;
}
.header .icon image {
   100rpx;
  height: 100rpx;
}
.header .icon{
  display:flex;
  flex-direction: column;
  align-items: center;
}
.content image {
   350rpx;
  height: 400rpx;
  margin: 10rpx 15rpx 10rpx 10rpx;
}
/* .content {
  display:flex;
  flex-direction: row;
  align-items: center;
} */
.content{
  display: flex;
  flex-flow: row wrap;
 align-content: space-around;
}

.content  .guobaoOwner{
  display:flex;
  flex-direction: row;
  justify-content: space-between;
  /* 设置view相关的 */
  background-color: rgba(0, 0, 0, 0.618);
  position:absolute;
   350rpx;
  height: 80rpx;
  margin: -80rpx 10rpx 10rpx 10rpx;
  /* 设置字体相关的 */
  color: white;
  font-size:medium;
  line-height:80rpx ;  /*字体居中*/
}
.content  .guobaoOwner image{
   40rpx;
  height: 40rpx;
  vertical-align: middle; /*图片居中*/
}
.content  .guobaoForm{
  margin-left: 10rpx;
}

<!--index.wxml-->
<view class="header">
    <view class="icon">
        <image src="/static/index/icon_01.png"></image>
        <text>奇思妙想</text>
    </view>
    <view class="icon">
        <image src="/static/index/icon_03.png"></image>
        <text>合作共赢</text>
    </view>
    <view class="icon">
        <image src="/static/index/icon_05.png"></image>
        <text>集思广益</text>
    </view>
    <view class="icon">
        <image src="/static/index/icon_07.png"></image>
        <text>云上生活</text>
    </view>
</view>

<view class="content" >
    <view class="guobaoDet" wx:for="{{guobaoList}}">
        <view class="guobaoPic">
            <image src="{{item.pic_url}}">
            </image>
        </view>
        <view class="guobaoOwner">
            <view class="OwnerName">
                <image src="/static/index/owner.png"></image>
                <text >{{item.ownerName}}</text>
            </view>
            <view class="OwnerFans">
                <image src="/static/index/fans.png"></image>
                <text >{{item.ownerFansNums}}万</text>
            </view>
        </view>
        <view class="guobaoForm">
            <text>{{item.ownerForm}}</text>
        </view>
    </view>
</view>

//index.js
//获取应用实例
const app = getApp()

Page({
  data: {
    guobaoList: [
      {
        pic_url: "/static/index/1.jpg",
        ownerName: "盖聂",
        ownerFansNums: '500',
        ownerForm: '秦时明月'
      },
      {
        pic_url: "/static/index/2.jpg",
        ownerName: "乔峰",
        ownerFansNums: '600',
        ownerForm: '天龙八部'
      },
      {
        pic_url: "/static/index/3.jpg",
        ownerName: "Harry Petter",
        ownerFansNums: '500',
        ownerForm: '哈利 波特'
      },
      {
        pic_url: "/static/index/4.jpg",
        ownerName: "伏地魔",
        ownerFansNums: '600',
        ownerForm: '哈利 波特'
      },
      {
        pic_url: "/static/index/5.jpg",
        ownerName: "琼恩 雪诺",
        ownerFansNums: '50',
        ownerForm: '冰与火'
      },
      {
        pic_url: "/static/index/6.jpg",
        ownerName: "夜王",
        ownerFansNums: '600',
        ownerForm: '权力的游戏'
      },
      {
        pic_url: "/static/index/7.jpg",
        ownerName: "苏轼",
        ownerFansNums: '50',
        ownerForm: '宋'
      },
      {
        pic_url: "/static/index/8.jpg",
        ownerName: "李白",
        ownerFansNums: '600',
        ownerForm: '唐'
      },
      {
        pic_url: "/static/index/9.jpg",
        ownerName: "秦始皇",
        ownerFansNums: '50',
        ownerForm: '秦'
      },
      {
        pic_url: "/static/index/10.jpg",
        ownerName: "汉武帝",
        ownerFansNums: '600',
        ownerForm: '汉'
      }
    ]
  },
  //事件处理函数
  bindViewTap: function () {
    wx.navigateTo({
      url: '../logs/logs'
    })
  },
  onLoad: function () {
    if (app.globalData.userInfo) {
      this.setData({
        userInfo: app.globalData.userInfo,
        hasUserInfo: true
      })
    } else if (this.data.canIUse) {
      // 由于 getUserInfo 是网络请求,可能会在 Page.onLoad 之后才返回
      // 所以此处加入 callback 以防止这种情况
      app.userInfoReadyCallback = res => {
        this.setData({
          userInfo: res.userInfo,
          hasUserInfo: true
        })
      }
    } else {
      // 在没有 open-type=getUserInfo 版本的兼容处理
      wx.getUserInfo({
        success: res => {
          app.globalData.userInfo = res.userInfo
          this.setData({
            userInfo: res.userInfo,
            hasUserInfo: true
          })
        }
      })
    }
  },
  getUserInfo: function (e) {
    console.log(e)
    app.globalData.userInfo = e.detail.userInfo
    this.setData({
      userInfo: e.detail.userInfo,
      hasUserInfo: true
    })
  }
})
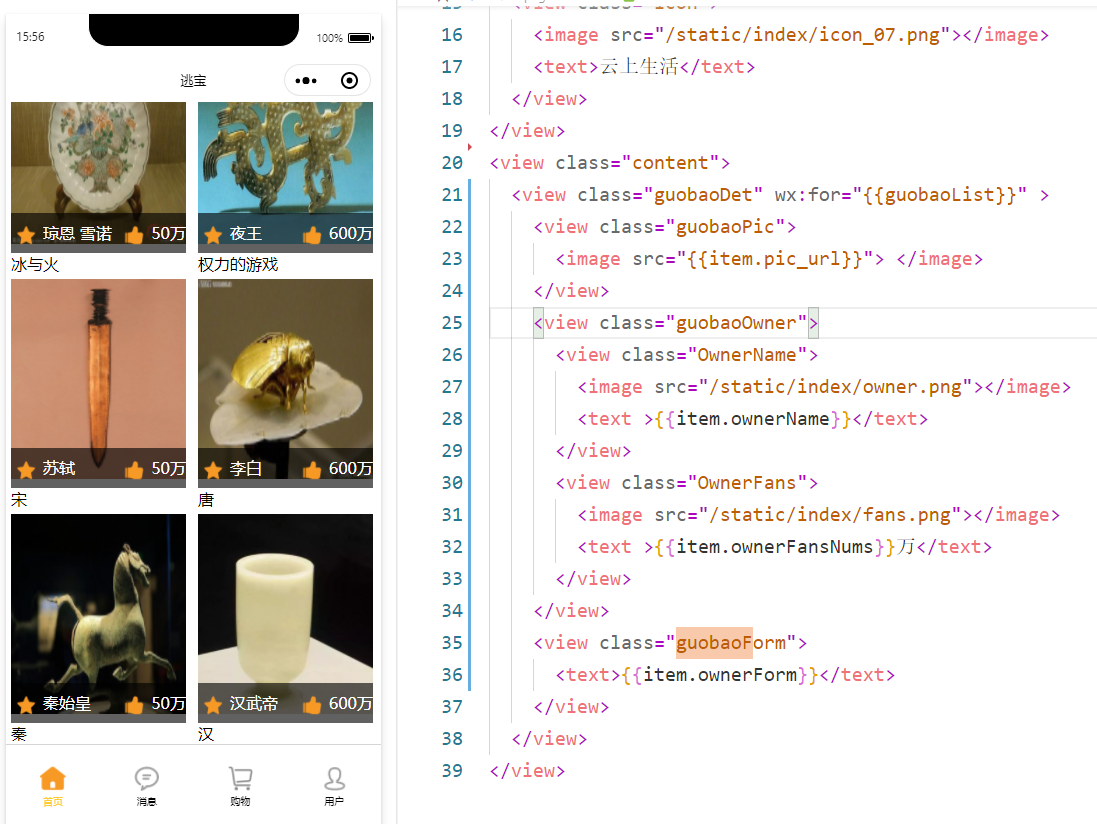
至此我们前端index.html代码由原来的200多行,优化到了不到40行
四、条件判断
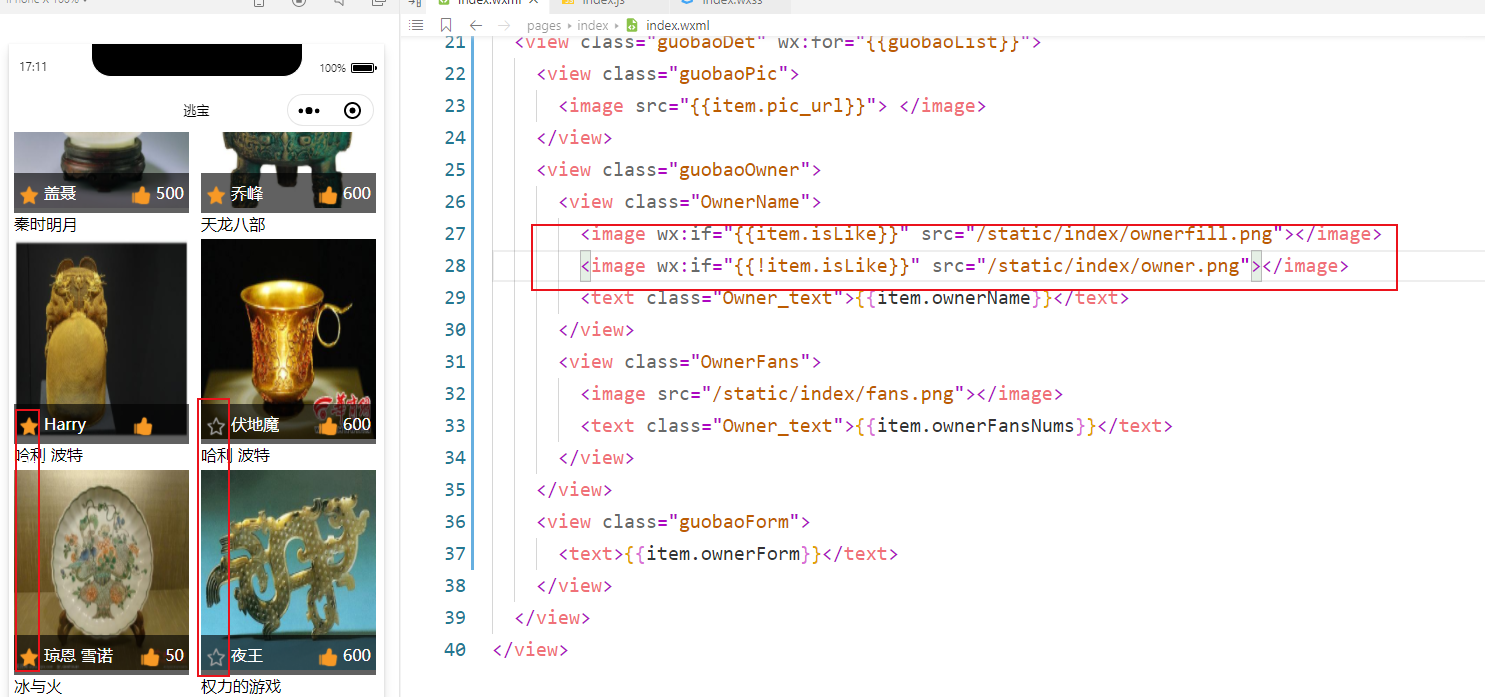
如果喜欢一个国宝,那么它的星星是黄色的,反之则为白色
1、if判断 wx:if

<!--index.wxml-->
<view class="header">
    <view class="icon">
        <image src="/static/index/icon_01.png"></image>
        <text>奇思妙想</text>
    </view>
    <view class="icon">
        <image src="/static/index/icon_03.png"></image>
        <text>合作共赢</text>
    </view>
    <view class="icon">
        <image src="/static/index/icon_05.png"></image>
        <text>集思广益</text>
    </view>
    <view class="icon">
        <image src="/static/index/icon_07.png"></image>
        <text>云上生活</text>
    </view>
</view>
<view class="content">
    <view class="guobaoDet" wx:for="{{guobaoList}}">
        <view class="guobaoPic">
            <image src="{{item.pic_url}}"> </image>
        </view>
        <view class="guobaoOwner">
            <view class="OwnerName">
                <image wx:if="{{item.isLike}}" src="/static/index/ownerfill.png"></image>
                <image wx:if="{{!item.isLike}}" src="/static/index/owner.png"></image>
                <text class="Owner_text">{{item.ownerName}}</text>
            </view>
            <view class="OwnerFans">
                <image src="/static/index/fans.png"></image>
                <text class="Owner_text">{{item.ownerFansNums}}</text>
            </view>
        </view>
        <view class="guobaoForm">
            <text>{{item.ownerForm}}</text>
        </view>
    </view>
</view>

  data: {
    guobaoList: [
      {
        pic_url: "/static/index/1.jpg",
        isLike:true,
        ownerName: "盖聂",
        ownerFansNums: 500,
        ownerForm: '秦时明月'
      },
      {
        pic_url: "/static/index/2.jpg",
        isLike:true,
        ownerName: "乔峰",
        ownerFansNums: 600,
        ownerForm: '天龙八部'
      },
      {
        pic_url: "/static/index/3.jpg",
        isLike:true,
        ownerName: "Harry Petter",
        ownerFansNums: 500,
        ownerForm: '哈利 波特'
      },
      {
        pic_url: "/static/index/4.jpg",
        isLike:false,
        ownerName: "伏地魔",
        ownerFansNums: 600,
        ownerForm: '哈利 波特'
      },
      {
        pic_url: "/static/index/5.jpg",
        isLike:true,
        ownerName: "琼恩 雪诺",
        ownerFansNums: 50,
        ownerForm: '冰与火'
      },
      {
        pic_url: "/static/index/6.jpg",
        isLike:false,
        ownerName: "夜王",
        ownerFansNums: 600,
        ownerForm: '权力的游戏'
      },
      {
        pic_url: "/static/index/7.jpg",
        isLike:true,
        ownerName: "苏轼",
        ownerFansNums: 50,
        ownerForm: '宋'
      },
      {
        pic_url: "/static/index/8.jpg",
        isLike:true,
        ownerName: "李白",
        ownerFansNums: 600,
        ownerForm: '唐'
      },
      {
        pic_url: "/static/index/9.jpg",
        isLike:true,
        ownerName: "秦始皇",
        ownerFansNums: 50,
        ownerForm: '秦'
      },
      {
        pic_url: "/static/index/10.jpg",
        isLike:true,
        ownerName: "汉武帝",
        ownerFansNums: '',
        ownerForm: '汉'
      }
    ]
  },
当然也可以用 wx:else

五、点击事件
1、点亮小星星
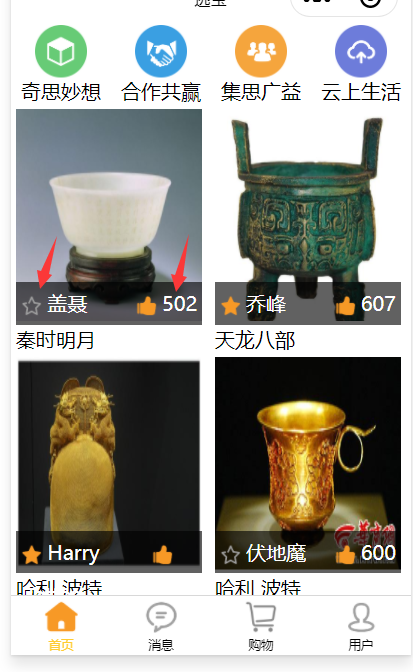
点击国宝下的星星图标,表示喜欢,再点一下,表示取消
1.1 给wxml中的元素通过bindtap设置点击事件,并通过data-参数名传递参数
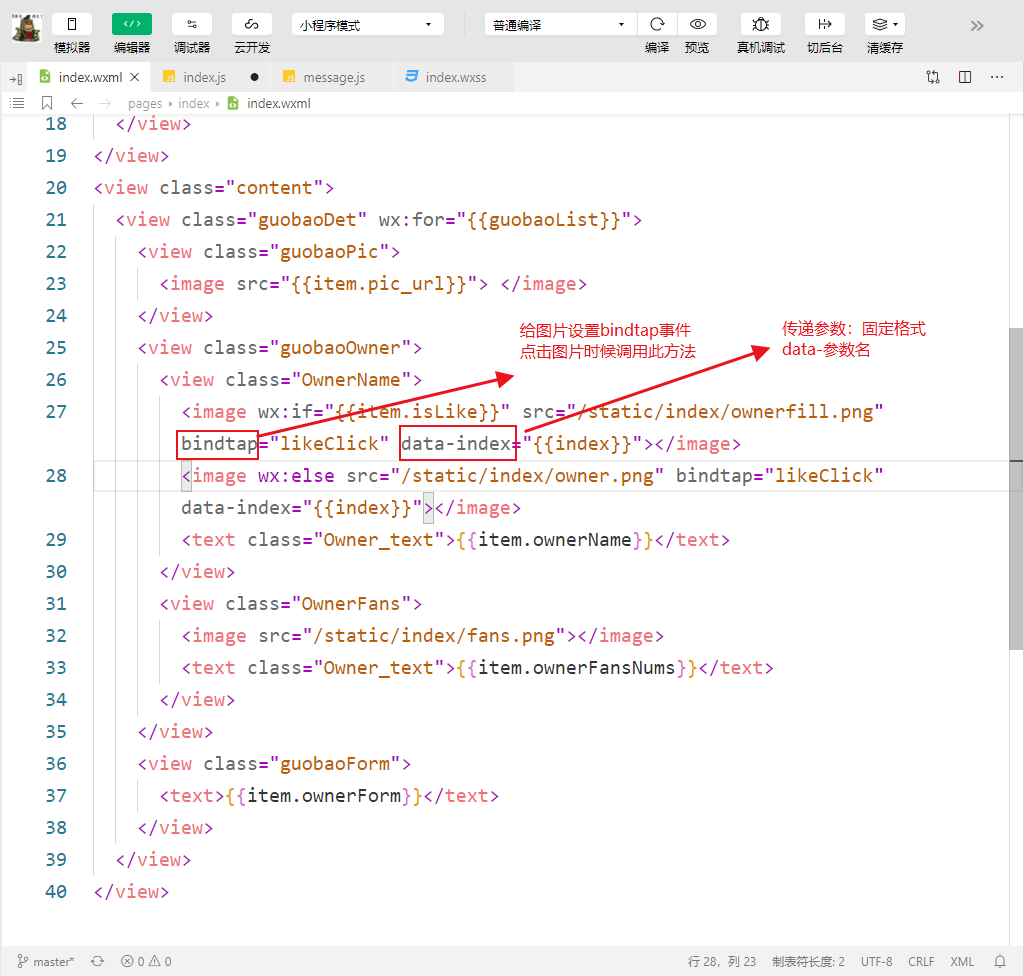
1.2 在js中获取参数,并处理响应的逻辑

2、点赞
点击国宝下的手指图标,没点一次后面的值+1
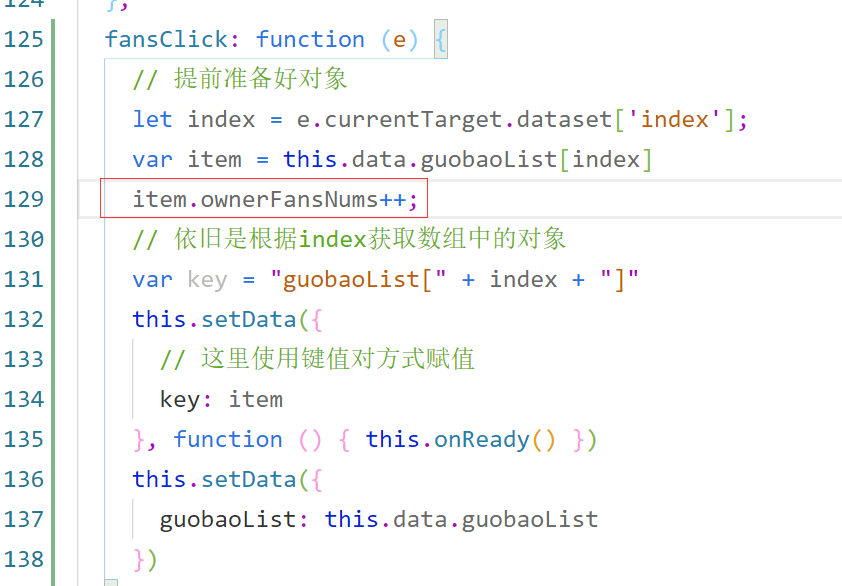
2.1 给wxml中的元素通过bindtap设置点击事件,并通过data-参数名传递参数

2.2 在js中获取参数,并处理响应的逻辑
效果展示:
3、页面跳转
我们给来源加一个详情页面
3.1 给wxml中的元素添加navigator类似于a标签,可传递参数。注意路径是相对路径

3.2 添加navigate的Page页面

3.3 在js中拿到数据进行拼接
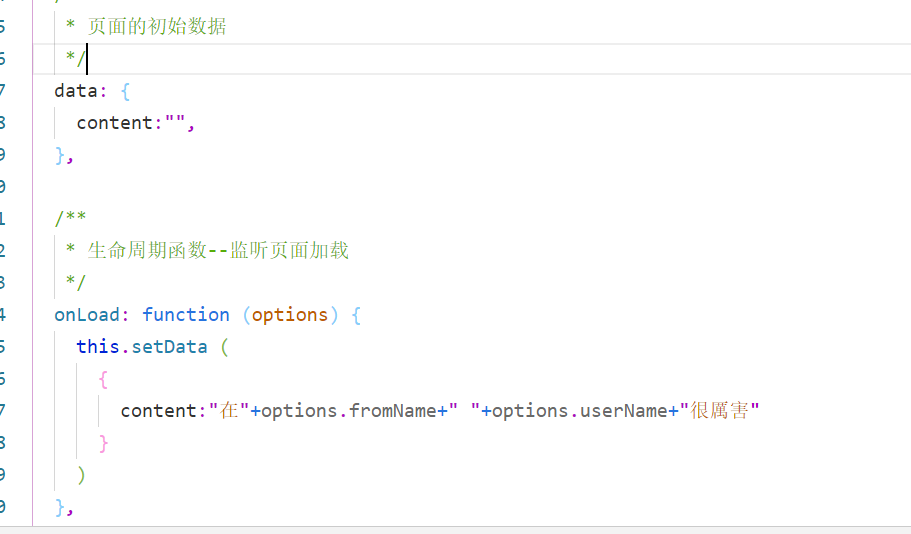
3.4 效果图

4、代码

<!--index.wxml-->
<view class="header">
    <view class="icon">
        <image src="/static/index/icon_01.png"></image>
        <text>奇思妙想</text>
    </view>
    <view class="icon">
        <image src="/static/index/icon_03.png"></image>
        <text>合作共赢</text>
    </view>
    <view class="icon">
        <image src="/static/index/icon_05.png"></image>
        <text>集思广益</text>
    </view>
    <view class="icon">
        <image src="/static/index/icon_07.png"></image>
        <text>云上生活</text>
    </view>
</view>
<view class="content">
    <view class="guobaoDet" wx:for="{{guobaoList}}">
        <view class="guobaoPic">
            <image src="{{item.pic_url}}"> </image>
        </view>
        <view class="guobaoOwner">
            <view class="OwnerName">
                <image wx:if="{{item.isLike}}" src="/static/index/ownerfill.png" bindtap="likeClick" data-index="{{index}}"></image>
                <image wx:else src="/static/index/owner.png" bindtap="likeClick" data-index="{{index}}"></image>
                <text class="Owner_text">{{item.ownerName}}</text>
            </view>
            <view class="OwnerFans">
                <image src="/static/index/fans.png" bindtap="fansClick" data-index="{{index}}"></image>
                <text class="Owner_text">{{item.ownerFansNums}}</text>
            </view>
        </view>
        <view class="guobaoForm">
            <navigator url="../navigate/navigate?fromName={{item.ownerFrom}}&userName={{item.ownerName}}" hover-class="navigator-hover">{{item.ownerFrom}}</navigator>
        </view>
    </view>
</view>

//index.js
//获取应用实例
const app = getApp()

Page({
  data: {
    guobaoList: [
      {
        pic_url: "/static/index/1.jpg",
        isLike: true,
        ownerName: "盖聂",
        ownerFansNums: 500,
        ownerFrom: '秦时明月'
      },
      {
        pic_url: "/static/index/2.jpg",
        isLike: true,
        ownerName: "乔峰",
        ownerFansNums: 600,
        ownerFrom: '天龙八部'
      },
      {
        pic_url: "/static/index/3.jpg",
        isLike: true,
        ownerName: "Harry Petter",
        ownerFansNums: 50,
        ownerFrom: '哈利 波特'
      },
      {
        pic_url: "/static/index/4.jpg",
        isLike: false,
        ownerName: "伏地魔",
        ownerFansNums: 600,
        ownerFrom: '哈利 波特'
      },
      {
        pic_url: "/static/index/5.jpg",
        isLike: true,
        ownerName: "琼恩 雪诺",
        ownerFansNums: 50,
        ownerFrom: '冰与火'
      },
      {
        pic_url: "/static/index/6.jpg",
        isLike: false,
        ownerName: "夜王",
        ownerFansNums: 600,
        ownerFrom: '权力的游戏'
      },
      {
        pic_url: "/static/index/7.jpg",
        isLike: true,
        ownerName: "苏轼",
        ownerFansNums: 50,
        ownerFrom: '宋'
      },
      {
        pic_url: "/static/index/8.jpg",
        isLike: true,
        ownerName: "李白",
        ownerFansNums: 600,
        ownerFrom: '唐'
      },
      {
        pic_url: "/static/index/9.jpg",
        isLike: true,
        ownerName: "秦始皇",
        ownerFansNums: 50,
        ownerFrom: '秦'
      },
      {
        pic_url: "/static/index/10.jpg",
        isLike: true,
        ownerName: "汉武帝",
        ownerFansNums: 60,
        ownerFrom: '汉'
      }
    ]
  },
  //事件处理函数
  bindViewTap: function () {
    wx.navigateTo({
      url: '../logs/logs'
    })
  },
  // onLoad: function () {
  //   if (app.globalData.userInfo) {
  //     this.setData({
  //       userInfo: app.globalData.userInfo,
  //       hasUserInfo: true
  //     })
  //   } else if (this.data.canIUse) {
  //     // 由于 getUserInfo 是网络请求,可能会在 Page.onLoad 之后才返回
  //     // 所以此处加入 callback 以防止这种情况
  //     app.userInfoReadyCallback = res => {
  //       this.setData({
  //         userInfo: res.userInfo,
  //         hasUserInfo: true
  //       })
  //     }
  //   } else {
  //     // 在没有 open-type=getUserInfo 版本的兼容处理
  //     wx.getUserInfo({
  //       success: res => {
  //         app.globalData.userInfo = res.userInfo
  //         this.setData({
  //           userInfo: res.userInfo,
  //           hasUserInfo: true
  //         })
  //       }
  //     })
  //   }
  // },
  onLoad: function (options) {

  },
  getUserInfo: function (e) {
    console.log(e)
    app.globalData.userInfo = e.detail.userInfo
    this.setData({
      userInfo: e.detail.userInfo,
      hasUserInfo: true
    })
  },
  fansClick: function (e) {
    // 提前准备好对象
    let index = e.currentTarget.dataset['index'];
    var item = this.data.guobaoList[index]
    item.ownerFansNums++;
    // 依旧是根据index获取数组中的对象
    var key = "guobaoList[" + index + "]"
    this.setData({
      // 这里使用键值对方式赋值
      key: item
    }, function () { this.onReady() })
    this.setData({
      guobaoList: this.data.guobaoList
    })
  },
  likeClick: function (e) {
    // 提前准备好对象
    let index = e.currentTarget.dataset['index'];
    var item = this.data.guobaoList[index]
    item.isLike = !item.isLike;
    // 依旧是根据index获取数组中的对象
    var key = "guobaoList[" + index + "]"
    this.setData({
      // 这里使用键值对方式赋值
      key: item
    }, function () { })
    this.setData({ guobaoList: this.data.guobaoList })
  }
})

<text>{{content}}</text>

// pages/navigate.js
Page({

  /**
   * 页面的初始数据
   */
  data: {
    content:"",
  },

  /**
   * 生命周期函数--监听页面加载
   */
  onLoad: function (options) {
    this.setData (
      {
        content:"在"+options.fromName+" "+options.userName+"很厲害"
      }
    )
  },

  /**
   * 生命周期函数--监听页面初次渲染完成
   */
  onReady: function () {

  },

  /**
   * 生命周期函数--监听页面显示
   */
  onShow: function () {

  },

  /**
   * 生命周期函数--监听页面隐藏
   */
  onHide: function () {

  },

  /**
   * 生命周期函数--监听页面卸载
   */
  onUnload: function () {

  },

  /**
   * 页面相关事件处理函数--监听用户下拉动作
   */
  onPullDownRefresh: function () {

  },

  /**
   * 页面上拉触底事件的处理函数
   */
  onReachBottom: function () {

  },

  /**
   * 用户点击右上角分享
   */
  onShareAppMessage: function () {

  }
})
六、微信常用API接口
1、获取用户信息
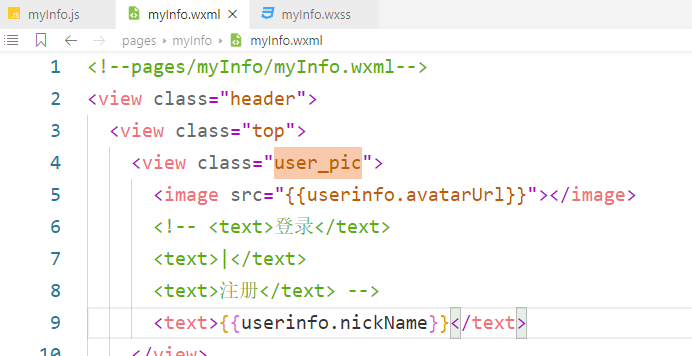
1.1 我们给“我的”页面设置头像和昵称的显示
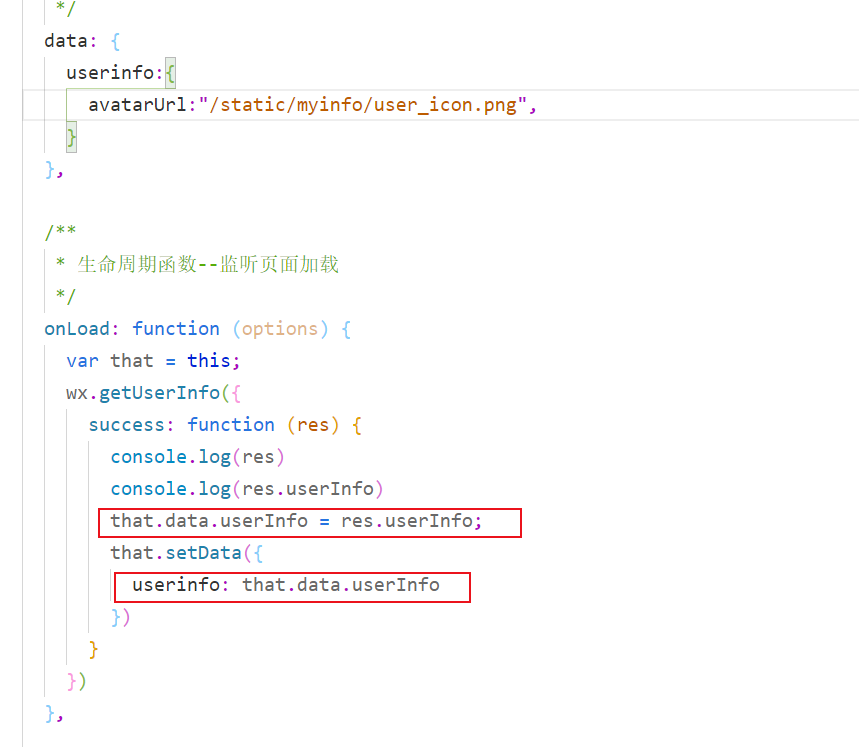
1.2 通过wx的API。getUserInfo()来获取数据
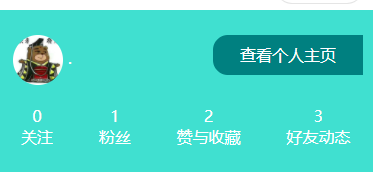
1.3 展示。
2、获取用户信息(官方推荐)
1.1 我们给“我的”页面设置头像和昵称的显示

1.2 添加bindGetUserInfo方法

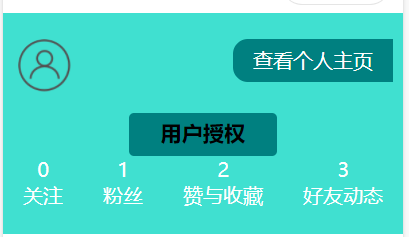
1.3 效果展示
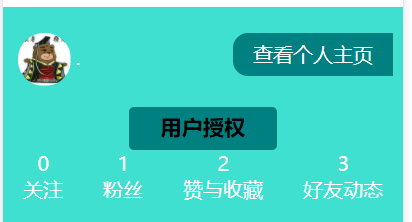

<!--pages/myInfo/myInfo.wxml-->
<view class="header">
    <view class="top">
        <view class="user_pic">
            <image src="{{userinfo.avatarUrl}}"></image>
            <!-- <text>登录</text>
            <text>|</text>
            <text>注册</text> -->
            <text>{{userinfo.nickName}}</text>
        </view>
        <view class="seeme">
            <text>查看个人主页</text>
        </view>
    </view>
    <view class="showUserInfo" > <button open-type="getUserInfo" bindgetuserinfo="bindGetUserInfo">用户授权</button></view>
    <view class="bottom">
        <view class="item">
            <text>0</text>
            <text>关注</text>
        </view>
        <view class="item">
            <text>1</text>
            <text>粉丝</text>
        </view>
        <view class="item">
            <text>2</text>
            <text>赞与收藏</text>
        </view>
        <view class="item">
            <text>3</text>
            <text>好友动态</text>
        </view>
    </view>
</view>
<view class="content">
    <view class="contentList">
        <view class="item">
            <image src="/static/myinfo/orders_icon.png"></image>
            <text>全部订单</text>
        </view>
        <view class="item">
            <image src="/static/myinfo/cash_coupon_icon.png"></image>
            <text>待支付</text>
        </view>
        <view class="item">
            <image src="/static/myinfo/discount_icon.png"></image>
            <text>待评价</text>
        </view>
        <view class="item">
            <image src="/static/myinfo/collect_icon.png"></image>
            <text>收藏</text>
        </view>
        <view class="item">
            <image src="/static/myinfo/address_icon.png"></image>
            <text>地址管理</text>
        </view>
    </view>
    <view class="mycontent">
        <view class="item">
            <text class="my_content_title">我的钱包</text>
            <view class="my_content_detail">
                <text>¥200</text>
                <text> > </text>
            </view>
        </view>
        <view class="item">
            <text class="my_content_title">我的优惠券</text>
            <view class="my_content_detail">
                <text>暂无可用</text>
                <text> > </text>
            </view>
        </view>
        <view class="item">
            <text class="my_content_title">领券中心</text>
            <view class="my_content_detail">
                <text>您的福利都在这里</text>
                <text> > </text>
            </view>
        </view>
    </view>
</view>
<view class="footer">
    <view class="item">
        <image src="/static/myinfo/wechat.png"></image>
        <text class="footer_item_text">微信客服</text>
    </view>
    <view class="item">
        <image src="/static/myinfo/alipay.png"></image>
        <text  class="footer_item_text"F>支付宝客服</text>
    </view>
</view>

/* pages/myInfo/myInfo.wxss */
.header{
  background-color: turquoise;
  display: flex;
  flex-direction: column;
  justify-content:space-around;
  color: white;
  margin-bottom: 20rpx;
}
.header .top{
  display: flex;
  flex-direction: row;
  justify-content: space-between;
}

.header .top image{
   100rpx;
  height: 100rpx;
  vertical-align: middle;
}
.header .top .user_pic{
    margin:20rpx 10rpx 20rpx 30rpx;
    align-items: center;
    justify-content: center;
}
.header .top .user_pic image{
  border-radius: 100rpx;
}
.header .top .seeme{
  background-color: teal;
  height: 80rpx;
   300rpx;
  margin: 50rpx 20rpx;
  line-height: 80rpx;
  text-align: center;
  border-radius: 30rpx 0rpx 0rpx 30rpx ;
}
.header .top .user_pic text{
  line-height: 150rpx;
  margin:0rpx 10rpx 20rpx 10rpx;
  align-items: center;
  justify-content: center;
}
.header .showUserInfo button{
  background-color: teal;
   280rpx;
  height: 80rpx;
  padding: 10rpx 0 0 0;
}
.header .bottom{
  display: flex;
  flex-direction: row;
  justify-content:space-around;
  margin-bottom: 50rpx;
}
.header .bottom .item{
  display: flex;
  flex-direction: column;
  justify-content:space-around;
  align-items: center;
}
.content{
  margin-top:60rpx;
}
.content .contentList {
  display: flex;
  flex-direction: row;
  justify-content: space-around;
}
.content .contentList .item{
  display: flex;
  flex-direction: column;
  justify-content: space-around;
  align-items: center;
}
.content .contentList .item image{
   80rpx;
  height: 80rpx;
}
.content .mycontent {
  margin-top: 100rpx;
  border-top:10rpx solid  darkgrey;
}
.content .mycontent .my_content_title{
  font-size: 39rpx;
  font-weight: 600;
}
.content .mycontent .item{
  height: 100rpx;
  margin: 50rpx 30rpx 50rpx 30rpx;
  border-bottom:4rpx solid  rgb(169, 169, 169);
  display: flex;
  flex-direction: row;
  justify-content: space-between;
}
.content .mycontent .my_content_detail{
  font-size: 35rpx;
  font-weight: 200;
}
.footer {
  margin: 100rpx 0 100rpx 0;
  display: flex;
  flex-direction: row;
  justify-content: space-around;
}
.footer .item{
  border: 4rpx solid rgb(169, 169, 169);
  border-radius: 20rpx;
  padding: 10rpx 10rpx 10rpx 10rpx;
  height: 50rpx;
  line-height: 50rpx;
  text-align: center;
}
.footer_item_text{
  margin-left: 10rpx;
}
.footer image {
  height: 50rpx;
   50rpx;
  vertical-align: middle;
}

// pages/myInfo/myInfo.js
Page({

  /**
   * 页面的初始数据
   */
  data: {
    userinfo: {
      avatarUrl: "/static/myinfo/user_icon.png",
    }
  },

  /**
   * 生命周期函数--监听页面加载
   */
  onLoad: function (options) {
    var that = this;
    wx.getUserInfo({
      success: function (res) {
        that.data.userInfo = res.userInfo;
        that.setData({
          //userinfo: that.data.userInfo //方式一 获取用户信息
        })
      }
    })
  },
  bindGetUserInfo: function () {
    var that = this;
    wx.getUserInfo({
      success: function (res) {
        that.data.userInfo = res.userInfo;
        that.setData({
           userinfo: that.data.userInfo //方式二 获取用户信息
        })
      }
    })
  },
  /**
   * 生命周期函数--监听页面初次渲染完成
   */
  onReady: function () {

  },

  /**
   * 生命周期函数--监听页面显示
   */
  onShow: function () {

  },

  /**
   * 生命周期函数--监听页面隐藏
   */
  onHide: function () {

  },

  /**
   * 生命周期函数--监听页面卸载
   */
  onUnload: function () {

  },

  /**
   * 页面相关事件处理函数--监听用户下拉动作
   */
  onPullDownRefresh: function () {

  },

  /**
   * 页面上拉触底事件的处理函数
   */
  onReachBottom: function () {

  },

  /**
   * 用户点击右上角分享
   */
  onShareAppMessage: function () {

  }
})
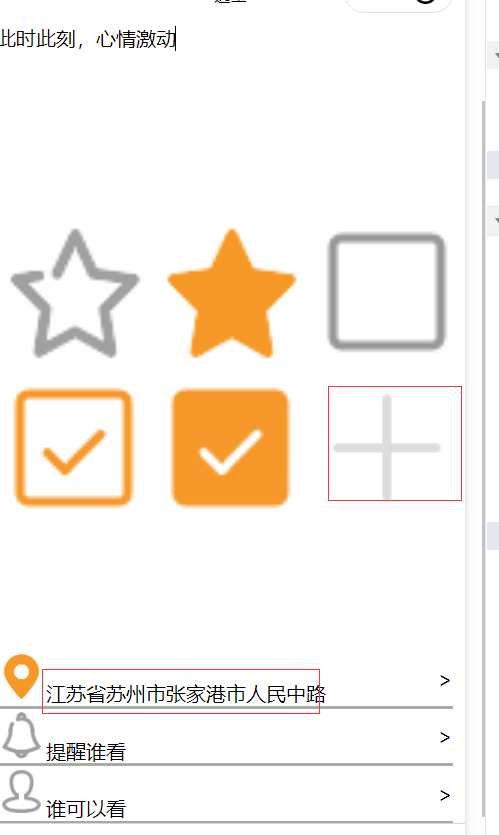
3、发布功能 获取用户位置,图片上传
3.1 需求:添加一个发布功能,类似微信发布朋友圈功能
3.2 所需要代码

<!--pages/publish.wxml-->
<view class="viewImage">
    <view class="container">
        <textarea placeholder="这一刻的想法...">
    </textarea>
        <image wx:for="{{publich.imageList}}" src="{{item}}"></image>
        <image wx:if="{{publich.imageList.length <9 }}" bindtap="uploadImage" src="/static/publish/add.png"></image>
    </view>
</view>
<view class="bottom">

    <view class="item" bindtap="chooseLocation">
        <view class="item_left">
            <image wx:if="{{publich.location}}" src="/static/publish/locationfill.png"></image>
            <image wx:else src="/static/publish/location.png"></image>
            <text wx:if="{{publich.location}}"  class="my_content_title">{{publich.location}}</text>
            <text wx:else class="my_content_title">所在位置</text>
        </view>
        <view class="my_content_detail">
            <text > > </text>
        </view>
    </view>

    <view class="item" >
        <view class="item_left">
            <image wx:if="{{publich.attUserList}}" src="/static/publish/tixingfill.png"></image>
            <image wx:else src="/static/publish/tixing.png"></image>
            <text wx:if="{{publich.attUserList}}"  class="my_content_title">{{publich.attUserList}}</text>
            <text wx:else class="my_content_title">提醒谁看</text>
        </view>
        <view class="my_content_detail">
            <text > > </text>
        </view>
    </view>
      <view class="item" >
        <view class="item_left">
            <image wx:if="{{publich.canUserList}}" src="/static/publish/yonghufill.png"></image>
            <image wx:else src="/static/publish/yonghu.png"></image>
            <text wx:if="{{publich.canUserList}}"  class="my_content_title">{{publich.canUserList}}</text>
            <text wx:else class="my_content_title">谁可以看</text>
        </view>
        <view class="my_content_detail">
            <text > > </text>
        </view>
    </view>
</view>

/* pages/publish.wxss */
.viewImage .upload image{
   100rpx;
  height: 100rpx;
}
.upload{
  display: flex;
  flex-direction: column;
  justify-content:space-around;
  align-items: center;
}
.container{
  display: flex;
  flex-flow: row wrap;
  align-content: space-around;
}
.container image{
   230rpx;
  height: 230rpx;
  margin: 10rpx 10rpx 10rpx 10rpx ;
}
.bottom {
  display: flex;
  flex-flow: column;
  align-content: space-around;
}
.bottom .item {
  display: flex;
  flex-direction: row;
  justify-content: space-between;
  align-items: center;
  border-bottom: 4rpx solid rgb(169, 169, 169);
  margin-right: 20rpx;
}

.bottom .item image{
   80rpx;
  height: 80rpx;
}

// pages/publish.js
Page({

  /**
   * 页面的初始数据
   */
  data: {

    publich:{
      imageList: [],
      location:"",
      attUserList:"",
      canUserList:""
    }
  },

  /**
   * 生命周期函数--监听页面加载
   */
  onLoad: function (options) {

  },

  /**
   * 生命周期函数--监听页面初次渲染完成
   */
  onReady: function () {

  },

  /**
   * 生命周期函数--监听页面显示
   */
  onShow: function () {

  },

  /**
   * 生命周期函数--监听页面隐藏
   */
  onHide: function () {

  },

  /**
   * 生命周期函数--监听页面卸载
   */
  onUnload: function () {

  },

  /**
   * 页面相关事件处理函数--监听用户下拉动作
   */
  onPullDownRefresh: function () {

  },

  /**
   * 页面上拉触底事件的处理函数
   */
  onReachBottom: function () {

  },

  /**
   * 用户点击右上角分享
   */
  onShareAppMessage: function () {

  },
  uploadImage: function () {
    var that = this;


    wx.chooseImage({
      count:9,
      sizeType:['compressed','original'],
      sourceType:["album","camera"],

      success: (res) => {
        var item = this.data.publich
        item.imageList = that.data.publich.imageList.concat(res.tempFilePaths);
        // 依旧是根据index获取数组中的对象
        var key = "publich"
        this.setData({
          // 这里使用键值对方式赋值
          key: item
        }, function () { })
        this.setData({ publich: this.data.publich })
      },
    })
  },
  chooseLocation: function () {
    var that = this;
    wx.chooseLocation({
      success: (res) => {
        var item = this.data.publich
        item.location = res.address ;
        // 依旧是根据index获取数组中的对象
        var key = "publich"
        this.setData({
          // 这里使用键值对方式赋值
          key: item
        }, function () { })
        this.setData({ publich: this.data.publich })
      },
    })
  }
})
3.3 效果展示
