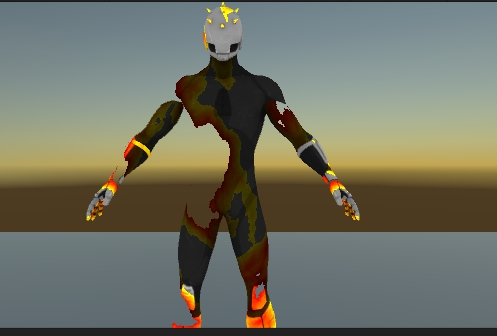
这里通过 “是否丢弃像素”的2种方法,写2个shader,效果是一样的,也提到了,丢弃某个像素的3种方式。
是否丢弃:
1.通过脚本控制shader变量判断当前是否丢弃像素,需要额外脚本;
2.shader根据当前时间控制是否丢弃某个像素,不需要额外脚本。
丢弃方法:
1.通过clip函数进行丢弃像素;
2.通过discard丢弃像素;
3.通过设置alpha变量为0丢弃像素。
1)DissolveOne.shader通过脚本控制
Shader "Unlit/DissolveOne"
{
    Properties
    {
        //外部脚本控制_Value来控制是否丢弃某个像素
        _MainTex ("Texture", 2D) = "white" {}
        _DissolveTex("Texture", 2D) = "white" {}
        _DissSize("DissSize", Range(0, 1)) = 0.1 //溶解阈值,小于阈值才属于溶解带
        _DissColor("DissColor", Color) = (1,0,0,1)//溶解带的渐变颜色,与_AddColor配合形成渐变色
        _AddColor("AddColor", Color) = (1,1,0,1)
        _Value("Value", Range(0,1)) = 0.5 //这个属性其实不用开放出来的,通过脚本控制就好,但我想看效果却懒得写脚本,就这样吧
    }
    SubShader
    {
        Tags { "RenderType"="Opaque" }
        LOD 100

        Pass
        {
            CGPROGRAM
            #pragma vertex vert
            #pragma fragment frag

            #include "UnityCG.cginc"

            struct appdata
            {
                float4 vertex : POSITION;
                float2 uv : TEXCOORD0;
            };

            struct v2f
            {
                float2 uv : TEXCOORD0;
                float4 vertex : SV_POSITION;
            };

            sampler2D _MainTex;
            sampler2D _DissolveTex;
            float4 _MainTex_ST;
            half _Value;//脚本控制的变量
            half _DissSize;
            half4 _DissColor, _AddColor;

            v2f vert (appdata v)
            {
                v2f o;
                o.vertex = mul(UNITY_MATRIX_MVP, v.vertex);
                o.uv = TRANSFORM_TEX(v.uv, _MainTex);
                return o;
            }

            fixed4 frag (v2f i) : SV_Target
            {
                fixed4 col = tex2D(_MainTex, i.uv);
                float dissolveValue = tex2D(_DissolveTex, i.uv).r;
                float clipValue = dissolveValue - _Value;
                clip(clipValue);// 如果clipValue<0则抛弃当前像素,
                //clip is equivalent to (if(clipValue<0)discard;),但好像好像discard需要更高一点的硬件支持
                //也可以通过设置col.a = 0抛弃当前像素:if(clipValue<0)col.a = 0;
                if (clipValue > 0 && clipValue < _DissSize)
                {
                    //溶解带渐变
                    half4 dissolveColor = lerp(_DissColor, _AddColor, clipValue / _DissSize)* 2;
                    col *= dissolveColor;
                }
                return col;
            }
            ENDCG
        }
    }
}
2)DissolveTwo.shader根据当前时间控制是否丢弃某个像素
Shader "Unlit/DissolveTwo"
{
    Properties
    {
        //shader根据当前时间控制是否丢弃某个像素
        _MainTex("Texture", 2D) = "white" {}
        _DissolveTex("Texture", 2D) = "white" {}
        _DissSize("DissSize", Range(0, 1)) = 0.1 //溶解阈值,小于阈值才属于溶解带
        _DissColor("DissColor", Color) = (1,0,0,1)//溶解带的渐变颜色,与_AddColor配合形成渐变色
        _AddColor("AddColor", Color) = (1,1,0,1)
        _DissSpeed("DissSpeed", Float) = 1
    }
    SubShader
    {
        Tags { "RenderType"="Opaque" }
        LOD 100

        Pass
        {
            CGPROGRAM
            #pragma vertex vert
            #pragma fragment frag

            #include "UnityCG.cginc"

            struct appdata
            {
                float4 vertex : POSITION;
                float2 uv : TEXCOORD0;
            };

            struct v2f
            {
                float2 uv : TEXCOORD0;
                float4 vertex : SV_POSITION;
            };

            sampler2D _MainTex;
            sampler2D _DissolveTex;
            float4 _MainTex_ST;
            half _DissSize;
            half4 _DissColor, _AddColor;
            half _DissSpeed;

            v2f vert (appdata v)
            {
                v2f o;
                o.vertex = mul(UNITY_MATRIX_MVP, v.vertex);
                o.uv = TRANSFORM_TEX(v.uv, _MainTex);
                return o;
            }

            fixed4 frag (v2f i) : SV_Target
            {
                // sample the texture
                fixed4 col = tex2D(_MainTex, i.uv);
                //因为这个溶解过程很快,所以为了看效果,可以改成:saturate(_Time.y % _DissSpeed / _DissSpeed),重复溶解
                float dissolveFactor = saturate(_Time.y / _DissSpeed);
                float dissolveValue = tex2D(_DissolveTex, i.uv).r;
                float delta = dissolveValue - dissolveFactor;
                if (delta < 0)
                {
                    discard;
                }

                if (delta >= 0 && delta < _DissSize)
                {
                    float leftFactor = delta / _DissSize;
                    half4 dissolveColor = lerp(_DissColor, _AddColor, leftFactor) * 2;
                    col *= dissolveColor;
                }
                return col;
            }
            ENDCG
        }
    }
}
两者溶解效果是一样的:

参考文章:
1.http://blog.csdn.net/u011047171/article/details/46873217
2.http://www.cnblogs.com/Esfog/p/DissolveShader.html