对于日志和事件的记录在每个项目中都会用到,如果在每个manager层中触发时间记录的话,会比较难以扩展和维护,所以可配置的日
志和事件记录在项目中会用到!
一、拦截器实现日志记录
(一)首先配置一个自定义操作日志注解接口类
package cn.yxj.tool;
import java.lang.annotation.ElementType;
import java.lang.annotation.Retention;
import java.lang.annotation.RetentionPolicy;
import java.lang.annotation.Target;
/**
 * 自定义操作日志注解接口类
 * @author
 *
 */
//表示在什么级别保存该注解信息
@Retention(RetentionPolicy.RUNTIME)
//表示该注解用于什么地方
@Target(ElementType.METHOD)
public @interface OperateLog {

    //操作日志的内容
    String content();
    //模块名
    String  moduleName();
    //操作类型
    String operateType() default "";
    //操作编号
    String code() default "";
}
(二)配置自定义拦截器
package cn.yxj.tool;


import java.lang.reflect.Method;
import java.text.SimpleDateFormat;
import java.util.Date;

import javassist.ClassClassPath;

import org.apache.commons.logging.Log;
import org.apache.commons.logging.LogFactory;
import org.apache.struts2.ServletActionContext;
import org.springframework.context.ApplicationContext;
import org.springframework.context.support.ClassPathXmlApplicationContext;


import cn.yxj.base.BaseService;
import cn.yxj.entity.PsLogs;
import cn.yxj.entity.PsUser;

import com.opensymphony.xwork2.ActionInvocation;
import com.opensymphony.xwork2.interceptor.AbstractInterceptor;
public class OperateLogIntercepter extends AbstractInterceptor{
    private static final Log log=LogFactory.getLog(OperateLogIntercepter.class);

    /*=(PsLogsService) new PsLogsServiceImpl();*/

    @Override
    public String intercept(ActionInvocation invocation) throws Exception {
        //第一种方式 自定义Spring容器   tomcat容器启动就会启动在bean里面注入
        Object bean = SpringContextHelper.getBean("psLogsService");//注入日志的service对象

        //第二种方式手动new的时候,调用的时候才会用到
        /*ApplicationContext con=new ClassPathXmlApplicationContext("applicationContext.xml");//注入日志的service对象
        Object bean = con.getBean("psLogsService");*/


        System.out.println("日志拦截器已经开始启动");
        Class<? extends Object> actionClass=invocation.getAction().getClass();
        String methodName=invocation.getProxy().getMethod();
        //获取当前方法
        Method currentMethod=actionClass.getMethod(methodName);
        System.out.println("当前方法+++++++++++++=="+currentMethod);
        boolean flag = currentMethod.isAnnotationPresent(OperateLog.class);//判断是否有自定义的注解OperateLog
        if(flag){
            OperateLog ol=currentMethod.getAnnotation(OperateLog.class);
            System.out.println(ol.content());
            PsLogs logs=new PsLogs();
            PsUser user=(PsUser)ServletActionContext.getRequest().getSession().getAttribute("info");//记录登录的信息这时候它在jsp和action之中所以并没有登录
            if(user==null){
                //没有登录以后记录数据库信息jsp的usercode值
                String userCode = ServletActionContext.getRequest().getParameter("usercode");
                String userPassWord= ServletActionContext.getRequest().getParameter("userpassWord");
                //获取当前登录用户的取值就可以在用户列表进行查询一道之后在给与赋值
                SimpleDateFormat sdf=new SimpleDateFormat("yyyy-MM-dd");
                Date date = sdf.parse(sdf.format(new Date()));
                logs.setOperateInfo(ol.content());
                logs.setOperatedatetime(date);
                logs.setUserCode(userCode);
                ((BaseService<PsLogs>) bean).save(logs);
            }else{
                //登录以后记录数据库信息
                SimpleDateFormat sdf=new SimpleDateFormat("yyyy-MM-dd HH:mm:ss");
                Date date = sdf.parse(sdf.format(new Date()));
                logs.setOperateInfo(ol.content());
                logs.setOperatedatetime(date);
                logs.setUserCode(user.getUsercode());
                logs.setUserName(user.getUsername());
                ((BaseService<PsLogs>) bean).save(logs);

            }

        }
        return invocation.invoke();
    }

    public static Log getLog() {
        return log;
    }
}
注意点:如果用的是第一种方法注入日志service对象的话必须自定义一个Spring容器
      //第一种方式 自定义Spring容器   tomcat容器启动就会启动在bean里面注入
        Object bean = SpringContextHelper.getBean("psLogsService");//注入日志的service对象
如果用第一种代码如下:
package cn.yxj.tool;

import org.springframework.beans.BeansException;
import org.springframework.context.ApplicationContext;
import org.springframework.context.ApplicationContextAware;

public class SpringContextHelper implements ApplicationContextAware{
    private static ApplicationContext context = null;
    public void setApplicationContext(ApplicationContext applicationContext)
            throws BeansException {
        context = applicationContext;

    }

    public static Object getBean(String name){
        return context.getBean(name);
    }
}
并且在application.xml里面注入spring容器
<bean id="springContextHelper" class="cn.yxj.tool.SpringContextHelper"></bean>
//第二种方式手动new的时候,调用的时候才会用到 无须代码加入因为直接new
  ApplicationContext con=new ClassPathXmlApplicationContext("applicationContext.xml");//注入日志的service对象 Object bean = con.getBean("psLogsService");

(三)配置自定义拦截器在struts.xml中
         <!--拦截器  -->
        <interceptors>
        <!--声明拦截器  -->
        <!--权限设置拦截器  -->
            <!-- <interceptor name="checkPrivilege" class="cn.yxj.intercepter.CheckPrivilegeIntercepter"></interceptor> -->
            <!--操作日志的拦截器  -->
            <interceptor name="operateLogIntercepter" class="cn.yxj.tool.OperateLogIntercepter"></interceptor>
        <!--配置一个拦截器栈  -->
            <interceptor-stack name="mystack">
                <!-- <interceptor-ref name="checkPrivilege"></interceptor-ref> -->
                <interceptor-ref name="operateLogIntercepter"></interceptor-ref>
                <interceptor-ref name="defaultStack"></interceptor-ref>
            </interceptor-stack>
        </interceptors>
        <!--默认使用这个拦截器栈  -->
        <default-interceptor-ref name="mystack"></default-interceptor-ref>
(四)在Action里面调用自定义注解
@OperateLog(moduleName="用户权限(功能表)",operateType="查询",content="浏览所有权限信息")
二、通过aop实现日志记录
(一)定义自定义的注解类
package cn.yxj.tool;

import java.lang.annotation.ElementType;
import java.lang.annotation.Retention;
import java.lang.annotation.RetentionPolicy;
import java.lang.annotation.Target;

/**
 * 自定义操作日志注解接口类
 * @author Dream
 *
 */
//表示在什么级别保存该注解信息
@Retention(RetentionPolicy.RUNTIME)
//表示该注解用于什么地方
@Target(ElementType.METHOD)
public @interface OperateLog {

    //操作日志的内容
    String content();
    //模块名
    String  moduleName();
    //操作类型
    String operateType() default "";
    //操作编号
    String code() default "";
}
(二)定义方法的前置增强
package cn.yxj.advicer;

import java.lang.reflect.Method;
import java.util.Date;

import org.apache.struts2.ServletActionContext;
import org.springframework.aop.MethodBeforeAdvice;
import org.springframework.context.ApplicationContext;
import org.springframework.context.support.ClassPathXmlApplicationContext;

import cn.yxj.Util.OperateLog;
import cn.yxj.beans.PsLogs;
import cn.yxj.beans.PsUser;
import cn.yxj.service.PsLogsService;

public class LogBeforeAdvice implements MethodBeforeAdvice{

    public void before(Method method, Object[] args, Object target)
            throws Throwable {
        System.out.println("日志记录开启");
        OperateLog annotation=method.getAnnotation(OperateLog.class);
        if(annotation!=null){
            ApplicationContext context=new ClassPathXmlApplicationContext("applicationContext.xml");
            PsLogsService service = (PsLogsService)context.getBean("psLogsService");
            //获取session中用户的信息
            PsUser user=(PsUser)ServletActionContext.getRequest().getSession().getAttribute("loginuser");
            PsLogs logs=new PsLogs();
            logs.setOperatedatetime(new Date());
            logs.setOperateInfo(annotation.content());
            if(user==null){
                String userCode = ServletActionContext.getRequest().getParameter("userCode");
                String userPassWord= ServletActionContext.getRequest().getParameter("userPassWord");
                logs.setUserCode(userCode);
            }else{
                logs.setUserCode(user.getUserCode());
                logs.setUserName(user.getUserName());
            }
            service.save(logs);
        }


    }

}
(三)在applicationContext.xml文件中配置
<!--aop log cfg 自动代理 -->
   <bean name="logBefore" class="cn.hmy.advicer.LogBeforeAdvice"></bean>
   <aop:config proxy-target-class="true">
     <aop:pointcut expression="execution(* *..action.*.*(..))" id="pointcut"/>
     <aop:advisor advice-ref="logBefore" pointcut-ref="pointcut"/>
   </aop:config>
三、使用过滤器实现日志记录
(一)配置自定义过滤器
package cn.bdqn.filter;

import java.io.IOException;
import java.util.Date;

import javax.servlet.Filter;
import javax.servlet.FilterChain;
import javax.servlet.FilterConfig;
import javax.servlet.ServletContext;
import javax.servlet.ServletException;
import javax.servlet.ServletRequest;
import javax.servlet.ServletResponse;
import javax.servlet.http.HttpServletRequest;
import javax.servlet.http.HttpServletResponse;

import org.springframework.context.ApplicationContext;
import org.springframework.context.support.ClassPathXmlApplicationContext;

import cn.bdqn.entity.PSUser;
import cn.bdqn.entity.Permission;
import cn.bdqn.entity.Role;
import cn.bdqn.entity.UserLog;
import cn.bdqn.service.IRoleService;
import cn.bdqn.service.IUserLogService;

public class PermissionFilter implements Filter {

    public void destroy() {

    }

    public void doFilter(ServletRequest request, ServletResponse response,
            FilterChain chain) throws IOException, ServletException {
        HttpServletRequest req=(HttpServletRequest)request;
        String url=req.getRequestURI();
        if (url.endsWith(".js")) {
            chain.doFilter(request, response);
        } else if (url.endsWith(".css")) {
            chain.doFilter(request, response);
        } else if (url.endsWith(".html")) {
            chain.doFilter(request, response);
        } else if (url.endsWith(".txt")) {
            chain.doFilter(request, response);
        } else if (url.endsWith(".gif")) {
            chain.doFilter(request, response);
        } else if (url.endsWith(".jpg") || url.endsWith(".jpeg")) {
            chain.doFilter(request, response);
        } else if (url.endsWith(".png")) {
            chain.doFilter(request, response);
        }
        int pos=url.indexOf("?");
        if (pos>-1) {
            url=url.substring(0,pos);
        }
        int actionindex=url.indexOf(".action");
        if(actionindex>-1){
            url=url.substring(0,actionindex);
        }
        int of = url.indexOf("/", 2);
        url=url.substring(of+1);
        System.out.println("url地址"+url);
        PSUser user=(PSUser)req.getSession().getAttribute("user");
        if(url.equals("login")){
                chain.doFilter(request, response);
        }else if(user!=null){
            for (Role role : user.getRole()) {
                for (Permission permission : role.getPermission()) {
                    if(permission.getUrl().equals(url)){
                        UserLog log=new UserLog();
                        log.setOptionDate(new Date());
                        log.setOptionInfo(permission.getName());
                        log.setUserCode(user.getUserCode());
                        log.setUserid(user.getId());
                        log.setUserName(user.getUserName());
                        //获取spring的上下文容器
                        ApplicationContext contex=new ClassPathXmlApplicationContext("applicationContext.xml");
                        //获取spring容器中定义的IRoleService对象实例用于查询角色信息
                        IUserLogService userLogService = contex.getBean(IUserLogService.class,"userLogService");
                        userLogService.save(log);
                        chain.doFilter(request, response);
                    }
                }
        }
        }else{
            HttpServletResponse resp=(HttpServletResponse) response;
            //resp.sendRedirect(req.getScheme()+"://"+req.getServerName()+":"+req.getServerPort()+req.getContextPath()+"/login");
                resp.setCharacterEncoding("utf-8");
            resp.getWriter().write("<script type='text/javascript'>alert('您没有该权限')</script>");
        }
    }


    public void init(FilterConfig arg0) throws ServletException {

    }

}
(二)在web.xml中配置过滤器
|
1
2
3
4
5
6
7
8
9
|
<!-- 过滤器 --> <filter> <filter-name>OpenSession</filter-name> <filter-class>filter.PermissionFilter</filter-class> </filter> <filter-mapping> <filter-name>OpenSession</filter-name> <url-pattern>/*</url-pattern> </filter-mapping> |
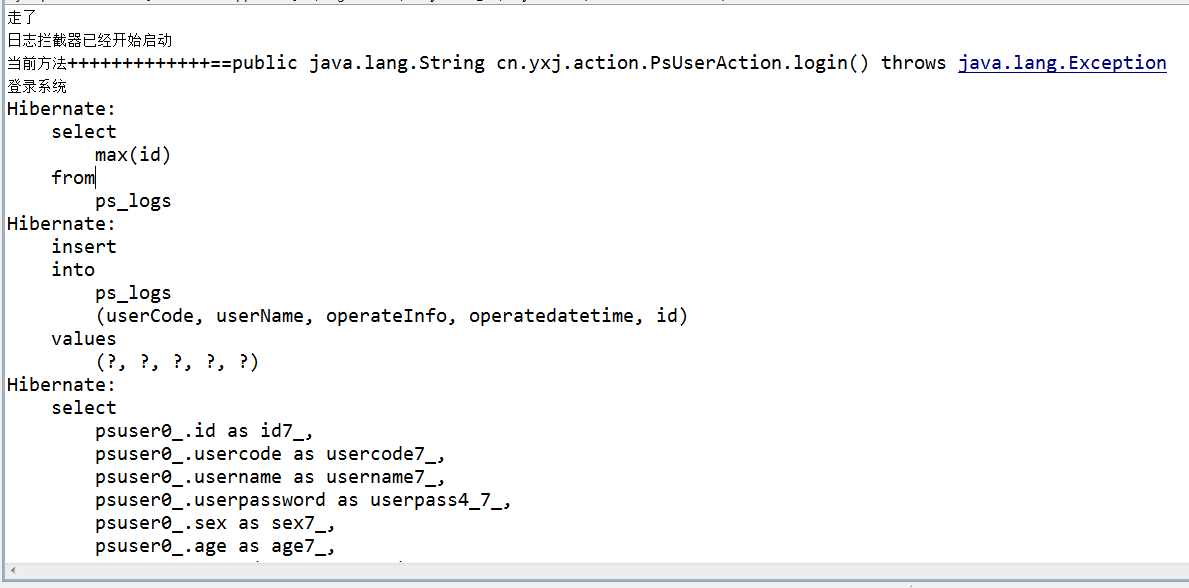
展示效果:

